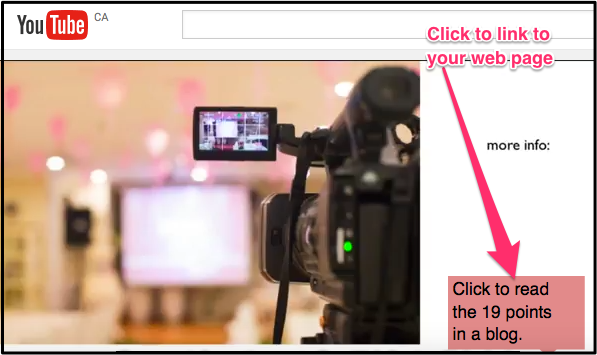
The way YouTube is set up, your competitor’s video could start playing as soon as your video is finished. So, well before the end of the video, you want a hyperlink to your website to show up.
There the viewer can get more information. They can click on the link before you competitor’s video starts playing.
14 steps to creating that YouTube hyperlink
1. Add the website to your Google Webmaster Tools account. This confirms ownership of the website.
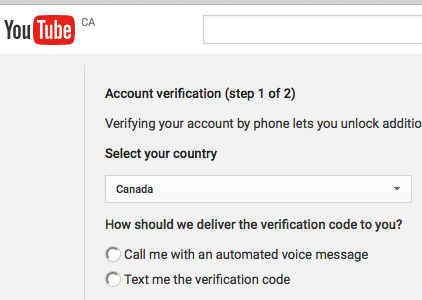
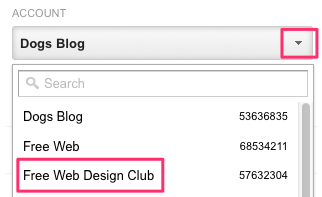
2. Open the YouTube channel that has the video to which you wish to add a link. If that channel has not already been verified, verify it.
3. Make sure your country is there, click the radio button beside the text option, enter your smartphone number, check off I’m not a robot and click submit button.
4. You’ll get a message saying your account is now verified.
5. Click on your YouTube channel’s icon and then click on the gear beside Creator Studio. 6. Click on View Additional Features > Video Manager
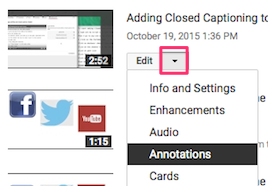
7. Click the drop down arrow beside the video that needs the link and select Annotations.
8. Click Add annotation
9. In the box type something such as “Click to read the 19 points in a blog”. 10. You will see your little blurb just above the timeline. Click on it and then drag and drop the red vertical lines to indicate where your text box should stop and start.
11. Check the Link box in the right column and add the URL of the website to which you wish the video to link.
12. After Start linked video at enter, add the start time given above.
13. Click the blue Apply changes button.
14. Watch you video to make sure it works Editor’s note: After going through all 14 points, my hyperlink would not work. So, I closed my browser, opened it up again and went through the whole process to get the annotations screen opened up again.
I clicked on Edit existing annotation and then on the text of the annotation. A great deal of information showed up. I clicked on the Preview link and the problem was fixed.
Earn a percentage of the selling price for every book sold.
How to add a website to your Google Webmaster Tools account
1. Go to your Google Analytics account
2. Click on the Admin tab
3. Click on the drop down arrow in the accounts column
4. Click on the name of the account you want
5. After the name of the account shows up in the property column, click .js Tracking Info > Tracking code.
6. Copy and paste that code into the head of the home page of the website in question.
7. Go to Webmaster Central
8. Click the red add a property button.
9. Enter the URL of your home page and click Continue
10. Your website is now in your Google Webmaster Tools account
This tutorial from Marion Ryan of OnlineBusinessGym.com shows you how to add a hyperlink to a YouTube video, which can link it to an affiliate product or another website of your choosing. Watch the video.
Peter Enns has been developing websites since 1996. He is a social media blogger and author of a free YouTube tutorial. It’s called 7 Day YouTube and will teach you how to make entertaining videos & animated GIFs.
On Dreamstime you can use search terms to find free images. For instance, I entered “tall buildings” in the search box and saw 31 free pictures of tall buildings. If you are not on this web page and wish to go to Dreamstime, bit.ly/nocostimages will get you there. Dreamstime has tens of millions of pictures & short videos from which to choose.
Go to the freeimages website (freeimages.com) and sign up for a free account and get free stock images.
Another excellent source of free stock images is Picjumbo. Every day more gorgeous free pictures show up. They are available for free, even for commercial use, with no restrictions. Important note: To get a free download into your Downloads folder, click on any image. Then click on the button to the left that says “FREE download”.
Gratisography is another site with royalty-free photos. It does not have the excellent search feature that Picjumbo has.
Unsplash has free stock images — mostly landscape photos. They can be used for free commercially if you wish. There is even a search bar so that you can search for things such as “offices”.
Little Visuals is another source of free landscape photos.
After writing this post, I found another source of free images: DeathtotheStock.
After you see a thumbnail of a Dalmatian picture you want, click on it
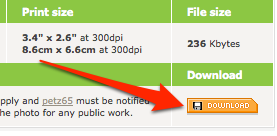
Gives you a page with a larger picture and a download button.
Clicking on the download button gives a large image
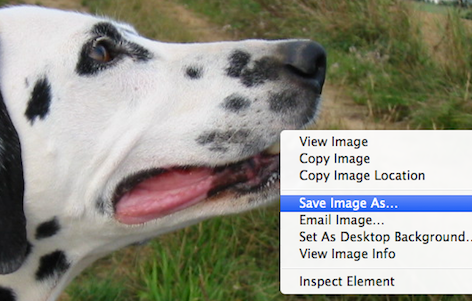
To save it in computer, right click and select Save image as.
This service dependent upon members sharing photos
So, if you become a member, upload some of your best photos
Let other members use them as royalty free images
Combine your free stock images
Pin it with Pinterest
After you download a number of images, the cheapest way to edit them is to use PhotoEditorX. It’s virtually the same as Photoshop which costs $120/year. PhotoEditorX costs $47 to download. The download comes with huge numbers of instructional videos. There are never any other costs.
To order it, simply scroll to the very bottom of that PhotoEditorX link and click on “click here to download now”.
High resolution and free stock images
One minor problem with high resolution images is the size
Just PART of it may occupy entire computer screen.
I solved that stock photography problem with Skitch
Look at the stock photo in Finder
Expand the finder as much as possible
Capture it with Skitch
Save with a descriptive name.
My photo is never too large now.
Peter Enns has been developing websites since 1996. He is a social media blogger and author of a free YouTube tutorial. It’s called 7 Day YouTube and will teach you how to make entertaining videos & animated GIFs.
At the bottom of this post is a video that shows a picture of a man who won a funny face contest. You can practice on that YouTube video to change it into a Wistia video.
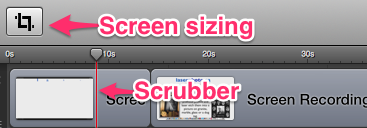
Press Esc to leave full-screen view and save your video with a descriptive name
Click your screen sizing icon and resize the canvas to 1920 x 1080 pixels.
Audio waves are too small. So, select the video clip.
Click the audio icon
Slide the volume button to its highest point and click Action > OK.
If the video has unwanted material on it, you will still likely keep ALL of the audio. So, right-click on the video clip and click Detach Audio.
Now you will isolate the individual shots that may have to be reproduced. Study the YouTube tutorial if you do not know how to recreate a shot. Move your scrubber to the very end of the shot, right-click and click on Split Clip.
If there are unwanted icons at the bottom of a segment, isolate that segment. Enlarge it. However, that could cut off some of the sides. If so, the entire shot may have to be made over again.
As soon as your video is ready to publish from ScreenFlow, click on File > Publish to Wistia
Earn a percentage of the selling price for every book sold.
The Wistia video below shows how I took one of the shots from a YouTube video and changed it into a shot for my Wistia video.
Editing questions?
Hopefully these 15 points with all of the hyperlinks will show you how to make a Wistia video from a YouTube video. If you have gone through the YouTube tutorial and still can’t quite get it, feel free to fill in the comments form below.
Peter Enns has been developing websites since 1996. He is a social media blogger and author of a free YouTube tutorial. It’s called 7 Day YouTube and will teach you how to make entertaining videos & animated GIFs.
Incorporating interactive features within videos encourages audiences to lean in and engage with content in ways they never could before. And that helps marketers and HR professionals learn more about audiences’ likes and dislikes, and how to target messages more effectively.
I’m going to show you a step-by-step system on how you can instantly gain credibility and become authority in any niche. This even works if you are a beginner or don’t have any success. Read more.
Amateur video
The short video below is an amateur video. Video marketing isn’t only for professionals. Watch the 30-second video now.
Attributes of the video that stand out
♦ It’s short, only 30 seconds long.
♦ It includes video from a smartphone to help viewers understand a point.
♦ There is text accompanying the voice to help people remember everything.
♦ Appropriate free background music was playing.
♦ There is a call to action at the end.
♦ A callout on the memorial is expanded to explain a point (how well the etching matches the original).
Peter Enns has been developing websites since 1996. He is a social media blogger and author of a free YouTube tutorial. It’s called 7 Day YouTube and will teach you how to make entertaining videos & animated GIFs.
I enjoy video editing to make some of the special effects like you see in the video below. On this page are some tips for making higher quality videos.
If you are skimming this page, the tips are highlighted in brown.
Short videos
People prefer short videos. You should aim to get your video as short as possible to get your point across. While video editing, you may have to ruthlessly delete footage. Once you’re at that place, do not remove so much that people miss the point. But, don’t add anything either.
Getting point across as quickly as possible
In the first segment of the video, I wanted people to know that
♦ The dog, Shavi, had been seriously injured.
♦ Shavi’s friend, Nina, had not entered the picture yet
♦ Later, Nina became her friend
I wanted to get those points across as quickly as possible. This is how I did it:
♦ Seriously injured — Picture of Shavi. Used Keynote to briefly explain the injuries with moving text. (Note that much of the video movement was created by using ScreenFlow to record a Keynote presentation on my computer screen.)
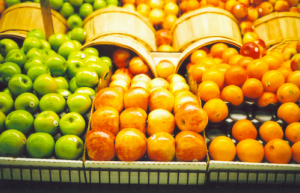
♦ Nina not entered picture yet — 2 identical pictures of Nina and Shavi. Used GIMP to create a translucent screen over Nina in one of the pictures
♦ Nina became friend — The identically-sized picture with Nina replaces the one with the translucent screen. Done in such a way that Shavi does not change position.
While video editing, always keep in mind that you must get a point across quickly at the beginning. Otherwise, people may not bother to watch the rest of the video. To see an example of getting a few points across quickly in the first 8 seconds, watch the 14 Tips video.
Earn a percentage of the selling price for every book sold.
To get this why and how information across as quickly as possible, I
♦ Explained that Shavi had been given to friends
♦ Showed a map to emphasize the 200 miles
♦ To show Shavi’s emotional state, reused the picture of Shavi without Nina
♦ Used the map again so that the viewer would quickly grasp the enormity of the distance
Transition from Shavi’s navigation to animal navigation in general
Special effects
You will not be able to make many of these special effects until you have had lots of practice. Things are just too complicated. However, while video editing, keep asking yourself how you might add some special effects.
The rest of the video is about amazing animal navigation. Here’s how I quickly got some of the points across.
♦ Used the map again with a question to emphasize the navigation concept
♦ Used the stories of the 29 cats and 60 dogs to show how Shavi has a homing ability in common with many animals
• YouTube video below shows how I created the segment with the dogs and cats
♦ In a nutshell, this is how I created the dog-cat statistic section:
• I used just the faces of dogs and cats to quickly get across the point of homing dogs and cats.
• Notice how after I select one cat picture, all I have to do is copy and paste it using Keynote.
• After I press Cmd V, the picture will be reproduced down and to the right.
• Look at the Inspector.
• Notice how the built-in effect changes to “appear” as soon as I either click on a picture or else press Cmd V.
• Even though I press Cmd V quickly, the images do not show up fast enough.
• So, after I use ScreenFlow to record the action, I use Clip Inspector to speed it up.
• Initially it took 2.2 seconds to make the 4 cat pictures appear.
• After using the ScreenFlow Clip Inspector, it took 1.1 seconds to make the 4 cat pictures appear.
Other creatures
The main video goes on to mention homing pigeons, the albatross and monarch butterflies.
Monarch butterflies
While video editing, I used video footage from other YouTube videos. I used the ScreenFlow text box feature to credit the owners of that footage. To see how I created this snippet of text, go to the Screenflow text creation page.
I wanted to emphasize the fact it takes the monarch butter flies 3 to 5 generations to migrate from Michoacan, Mexico to Canada and back. A female butterfly may leave Mexico. The great grandchild may be the one to return to the great grandmother’s former habitat.
I made a montage of the egg, caterpillar, pupa and butterfly leaving the chrysalis. I used the Clip Inspector to speed the montage up. While the montage was being shown, I was speaking about one generation laying eggs, dying and then being replaced by the next generation. My voice was close captioned at the bottom to help people follow the whole process.
Special effects to show life beyond the fourth dimension
At one point I said that I believed the homing ability had something to do with life beyond the fourth dimension. I used 2 special effects to get that point across. First of all, I used the Keynote spin action from the Inspector to make the picture of Albert Einstein spin.
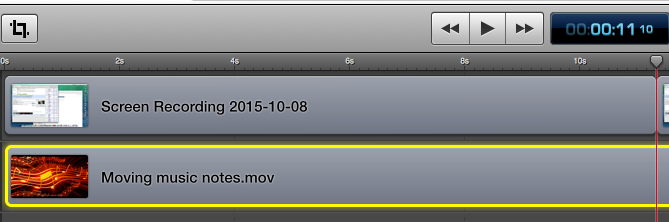
Then, after making a ScreenFlow video of it, I overlapped two video clips on the timeline. Double-clicking on the overlapping portion gave the transition inspector you see on the right. You can see that “Ripple” has been selected. That was the transition that appeared to suggest “beyond the fourth dimension” more than any other.
Next chance you get, you should investigate the various transitions.
Link at end of video
When people watch YouTube videos, the end often opens up in a related YouTube video. It could belong to your competition.
To avoid that problem, I often give the URL of a related web page on my website. To shorten the URL, I often use a Bitly address with a descriptive name.
While video editing, I may expand the clip to let it play for 20 seconds while the music finishes. I suspect people will usually close or pause the video before the competition’s video shows up.
I also often add a translucent button within the website that visitors can click on to link to a web page.
Add Free Music
YouTube has over 50,000 tracks of free music that you can use on your YouTube videos. You can select them by genre and mood. To learn more, go to the free background music blog post.
Making background softer during the speaking parts
ScreenFlow has a feature called “audio ducking”. With it you can control the volume of your background music. Then, when speaking parts begin, the background music will soften until the speaking is finished. Go to the audio ducking page.
Keyboard shortcuts
J, K, L
While editing,
J makes the scrubber go back.
K stops the scrubber
L makes the scrubber go forward
The more you tap J & L, the faster they go.
MP4
12,000 should be the minimum kps.
Tiny talking head in corner
Make a separate video of the talking head. Make it small.
Copy clip into clipboard & Cmd V to paste in the TOP layer in a timeline. Drag & drop to position.
Excellent intro
Watch the first 8 seconds of the video below. That’s the type of introduction you can make with ScreenFlow.
Note that you have to get people’s attention at the very beginning. Otherwise, they will not watch the rest of your video.
If you are really interested in knowing how to make the 8-second introduction, go to the 10 steps to make the intro.
We put a great deal of effort into each blog post. Please use the comments box to tell us how we are doing. How could we improve our blog posts? Do you find these blog posts useful?
Peter Enns has been developing websites since 1996. He is a social media blogger and author of a free YouTube tutorial. It’s called 7 Day YouTube and will teach you how to make entertaining videos & animated GIFs.
Make a video with the 14 Twitter tips. The only way to get good at it is practice, practice, practice. So, scroll down on the previous page and use Skitch to capture each of the 14 images from the SlideShare presentation. After you have captured each picture, go to File > Export to save each picture with a descriptive name.
(Note: You want to prevent your pictures from being too fuzzy. So, click the arrow with 2 points in order to make your SlideShare presentation full screen.)
Drag each picture from the Finder to a new Keynote slide. For each slide, write a short description in such a way that it helps viewers remember what you said.
Keynote vocabulary
You must study Keynote and learn the vocabulary below.
The order of each slide: 1st — Image with an iris effect and a duration of 0.75 seconds. 2nd — Text with a convergence effect. The duration will be approximately the amount of time it takes to read the text out loud.
Earn a percentage of the selling price for every book sold.
When you make a video for your business, you need a call to action. Here you are telling people to go to a website. They may even end up buying something there.
(Don’t make the buying part too blatantly obvious. To get blog followers, you have to give people an experience. Most of them do not want the buying part to interfere with the experience.)
You need the name of the website and the page. Above that, in much smaller text, you will have a very brief explanation of what the web page is all about. In order to tie that introduction and conclusion together, I used the same picture but without the numbers.
A convergence effect is used for the text. In my particular case, I used ScreenFlow to slow down the website domain name. I wanted it to match the voice clip that went along with it.
Adding voice clips
When you make a video, it is usually more effective to have both voice and music in each video.
Read the text of your video into an audio recorder and save it onto your hard drive as an MP3 file.
1. Drag the MP3 file onto the timeline 2. Select it 3. Click on the audio properties icon 4. Change the volume to 300% so that the audio clips easy to work with 5. Click Action > OK 6. Drag the red scrubber to the beginning and end of the flat lines, split the clip and delete the silent portions. 7. Starting at the first voice clip on the left, line it up with the the corresponding text. You will often have to split the clip and add a freeze frame so that the video portion of the words go beyond the audio portion for the same words.
There is more voice clip information in the voice clip blog post on this website.
Adding free music to a YouTube video
Open one of your YouTube accounts and find the list of all videos in that account.
Scroll down to the bottom, click on the “help” button and search for “free music”. You will end up with a link talking about their free music library. Simply follow the instructions.
There are dropdown arrows for genre & mood. I usually choose cinematic or classical for the the genre and happy for the mood.
YouTube has 50,000 music clips from which to choose. So, when you make a video, you have no excuse for not choosing the ideal music clip.
Listen to a number of tracks before choosing one that appears to be ideal. Download it.
Adding the music
Drag the music MP3 file from your download folder to the timeline.
You want the music to be quiet enough while someone is speaking. Then you want it to be louder when no one is speaking. The audio ducking page explains how to do that.
Note that after a YouTube video finishes, another related video will start playing. So, make sure that you add a freeze frame to the end of your video and have it continuing motionless for about 20 seconds. You want people to have ample time to jot down the website address. During this time you will have the music playing in such a way that the end of the music will be at the end of the freeze frame.
How to upload a video to YouTube
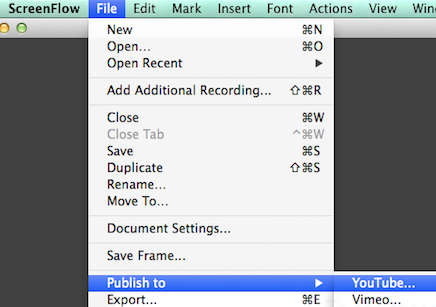
After your video is complete and saved, click on File > Publish to > YouTube. Select Next. If you have more than one YouTube channel, sign out and sign in again. You want to make sure that you are not on the wrong channel.
Select your category and then write a title, a description and the tags that will help people searching for your video. (If you are having trouble uploading, see the YouTube section of this website.)
ScreenFlow screen capture & video editing software
ScreenFlow is a professional-quality screen capture and video editing software. You can capture the motion in your Keynote presentation, shorten or lengthen the time, add free music and 101 amazing other things with ScreenFlow. Watch the video below to get an idea of how ScreenFlow works.
Search YouTube.com for lots more videos about ScreenFlow.
ScreenFlow does not work with a PC. If you do not have a Mac, it may be worthwhile buying one so that you could use ScreenFlow. Considering the quality, ScreenFlow has an incredibly low price tag of $129 USD. Go to the ScreenFlow website to order.
Peter Enns has been developing websites since 1996. He is a social media blogger and author of a free YouTube tutorial. It’s called 7 Day YouTube and will teach you how to make entertaining videos & animated GIFs.
This post tells how to make a video. Watch the YouTube video below. It’s based on the blog post about 14 tips on how to get more Twitter followers. It condenses that blog post into two and a half minutes.
Getting started with your first YouTube video
Start your first YouTube video by planning on scrap paper. Look at the blog post and jot down each of the 14 points. A picture helps people remember each point. So, decide what would be the appropriate image for each of the 14 points.
It is essential to grab a visitor’s attention in the first 2 seconds or so. Otherwise, they will skip your video and go watch someone else’s video. So, plan your opening very carefully. You will be having music. So, it is not necessary to have much speaking in the intro.
If you plan on uploading to YouTube after you make a video, you can get free music. You have your choice of 50,000 music clips and can filter them by genre and mood. Learn more.
In order to have lots of motion in the entire video, the video was used using Keynote (Apple’s answer to PowerPoint). The motion created was captured and edited with ScreenFlow.
Earn a percentage of the selling price for every book sold.
When you make a video, it helps to have presentation software such as Keynote.
In Keynote
1. You create a slide with a white theme, 2. Delete the two text boxes that come up and 3. Click on View > Show Rulers. 4. The bottom of your presentation will be at -22 on the vertical ruler. 5. The right-hand margin of your presentation will be at 44.
To get the viewer’s attention, the word “followers” came up on the screen first. At the end of the intro., you use the Keynote convergence effect to bring the title up: 14 Tips to Get More Twitter Followers.
You key in that title so that it looks like the title in the video. Then press Cmd C, Cmd V to make a second copy of the text. Delete all of the words from the one copy except for “Followers”. The full title is dark blue and “Followers” is a lighter blue. To choose the colors, use the color box above “40” on the ruler.
Note that the “Followers” all by itself is on the screen when the video starts. It’s build in effect is “none”.
The dark blue title is the 29th item to show up on the screen.
To give the idea of following, you want ducks to be in a row. In order to have variety in the picture of the 7 ducks, I purchased the photo of three ducks you see on the right. (I own the picture and am giving you permission to use it if you want to make this video.)
10 steps
Use Skitch screen capture software to copy the picture of the three ducks. Alternately, you can right click on the picture and select “Save image as”. You should now:
1. Use GIMP to isolate each of the ducks and 2. Click on Image > Scale Image to make each one exactly 131 pixels wide. 3. Use GIMP to create each of the 14 numbers as a PNG image. 4. Make each number on a transparent layer so that only the number covers the duck. 5.Use the build inspector (yellow diamond at the top of the inspector) to manipulate the text and images. 6. The word “follow” is on the screen when the video starts. So, the build in effect will be none. 7. Make the ducks appear like they are in the video. Use the appear effect for both the ducks and the numbers. 8. After you have lain out each of the 14 ducks and numbers, select them one at a time starting with duck #1. 9. The order number for that duck will be 1. The number 1 will be order #2. The final duck will be order #27 and the number 14 will be order #28. 10. The title of the video will be order #29 with a convergence effect.
ScreenFlow does not work with a PC. If you do not have a Mac, it may be worthwhile buying one so that you could use ScreenFlow. Considering the quality, ScreenFlow has an incredibly low price tag of $129 USD. Go to the ScreenFlow website to order. Alternately, you could go to the same website & get a free trial copy of ScreenFlow.
SlideShare presentation
Peter Enns has been developing websites since 1996. He is a social media blogger and author of a free YouTube tutorial. It’s called 7 Day YouTube and will teach you how to make entertaining videos & animated GIFs.
Study the statistics below. You will understand why it is important for you or someone on your team to improve their video creation skills.
According to Marketing Profs, people remember only 20% of what they read if not accompanied by graphics.
The same website said that posts with a graphic have a 650% larger engagement rate.
WebDAM says that by 2018 79% of Internet traffic will be video content.
The same website says that viewers are 86% more likely to buy a product after watching a product video.
10 points to think about
Now consider these 10 points carefully. At the bottom of this page there is a video to help you remember them.
1.Goals and Outline. Before starting to create your video, write down the precise goals of your video. Jot down an outline of what your video should look like. Ask how you could improve it and rewrite it.
4.Presentation Software. Improve your video by having more movement on the screen. Use presentation software such as Keynote or Powerpoint to animate your images and text.
5. MP4. Add MP4 files to make a smaller animation within a video. Here is a YouTube video giving an example of an MP4 file that can be shown within a Keynote presentation. Notice that an image of a computer monitor is on top of the MP4 file. Other things, such as text, can be happening on the screen at the same time.
6.Screen Capture. Use screen capture software such as ScreenFlow to capture all of the movement in your presentation software. Then use it to edit your video. (Note: You must have a Mac in order to use ScreenFlow.)
Earn a percentage of the selling price for every book sold.
Click here to learn more. 7.Print and Voice. Rather than just using your voice, have print moving across the screen as you are speaking it.
8. Music. Present pleasant background music using audio ducking. Then isolate each voice clip so that your music background will be loud enough between voice clips and soft during the voice clip.
9. Image Beyond Voice Clip. Freeze video frames so that each image clip goes beyond the voice clip.
10.Genre & Mood of Mucic. Go into your YouTube channel and then Creator studio > Gear icon > Additional features. Click on the “Help” menu and search for “music library”. You will be told how to have access to tens of thousands of music clips for your YouTube videos.
Filter the music by genre and mood. Listen to many samples of music and choose an excellent music clip for each video.
This page condensed into 14 SlideShare slides
This page content in a YouTube video
Inevitable Social Media
is a free 25 page ebook giving an excellent overview of social media
marketing. To get your free copy, click on the picture of the ebook.
Using a green screen and Chroma Key, you can change your cluttered office to look like a professional TV studio.
When starting out, practice using inexpensive materials. You can go to a dollar store and buy a dozen or so sheets of green bristol board. Tape it so that everything behind you appears green.
Using Chroma Key
Make a video of yourself talking in front of a green screen. Use the ScreenFlowsubroutine (Chroma Key) to remove all of the green from the background.
Go to a website such as Free Video Footage to download some free video material to use behind your head. (I had trouble signing up at first. I finally figured out that my username had to be a unique word with no spaces.)
Paste a video behind your head and you can make a mock news story teaser like the one you see below.
Materials required
1. Mac desktop computer 2. Copy of ScreenFlow video editing software 3. Enough green bristol board to make your entire background green
That’s all you need.
Producing a video like the one above
Let us assume that you have gone to the Free Video Footage website and downloaded a video to use for the background.
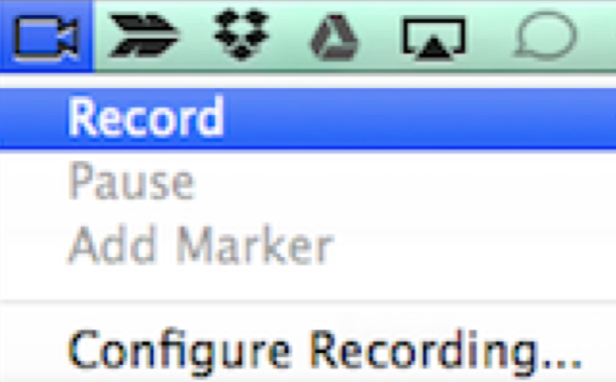
1. Write a script for your mock newscast 2. Open ScreenFlow 3. Configure your ScreenFlow program to record video from the built-in camera and record audio from the built-in microphone 4. Build the bristol board green screen behind you 5. Have your script on the computer screen so that you can look into the camera while doing the news cast 6. Click the ScreenFlow camera icon > Record 7. Read the script. While you are doing that, the camera will record you 8. When finished, click camera icon > Stop Record 9. Go to the YouTube tutorial to get an idea how to begin editing your video 10. Click Video Filters > Chroma Key > Add 11. Drag the .MOV file BENEATH the green screen file
This is an explanation of how to make a YouTube video that explains a concept. It is best if the viewer sees the printed words and hears the sound bites at the same time. That way he is using two senses to perceive the message and is more likely to remember it.
After watching the YouTube video, read the 17 points below. Then watch the video again. If you have a copy of ScreenFlow, practice. Keep watching the video, studying the 17 points and practicing until you have a thorough understanding of how to add to and edit sound bites in YouTube videos.
1. Record the video part of your YouTube video with ScreenFlow
2. Write out your script
3. Record it with an audio recorder
4. Save it as an MP3 file
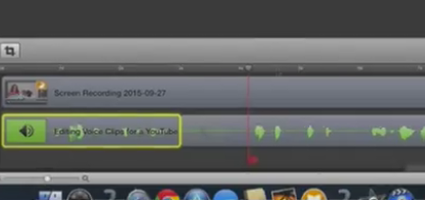
5. Drag your MP3 file onto the ScreenFlow timeline
6. Select the MP3 file and click on the audio icon near the upper right-hand corner.
7. Change the volume to 300% and press the tab button. This will make the audio waves larger and easier to work with.
8. You can also drag the slider to make the timeline segments longer & easier to work with.
9. Right-Click > Split Clip to remove the silent part between the sound bites.
10. Each voice clip will correspond to a portion of the video. Move the red scrubber line to the end of a video portion and split the clip.
11. Move the right-hand part of the video clip out of the way.
12. Right-click > Add Freeze Frame.
13.Read point #8 in this freeze frame explanation. Add a freeze frame and extend it beyond the voice clip.
14. Rather than use freeze frame, you can shorten or lengthen the video clip using the clip inspector.
15. Drag the rest of the video clip back to the left so that there is no space between clips.
16. Repeat this procedure for every voice clip.
17. Now you are likely ready to add the music to your video.
Earn a percentage of the selling price for every book sold.
In order to start adding voice clips to YouTube videos, you should understand each point thoroughly. Here is a suggestion on how to make that happen:
1. Watch the YouTube video above. 2. Read over each of the 17 points. 3. Practice using ScreenFlow. 4. Keep repeating this process until you thoroughly understand how to add voice clips to a YouTube video.
ScreenFlow video editing software
ScreenFlow is a professional-quality screen capture and video editing
software. You can capture the motion in your Keynote presentation,
shorten or lengthen the time, add free music and 101 amazing other
things with ScreenFlow.
Search YouTube.com for lots more videos about ScreenFlow.
ScreenFlow does not work with a PC. If you do not have a Mac, it may be worthwhile buying one so that you could use ScreenFlow. Considering the quality, ScreenFlow has an incredibly low price tag of $129 USD. Go to the ScreenFlow website to order or to get a free trial copy.
SlideShare presentation corresponding to this blog post
Peter Enns has been developing websites since 1996. He is a social media blogger and author of a free YouTube tutorial. It’s called 7 Day YouTube and will teach you how to make entertaining videos & animated GIFs.

 6. Click on View Additional Features > Video Manager
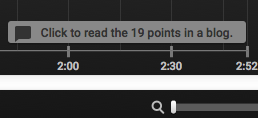 10. You will see your little blurb just above the timeline. Click on it and then drag and drop the red vertical lines to indicate where your text box should stop and start.
 Editor’s note: After going through all 14 points, my hyperlink would not work. So, I closed my browser, opened it up again and went through the whole process to get the annotations screen opened up again.

 How to add a website to your Google Webmaster Tools account
 Peter Enns has been developing websites since 1996. He is a social media blogger and author of a free YouTube tutorial. It’s called 7 Day YouTube and will teach you how to make entertaining videos & animated GIFs.
 B
B Another excellent source of free stock images is

 Play the entire video
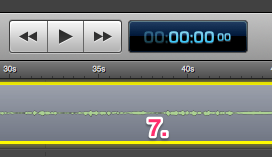 Audio waves are too small. So, select the video clip.
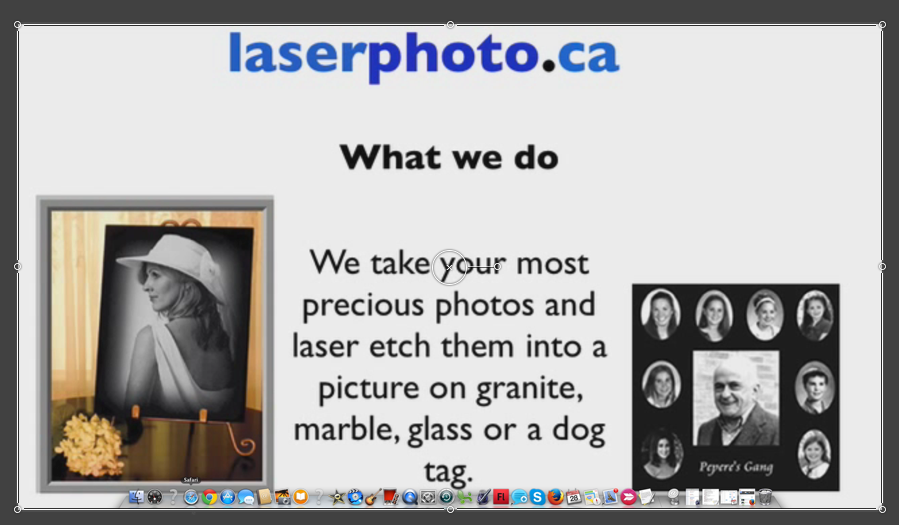 Now you will isolate the individual shots that may have to be reproduced. Study the
  The bullet points below are from the
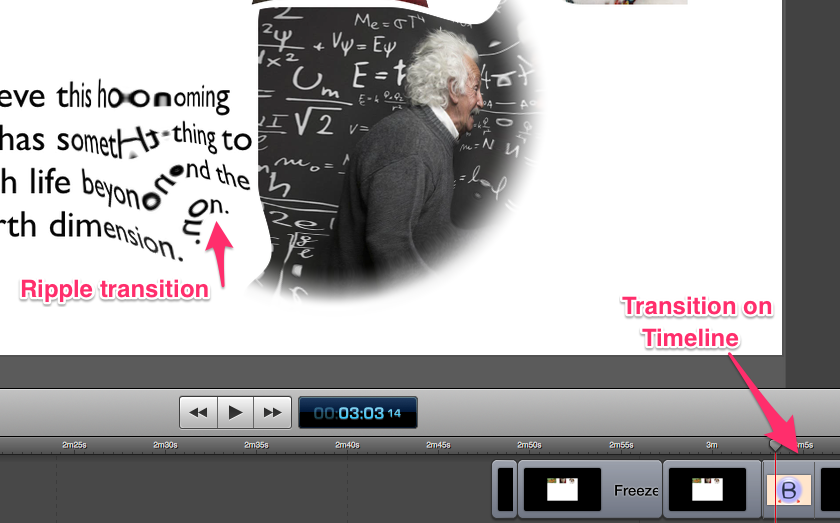
 Then, after making a
  When people watch YouTube videos, the end often opens up in a related YouTube video. It could belong to your competition.
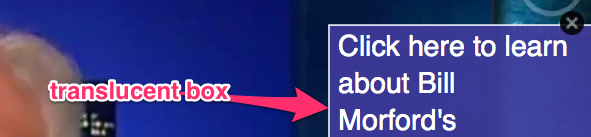 I also often add a translucent
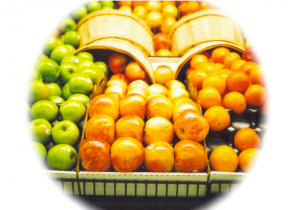
 The order of each slide: 1st — Image with an
 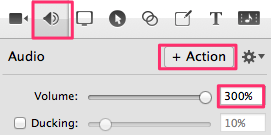 Read the text of your video into an audio recorder and save it onto your hard drive as an MP3 file.
 How to upload a video to YouTube
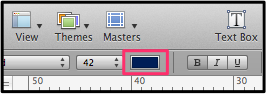 You key in that title so that it looks like the title in the video. Then press Cmd C, Cmd V to make a second copy of the text. Delete all of the words from the one copy except for “Followers”. The full title is dark blue and “Followers” is a lighter blue. To choose the colors, use the color box above “40” on the ruler.
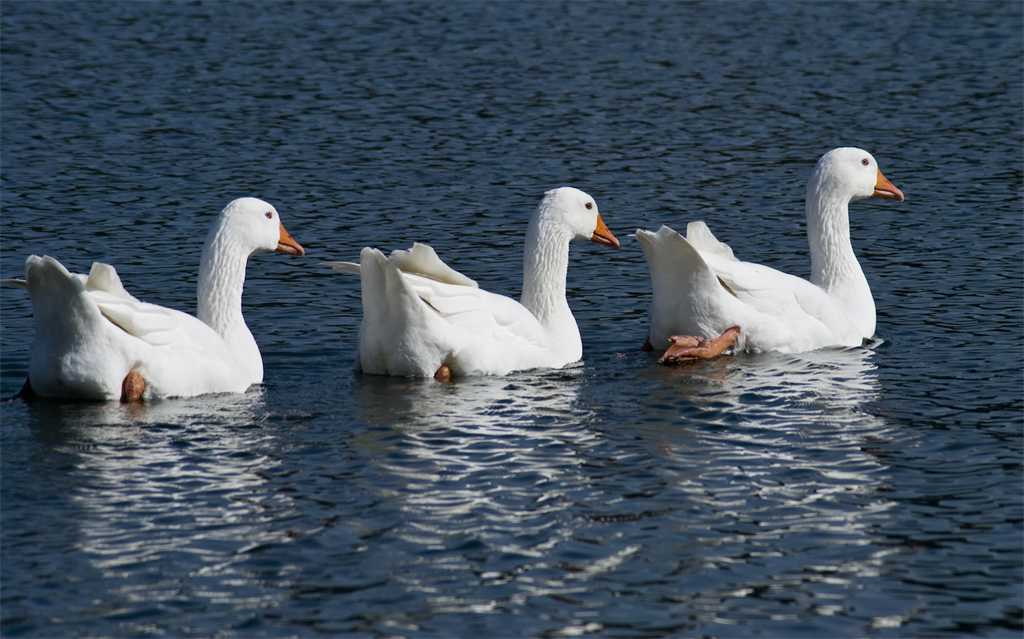 To give the idea of following, you want ducks to be in a row. In order to have variety in the picture of the 7 ducks, I purchased the photo of three ducks you see on the right. (I own the picture and am giving you permission to use it if you want to make this video.)
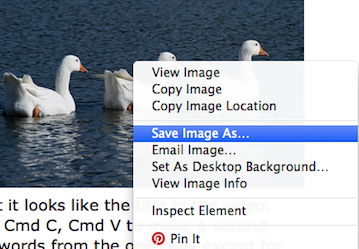 Use
Use 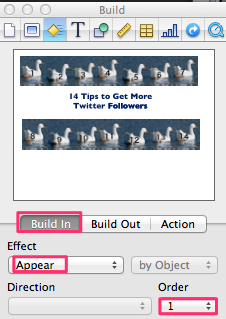 Use the build inspector (yellow diamond at the top of the inspector) to manipulate the text and images.
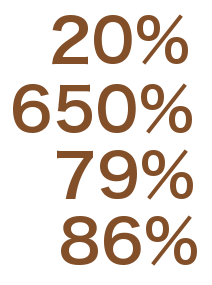 According to
  MP4.
MP4.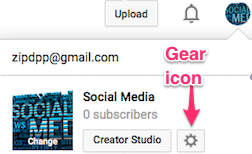 Additional features. Click on the “Help” menu and search for “music library”. You will be told how to have access to tens of thousands of music clips for your YouTube videos.
 Using a green screen and Chroma Key, you can change your cluttered office to look like a professional TV studio.
 Have your script on the computer screen so that you can look into the camera while doing the news cast
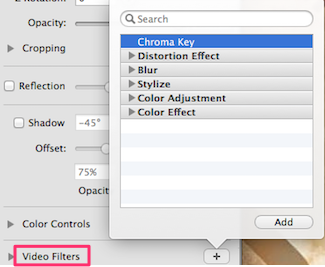
 13. Edit the rest of your movie and
 9. Right-Click > Split Clip to remove the silent part between the sound bites.