How to Create a Short Video with a Powerful Message

Your problem

short videoHere’s your problem: The shorter the YouTube video, the more people will watch it. So, how do you make a short video that includes all of your very important message?

The solution

Start by having a web page that presents your message quite succinctly. Then, using different words, write the succinct message in a way that can be presented in your short video.

Wherever possible, express your idea with an image instead of a words. Integrate your succinct message into your video.

At the end of the video, write out the URL of the web page. Show it statically for about 20 seconds so that your video doesn’t quickly change to your competition’s video.

Click here to learn more.

An Example

short videoI was promoting an ebook called How to Serve Customers with Disabilities. It is an ebook that is available on Amazon.

I had previously written the succinct description of the ebook below.

You may be trying to serve customers with

  • Down syndrome,
  • A wheelchair,
  • Vision problems,
  • Hearing problems,
  • Dexterity issues,
  • Memory problems
  • Or any of a wide variety of disability issues.

How to Serve Customers with Disabilities will help you make these customers feel more included. Often people with disabilities can feel marginalized. What you will learn in this training manual can help you make these people feel like returning to your business.

As you can see in the video at the bottom of this page, the description above is included in the short video along some appropriate images. Note that the URL of the web page remains for around 20 seconds.

After I was finished the video, I posted it on this Facebook page along with a few words of explanation.

Free online course for making a short video

short videoGo to 7 Day YouTube for guidance on how to make your short video.

(The repeating video here is called an animated GIF. Learn how to make them.)


Watch my short video

Youtube Video, How to Make Your First One

Materials required

youtube videoIn order to make this simple YouTube video, this is what you will need.

Creating the above YouTube video in 9 steps

1. Open Keynote

youtube videoIf you do not have Keynote yet, go to Mac App Store Preview and click on View in Mac App Store. Then click on Get.

2. Assemble your images

In our case we will go to bit.ly/nocostimages and get some images at no cost. Type “tree” and click search icon. Follow instructions. The tree pictures you download will be in your Downloads folder.

3. Drag pictures into Keynote slide

In Keynote click View > Show Rulers. Drag the right-hand edge to 44 and the bottom edge up to -22.

Drag & drop your two tree pictures onto a Keynote slide. Size them so that they are the same height.

Click here to learn more.

4. Add text

Click the text box icon twice to get two text boxes above the pictures. Drag them so that they are the same height and in the right position.

youtube videoChange top text two “My First”. Change the other text to “YouTube Video”. Select top text and change the text to

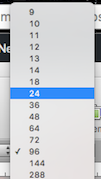
  • 96 point font
  • Light green
  • Bold

Do the same with the bottom text but make it a darker green.

5. Add Keynote effects

youtube video

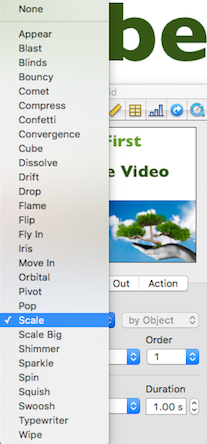
If you click the Inspector icon, you can find the 29 Keynote effects listed here. These are the effects you should add:

  • Top text — Scale
  • Bottom text — Shimmer
  • Left picture — Sparkle left to right
  • Right picture –Swoosh left

Each one has a duration of one second. The order will be in the order given in the above bullet points.


6. Test

Click the Play button in the upper right-hand corner a couple of times  to test it out.

7. Record with ScreenFlow

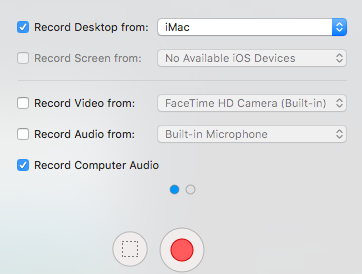
youtube videoMake sure ScreenFlow is configured  to Record Desktop from iMac. Start recording by clicking the red button or else clicking ScreenFlow icon > Record at top of screen.


8. Edit & size video

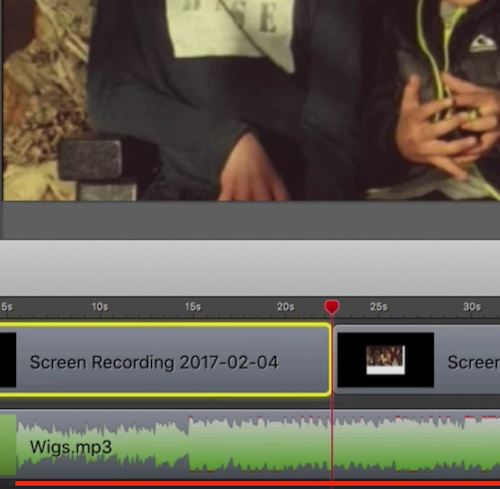
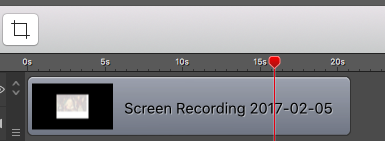
youtube videoStop record. File > Rename with a descriptive name. Move the red vertical scrubber line to the beginning & then the end of the useful part of the video. Right-click and delete those parts of the video that are no longer useful.

youtube videoUsing the slider in the lower left, set the video size at 1920 x 1080. Then click the green check mark. If the slide in the timeline has been selected, use the Scale slide near the upper right to make sure the video fills the canvas.

Save again.

9. Upload to YouTube

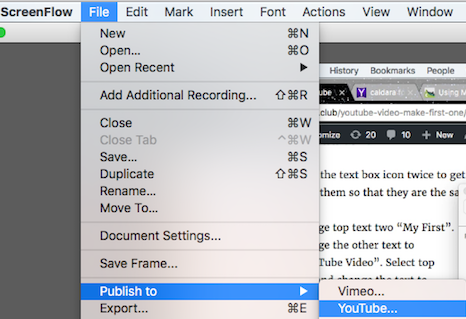
Assuming you have set up your account and channel with YouTube, upload to YouTube using File > Publish to > YouTube.


Related pages

Video-creation course — seven days, no charge


WordPress authorPeter Enns has been developing websites since 1996. As a VA (virtual assistant), he specializes in new website development, researching and writing blog posts and creating videos for YouTube and as animated GIFs. He is a social media blogger and author of the free YouTube video-creation tutorial called 7 Day YouTube.

tweets


Adobe Stock Images Review

Introducing Adobe Stock images

Adobe StockI have been using Adobe Stock images for several years. I highly recommend them IF you can reasonably use 10 images per month.

They have tens of millions of images from which to choose. All you have to do is type in the correct keywords and you will find an image you like.

Caveat before you sign up

I found that I was not using enough images. So, I started the process of cancelling my subscription. I got the above cancellation fee message.

They gave me to take the next 60 days at no charge if I would not cancel. So, that’s the option I took.

Why use Adobe Stock images?

Adobe Stock

There are several reasons why you might want to use Adobe Stock images:

  • When visitors find your page, you must grab their attention within seconds. Otherwise they may go to another page and never go to your website again.
  • People are more likely to start reading short lines. If your amazing image covers half of your first paragraph, visitors will read your short lines. Now thatAdobe Stock you have their attention, they are more likely to read the rest of the article.
  • People usually do not read a web page; they will skim it. When you have attractive, pertinent images, it is easier to grasp the concepts while skimming.
  • Video marketing is becoming more popular and more important with every passing month. Having attractive,Adobe Stock pertinent images in your videos & animated GIFs makes people more likely to pay attention to them.
  • They are only $3 (USD) each. You pay $30/month for 10 photos. What you do not use will be accumulated into the next month.


How to find an image

Adobe StockLet’s say you are writing an article about a sales funnel. You want to grab the visitors’ attention from the very beginning. You also want the first lines to be short so that people would read them. Then you would draw them in so that they would read the rest of the article.

You remember seeing a picture like the one to the left. So, you would log into Adobe Stock and search for “sales funnel people”.

You would end up with over a hundred pictures from which to choose. You begin the process of Adobe Stockcollecting around 10 or 20 possible pictures you might use.
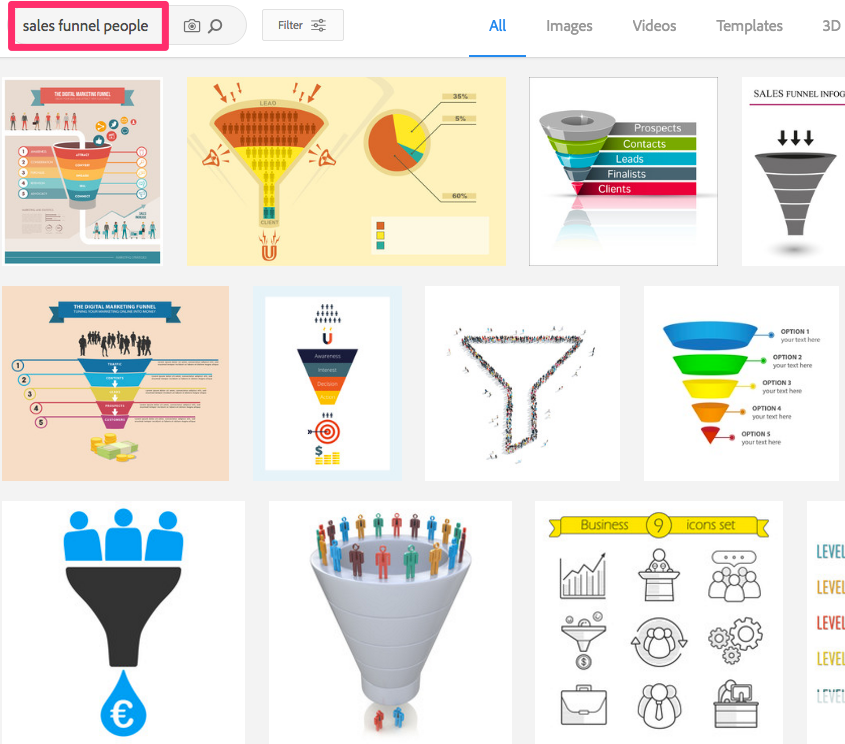
So, you hover over the bottom of each picture that is a candidate. Click on the Save Preview to Computer icon. All of these watermarked images will be saved in your Downloads folder.

After you have sufficient watermarked sales funnels, you go into your Downloads folder and choose the best image. You write down its unique number. Then enter it into the Adobe Stock search engine.

Your favourite image will show up. You hover over the bottom and select the License & Save to Computer image. You go back into your Downloads folder. Give your new image without the watermark a descriptive name.

Thus Adobe Stock has helped you make a more attractive blog post.

Adobe Stock is not for everyone

Adobe StockFor people who use significantly fewer than 10 images a month, there are better alternatives such as Dreamstime. Instead of paying for 10 images up front, you buy points. Each image costs so many points. Left-over points can be used to pay for part of another image.

Dreamstime also has a number of free images. (They have over 58 million images altogether.) The free ones are often lower quality. However, I have used them in attractive animated GIFs more than once. To access their website, go to bit.ly/nocostimages.

If you go there now, you will see a Free Images tab at the top. Click on it and then enter keywords into the search box. Your free images will show up first. The higher quality images will show up next. You have to pay for images from that group.

Adobe StockI’d like to point out the Stock Footage tab. That’s where you can get super high quality video clips to use as introductions to your YouTube videos. The animated GIF you see here represents how I introduce most videos on my Web Design YouTube channel.


video marketingPeter Enns has been developing websites since 1996. As a VA (virtual assistant), he specializes in new website development, researching and writing blog posts and creating videos for YouTube and as animated GIFs. He is a social media blogger and author of a free YouTube tutorial. It’s called 7 Day YouTube and will teach you how to make entertaining videos & animated GIFs.

video marketing tweets

Scrolling Text for Bottom of YouTube Videos

Creating scrolling text in 16 steps

scrolling textMany people will leave a YouTube video before they get to the end of it. To get your main message across to those people, you can add scrolling text to the bottom of your video near the beginning. This post tells you how to create that scrolling text in 16 steps.

1. Select video clip that will have scrolling text

scrolling textLook at the ScreenFlow timeline used to create your YouTube video.  Select that portion of video clip that will have the scrolling text. Copy it into your clipboard (Cmd C). (If you cannot follow the above 3 sentences, you might go to bit.ly/7dayyoutube. You can take a free 7-lesson course on how to make entertaining YouTube videos. )


Earn a percentage of the selling price for every book sold.

Click here to learn more.

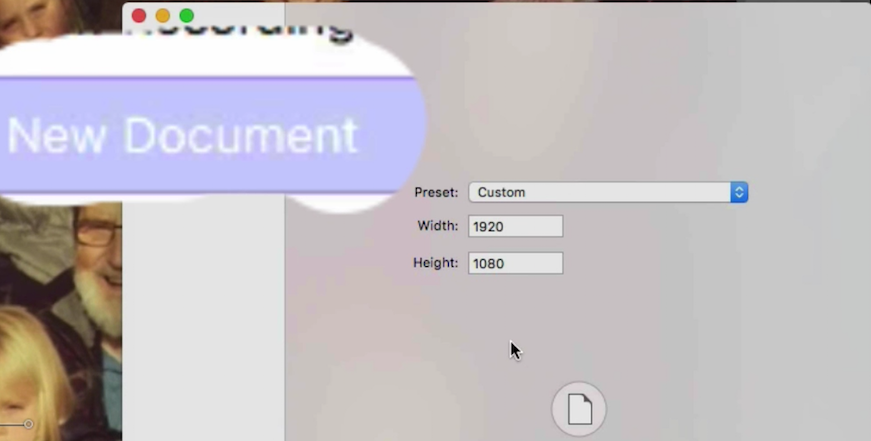
2. Click File > New > New document

scrolling text

While on ScreenFlow from the above step, click on File > New.  That will open up a panel that gives you 3 choices including New Document.  Click on New Document.

3. Paste clip into new document

scrolling textCmd V to paste clip from point #1 into your new document.

4. Name new document

File > Rename to name new document.

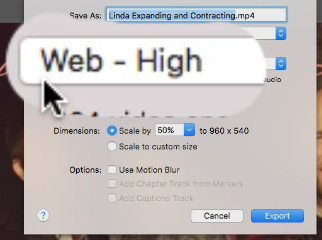
5. File > Export > Web High > Export

File > Export to create a new MP4 file. Make sure Web-High is selected. Click the Export button.

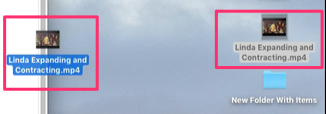
6. Drag MP4 from desktop to Keynote

scrolling text

Your new MP4 file will be created on your desktop. Drag it from the desktop to a new Keynote slide.


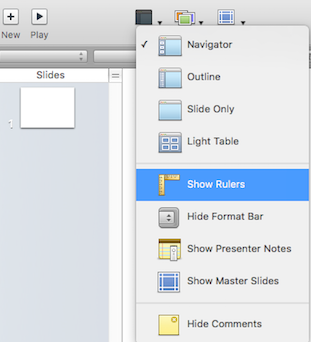
7. Add rulers to Keynote 

scrolling text

Click View > Show Rulers to add rulers to the top and left of your Keynote slides.


8. Size pages to 44 x -22 pixels

scrolling text


Drag right-hand edge of screen to 44 pixel point. Drag bottom to -22.


9. Write text into text box

scrolling textClick text box icon. Expand width of text box and type in text you want to scroll along bottom.


10. Reduce text size 

scrolling text


Reduce text size so that it will not be a big distraction to the viewer.


11. Change text to contrasting colour

scrolling textChange text to a colour that contrasts with the background. Even though the scrolling text is subtle, people still must be able to quickly read it.

12. Moving text with no acceleration

scrolling text


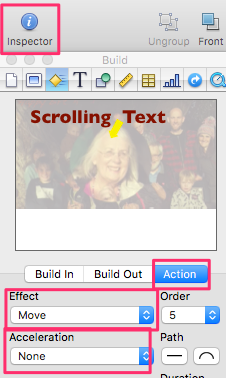
Click Inspector icon. Change action to move.  Change acceleration to None.


13. Reverse direction of moving text

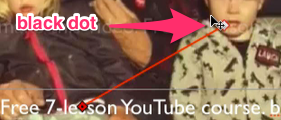
scrolling textAfter applying Move action, a red line with a red diamond and a black dot inside will show up at either end on the text to be moved. Click and hold the right-hand red diamond. Move your cursor in a 180 degree arc so that that diamond is on the left-hand side.

14. Position text so that it starts and stops at ideal points

scrolling textDrag the text to the right-hand edge to your ideal starting position.  Drag the diamond on the left to the ending position.

15. Change timing 

With scrolling text selected, click the Inspector icon and then change the duration to around 7 or 10 seconds.  Keep clicking the play button to find the ideal time.

16. Record, edit & upload to YouTube

Start recording with ScreenFlow and then click the Play button. Edit your work as a 1920 x 1080 pixel video.


MP4 file

An MP4 file is a file that can contain both video and audio. Videos shared on the Internet usually have an MP4 extension.


Peter Enns has been developing websites since 1996. He is a social media blogger and author of the free YouTube video-creation tutorial called 7 Day YouTube.

tweets

Animated GIFs in 6 Steps

What are animated GIFs?

animated GIFs

Animated GIFs are small, simple, short animations that keep repeating like the example on the left. A YouTube video can show over 16 million different colours. An animated GIF can have a maximum of 256 different colours.

Videos including animated GIFs are becoming so popular that they are a marketing necessity.

The Brain Rules website says, “We are incredible at remembering pictures. Hear a piece of information, and three days later you’ll remember 10% of it. Add a picture and you’ll remember 65%.Read more.

The Animoto website says, “76.5% of professional marketers and SMB owners that have used video marketing say it has had a direct impact on their business.

Materials required

In order to make animated GIFs, this is what you will need.

  • Mac computer
  • Keynote presentation software
  • ScreenFlow video-creation software

6 steps to creating animated GIFs

1. Drag & drop images onto Keynote slide(s)

(You can find free images at bit.ly/nocostimages. After you get there, click on the “Free Photos” tab in the horizontal menu.) If you have not used Keynote much, go to the Presentation Software blog post.

2. Add a MINIMUM amount of text

The animated GIF will be quite small.  So, the text should be as large as is reasonable so that people will indeed read it. People remember pictures much better than they remember text.  So, get most of your message across with the images.

3. Use Keynote to animate your text and imagesanimated GIFs

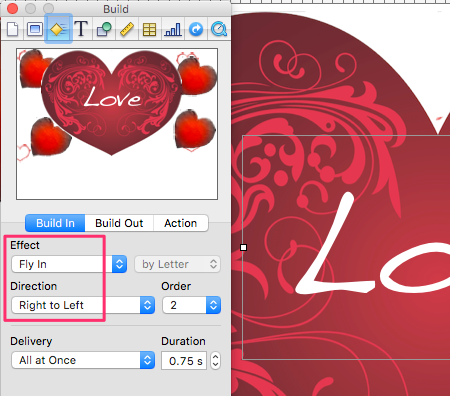
Experiment with the various Build In and Action effects. Go to the bit.ly/nocostimages website, get some free images and practice making a presentation as complex as the one you see below.

animated GIFs


4. Record your presentation with ScreenFlow

You will be using ScreenFlow to record, edit & upload your presentation as an animated GIF. Remember to save your ScreenFlow video with a descriptive name as soon as you see it on the screen. Then you can start editing it.

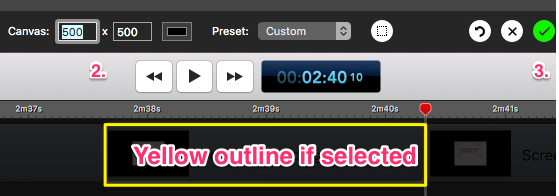
5. Edit video with a maximum size of 500 x 500 pixels

  1. animated GIFsClick you sizing icon
  2. Change each of the Canvas dimensions to 500 pixels
  3. Making sure your video snippet has been selected, click
    animated GIFsthe green check mark icon.
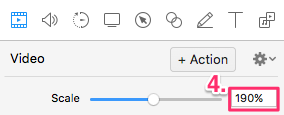
  4. Move the slider to size the animated GIFsvideo to fit in the canvas. Experiment lots until it becomes second nature.
  5. Make sure one of dimensions remains at 500 px.
  6. 6. Click File > Export > Animated GIF > Export

animated GIFsAfter clicking File > Export, look at the new panel that shows up. Using the dropdown arrow, select Animated GIF.  Click the Export button.

Now you will be able to drag your animated GIF from your Desktop folder into an email. Alternately, you can use the Add Media button to add the animated GIF to a web page.

YouTube video

To get a better understanding of the points above, watch this video.

Troubleshooting

If you are having trouble making animated GIFs with ScreenFlow 6.0+, it may have nothing to do with your ScreenFlow program. Four other alternatives:

    1. Too many colours.  Animated GIFs are designed to have a maximum of 256 colours.
    2. Corruption in your Mac computer.
    3. File too large.  The animated GIFs should be a maximum of 500 x 500 pixels and a maximum of 2 Mb.
    4. After you have finished the above steps, close your computer down and start up again. Then you should be able to make animated GIFs to your heart’s content.

Solving my animated GIF problem

I suddenly was unable to successfully make even simple animated GIFs. So, I

    • Deleted lots of pictures
    • Emptied my trash
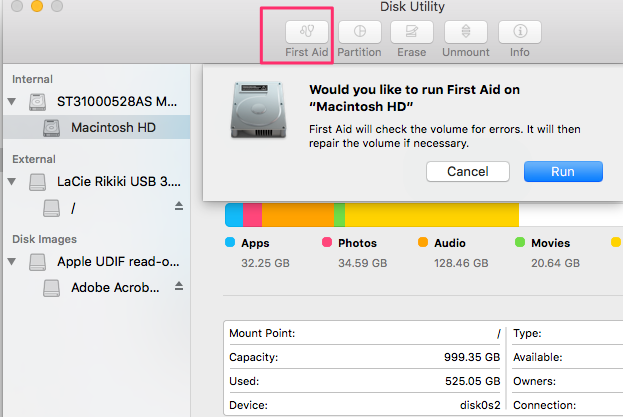
    • animated GIFs“Disk”, Enter into spotlight (magnifying glass in upper right-hand corner of screen)
    • Waited several seconds and then click the First Aid icon
    • Closed all programs and click Apple icon > Restart

7 Day YouTube as a SlideShare


Monetize Your YouTube Videos

What is YouTube advertising?

Before you monetize your YouTube videos, you will want to know about the types of ads you can get paid for displaying. Below these images there are 5 different types of YouTube advertising.

Note that for YouTube advertising to be worth your while, your video really should be getting 1000 views per day.

To find six methods of monetizing your YouTube videos without YouTube advertising, see lesson 6 of the free YouTube tutorial.
monetize

1. Embedded ad

This is the type of ad that will be shown to the right of a YouTube video.

2. Overlay ads

These pop up on top of a YouTube video near the bottom.  If you don’t want to watch it, simply click the tiny “x”.

3. Skippable preroll ads

These are video ads that begin to play at the beginning of the YouTube video.  After 5 seconds, you can stop them if you wish.

Earn a percentage of the selling price for every book sold.

Click here to learn more.

4. Non-skippable ads

These are video ads that begin to play at the beginning of the YouTube video.  You cannot watch the video until the entire ad has played.  The maximum allowable length is 30 seconds.

5. Sponsored cards

This are similar to overlay ads. They will appear sometime while the video is playing. They will be somehow related to the content of the YouTube video.

How much money can I make if I monetize my videos?

This is a very complicated question because there are so many variables. A few people make over a million dollars a year. Many make nothing.  Here are a few variables that can determine how much you make:

  • Are people even clicking on the ads?  If so, you can earn around $2 (USD) per 1000 views.
  • How much are advertisers paying to display their ads?  Different industries pay different amounts for ads. An insurance ad would cost more than a shoe polish ad.
  • Does YouTube think your content is good for ads?
  • How often do people skip the ads?
  • From which countries are people watching your video?  Rich or poor?
  • How interested advertisers are in advertising on your genre of channel.

The main secrets to making a decent amount of money

  • Make quality videos of the type that lots of people like to watch.  You want content that should attract huge numbers of viewers.
  • You may want to make money outside of AdSense. You can monetize your videos by displaying other people’s products or promoting your own products.

YouTube video creation

The YouTube video on this page was created using ScreenFlow.


Peter Enns has been developing websites since 1996. He is a social media blogger and author of the free YouTube video-creation tutorial called 7 Day YouTube.

tweets

How to Start Script Writing for More Professional Animated GIFs

How to start making your animated GIF

video-final-gif-10-seconds-2Script writing must be an essential first part of creating your animated GIF. You might think that you can simply create the GIF in your head. Then make the video.  After all, you want it to be only 10 seconds long.

That’s wrong thinking.  The following is a good scope & sequence for creating your animated GIF:

  1. Decide upon the main point you are trying to get across
  2. Collect  one or more graphics
  3. Write your script out. It will guide you in making the right video clips.  Plus it helps you remember all of the necessary features of a good animated GIF:
  • Obvious to viewer what animated GIF is all about
  • Rarely have a shot with a message less than 1 second or greater than 2
  • Each shot must be in logical sequence
  • Each shot gives a micro story
  • Entire video less than 15 seconds

Script writing, then making all clips

  • Following the script, record all video clips
  • Make a blank timeline
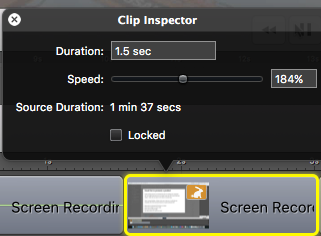
  • script writing clip-inspectorAdd clips in order they appear in script
  • Use something like ScreenFlow’s Clip Inspector to (usually) shorten the clips
  • If final copy is greater than 15 seconds, consider using Clip Inspector to shorten it


Earn a percentage of the selling price for every book sold.

Click here to learn more.

Video Motion example

The Video Motion example above will be used to illustrate a paragraph in a long article about how to create YouTube videos.

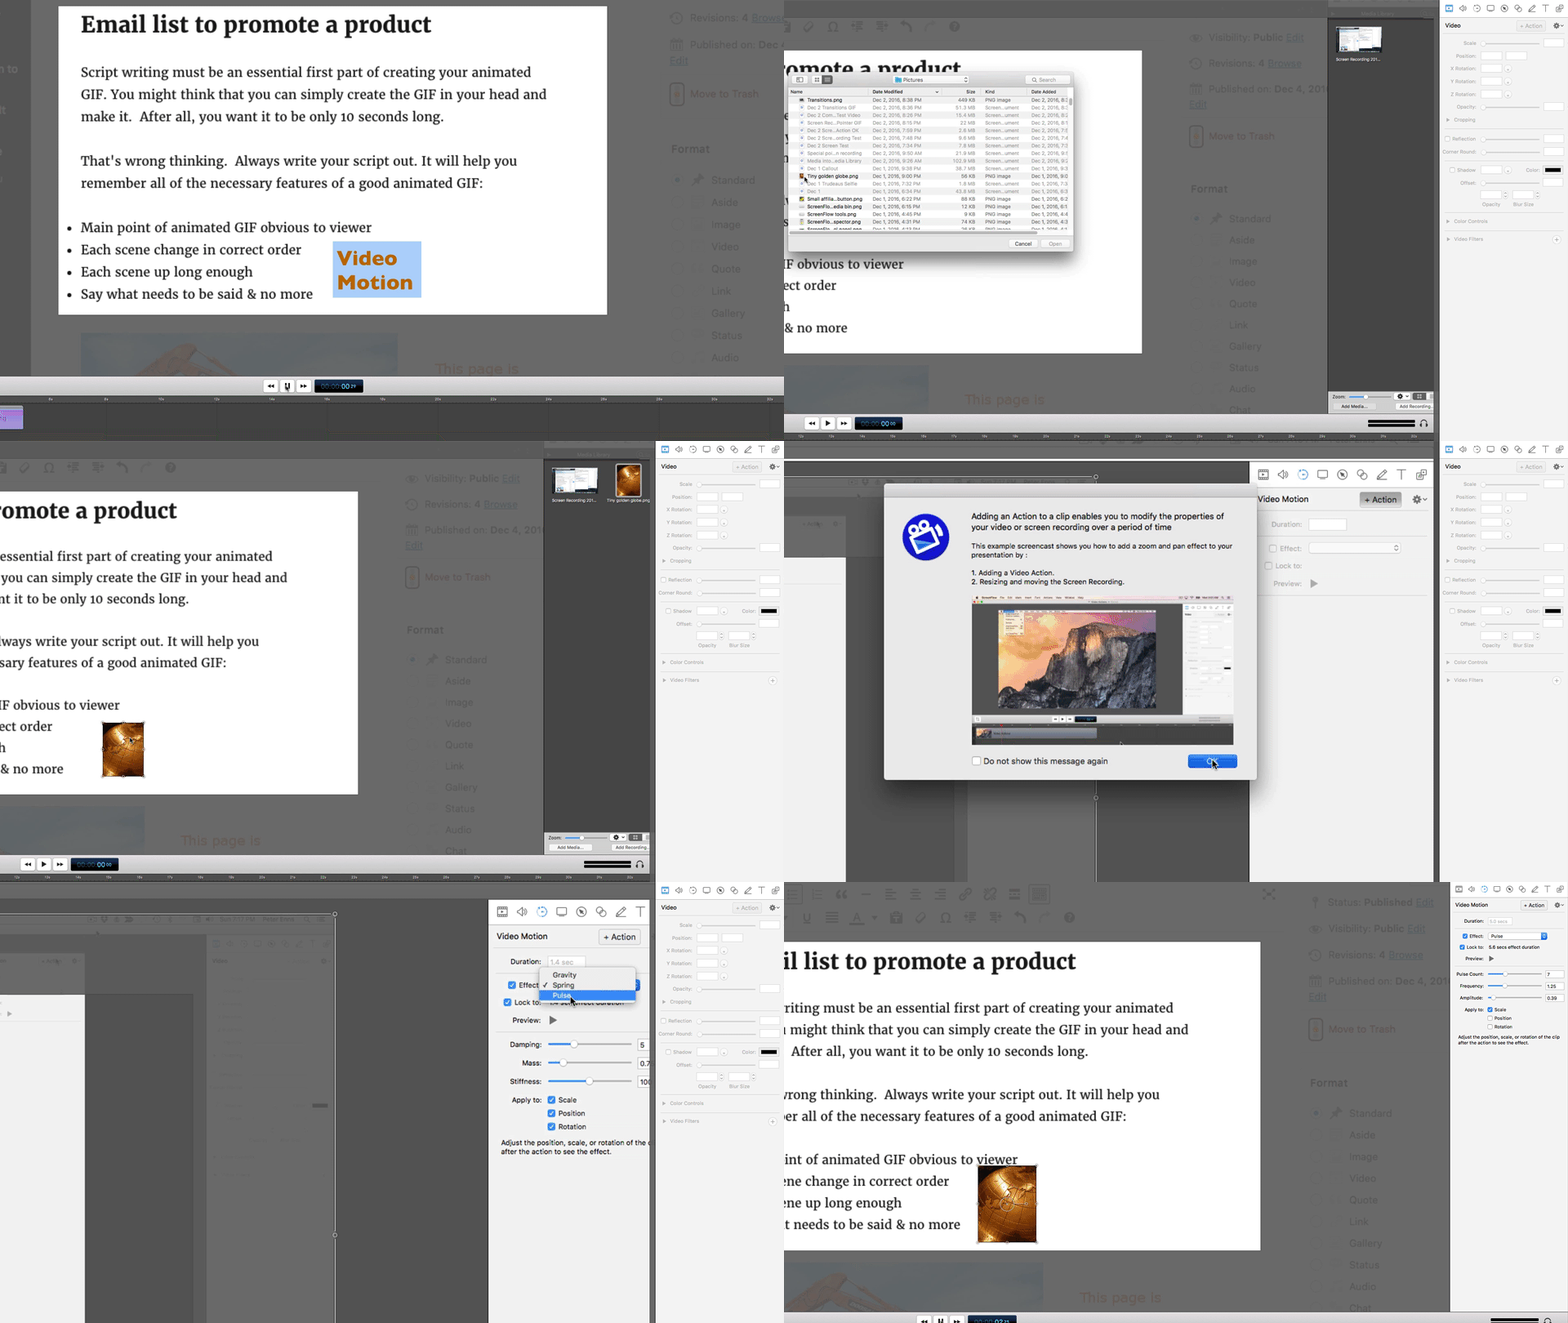
Here is the script that was used to create the animated GIF above:

  • Select background
  • Title — Video Motion — pulsating
  • Media Library, add media
  • Drag media to point where will pulsate
  • Click Video Motion tab
  • Action > OK
  • Effect > Pulse
  • Make 10 second demo

The script writing was done with bullet points to make it quicker to gather all of the video clips.

Create animated GIFs in 6 steps

1. Drag images onto Keynote slide(s)

(You can find free images at bit.ly/nocostimages. After you get there, click on the “Free Photos” tab in the horizontal menu. Learn about eleven sources of free videos.) If you have not used Keynote much, go to the Presentation Software blog post.

2. Add a MINIMUM amount of text

The animated GIF will be quite small.  So, the text should be as large as is reasonable so that people will indeed read it. People remember pictures much better than they remember text.  So, get most of your message across with the images.

3. Use Keynote to animate your text and imagesanimated GIFs

Experiment with the various Build In and Action effects. Go to the bit.ly/nocostimages website, get some free images and practice making a presentation as complex as the one you see below.

animated GIFs


Another way of adding interest to your moving text is to show an image within the letters. Learn how.

4. Record your presentation with ScreenFlow

You will be using ScreenFlow to record, edit & upload your presentation as an animated GIF. Remember to save your ScreenFlow video with a descriptive name as soon as you see it on the screen. Then you can start editing it.

5. Edit video with a maximum size of 500 x 500 pixels

  1. animated GIFsClick you sizing icon
  2. Change each of the Canvas dimensions to 500 pixels
  3. Making sure your video snippet has been selected, click
    animated GIFsthe green check mark icon.
  4. Move the slider to size the animated GIFsvideo to fit in the canvas. Experiment lots until it becomes second nature.
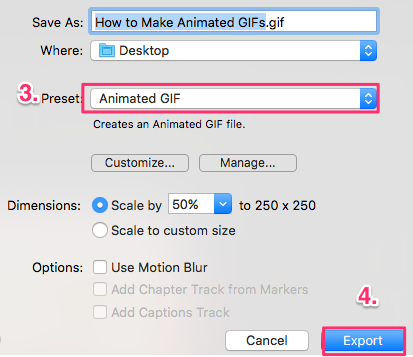


6. Click File > Export > Animated GIF > Export

animated GIFsAfter clicking File > Export, look at the new panel that shows up. Using the dropdown arrow, select Animated GIF.  Click the Export button.
Related pages

How to make an animated GIF using ScreenFlow.

Over two dozen things you can do with ScreenFlow.

Use GIMP to edit your photos.


Peter Enns has been developing websites since 1996. He is a social media blogger and author of the free YouTube video-creation tutorial called 7 Day YouTube.

tweets

11 Tips to Enhance Your YouTube Video Quality


Video Quality start-your-own-business-click-hereI wanted to make a YouTube video to complement my blog post about how to start your online business.   The purpose of the video was to get people to the post. I had 5 main points I was trying to get across.
Watch the video below.

11 secrets  for adding video quality & making some boring points memorable

The 5 points are in abbreviated form such as “paid advertising” and “build a list”. If I would have simply listed those 5 points, most people would have closed the video before they watched it all. I had to enhance the video quality.  So, here’s what I did to make it interesting.


1. Bought the “start your online business” graphic from Adobe Stock.
2. Used the Keynote effects to give movement to the text.
3. Had additional smaller text to give more meaning to each of the 5 main points.
4. Video Quality start-online-businessHad a Keynote “spin” action on graphics that came from the blog post.
5. At the end I added the URL of the blog post that corresponded to the video.
6. I set the Keynote slides to “play” and recorded them with ScreenFlow.
7. Edited the video using ScreenFlow.
8. Using ScreenFlow, I recorded the text as an audio file.
9. Added the individual audio clips to the video.
10. Went to the YouTube audio library to find free music to use in the video.
11. Used the audio ducking feature to soften the music during the speaking parts.


Earn a percentage of the selling price for every book sold.

Click here to learn more.

Buy ScreenFlow

Go to the ScreenFlow website to buy. Alternately, you can get a free trial copy so that you can try before you buy.


Peter Enns has been developing websites since 1996. He is a social media blogger and author of the free YouTube video-creation tutorial called 7 Day YouTube.

tweets

1st Amendment Right of Free Speech Eroding

no-free-speech-mouth-600-curtail

As of midnight on Sept. 30, 2016 the US Government is ignoring the 1st amendment.  It is giving up Internet control to the Internet Corporation for Assigned Names and Numbers (ICANN).

The Internet will then be governed by a “multi-stakeholder” model, including businesses, individuals, and foreign governments. According to Internet expert Lee Romanov, this means China or Russia could control what you upload, and the information you search for.

Why is this happening?

The big questions are:

♦ Why is President Obama giving up Internet control ?
♦ Why are so many North Americans unaware of this?
♦ Why are we not allowed to help decide this issue that will dramatically impact our lives?
♦ Ted Cruz says; “It a violation of federal law” but that’s not stopping Obama. Cruz asks “Where’s the gain?”

Ted Cruz says that the administration is “pushing through a radical proposal to take control of Internet domain names and instead give it to an international organization, ICANN, that includes 162 foreign countries.” Cruz warns this will empower countries such as Russia, China, and Iran to censor our speech on the web.

Watch Senator Ted Cruz’ comment on this subject.


Earn a percentage of the selling price for every book sold.

Click here to learn more.

Who Is ICANN & How Are They Funded

ICANN is responsible for establishing the Internet’s global Domain Name System.  That includes policy development for internationalization of the DNS system. They are primarily funded by the registrar’s who sell you your domain names.

When the US passes over control to ICANN, long-term funding must come from the entities that will benefit from ICANN services. It’s power is immense. ICANN can delete anything online, including your website.

What’s the risk to the 1st amendment?

If you think no one is interested in controlling the internet, think again:

♦ Banks,
♦ Big Pharma,
♦ GMO Companies,
♦ Billionaires, and
♦ Terrorist Organizations.

This will become it’s own pay-to-play model for the rich and self-interest groups.

It’s starting

I tried advertising this page with my Facebook account.   The text of the ad would have read “Danger: Eliminating free speech on the Internet. Act fast. Government trying to remove 1st amendment right. See bit.ly/nofreespeech.”

Facebook said that they could not let the ad run because it violated their adverting policies.  Sounds like Facebook is in favor or restricting our free speech.

What can you do about it?

Go to this website to fill in a form with your comments.  There also is much more information about this 1st amendment infringement.

Contact your elected representative ASAP!


Peter Enns has been developing websites since 1996. He is a social media blogger and author of the free YouTube video-creation tutorial called 7 Day YouTube.

tweets