This post has moved here.
Web Design Resources

 There are well over 6 million ebooks available for sale on Amazon. When people search for the topic of your book, how will they even find it among so many books?
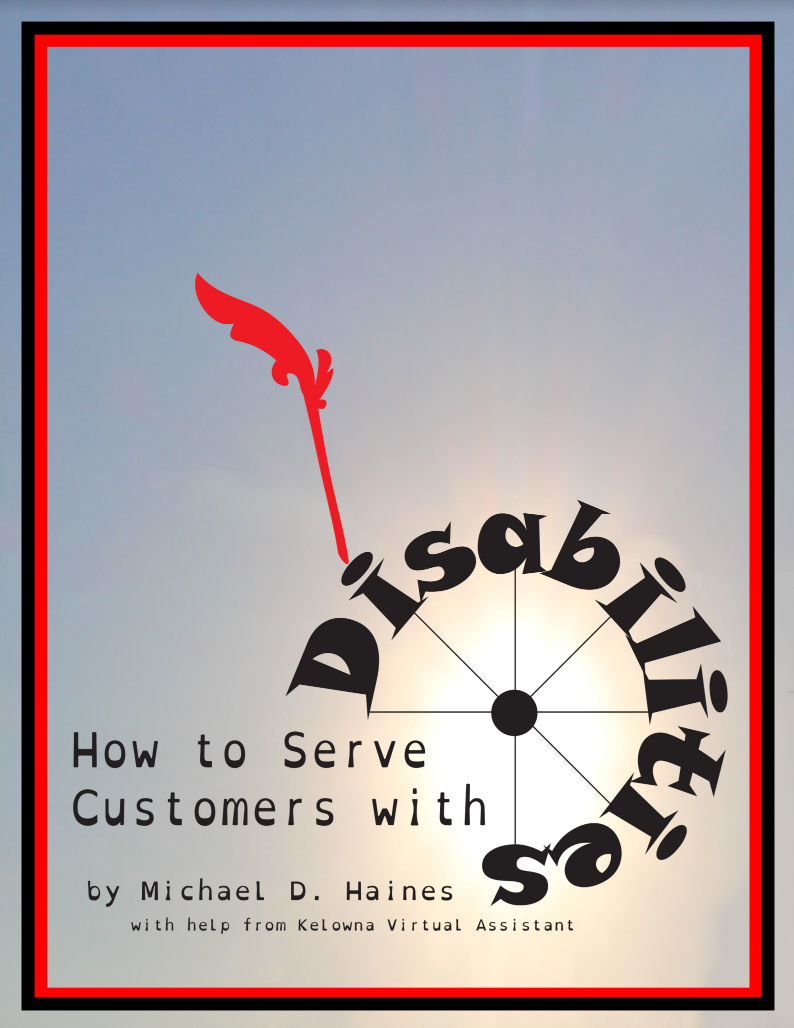
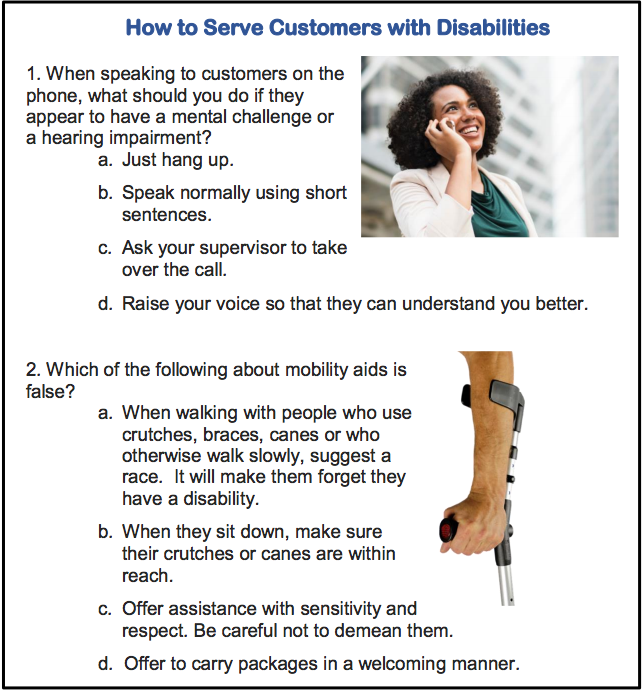
Here is the cover of my ebook. I was asked to choose two categories in which the ebook belonged. I chose Disabilities and Customer Service.
When people choose either of those categories, I want my title to be listed near the top. It is very much like wanting to be on page 1 of Google.
Below are some of the tricks I used to market my book.
Before I even put the ebook up for sale on Amazon, I created the tweet below.

The tweet reads: I’m launching a new ebook called How to Serve Customers with #Disabilities. It’s a #CustomerService training manual. Reply to this tweet if you want early access to Amazon’s 5-day free ebook promotion.
If people do reply, I will send them a link to where on Amazon they can get a free ebook. At the end of chapter 1 there will be a request for a review on Amazon. The request will include the link image below.

Having lots of reviews helps a book get closer to the top of the search list.
Before starting the 5-day promotion mentioned below, make sure you have a high-quality website. (See example.) You home page ideally will make people want to see the book. Try to make sure there is a testimonial page.
Go here for instructions on how to publish an ebook.
One thing that can hold you up while trying to publish is not completing the tax information. I’m a Canadian living in Canada. So, I went to https://www.irs.gov/individuals/international-taxpayers/taxpayer-identification-numbers-tin to get a tax identification number (TIN).
I finally completed the Tax Information Interview and filled in the radio button below.

Then I was taken to another page where I checked the form and clicked the Exit Interview button.
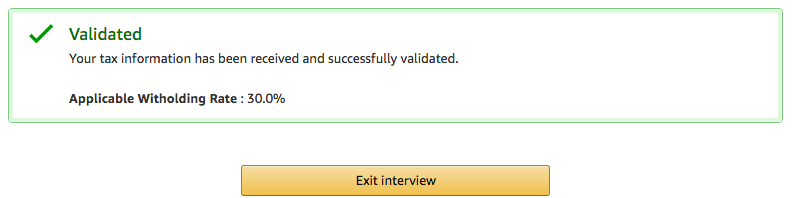
That took me back to a KDP Amazon page where I was told that I had completed the required tax documents.
I returned to the Jumpstart web page and clicked on #3, Write Your Book Description.
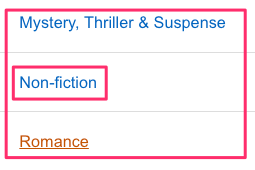
On scrap paper I jotted down all of the information I gleaned using Jumpstart. This included a “yes” for DRM and the categories. (Mind you, I could not use the categories I had chosen. They were not in the list.)
Then I went to this web page for pretty good uploading instructions.
This page is where you can check to make sure you HTML manuscript and cover have been uploaded properly.
If you read the Kindle Create PDF file mentioned below, you will realize that there are 3 types of books. For a book with lots of images, this is the best way to make your ebook uploadable:
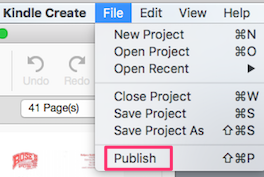 When you click Publish, Kindle Create produces a publishable file (.kpf) that you can submit to KDP. (The .kpf file is only used for publishing; the .kcb file is used for updates.)
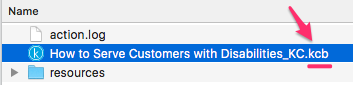 Note that the KCB file mentioned above is in the KC folder.
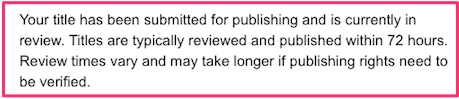

Remember that may people will not finish a book. Also, remember that people are more likely to give reviews if you make it easy for them.
Combining those 2 ideas, the about Click button was inserted at the end of chapter 1. It has a link to https://www.amazon.com/review/create-review/ref=dpx_acr_wr_link/#.
Lots of positive reviews will help push your book closer to the top of the Amazon search engine. Keep in mind that they will not be able to leave a review unless they have spent at least $50 on Amazon in the previous year.
This was first started during the 5-day Free Book Promotion.
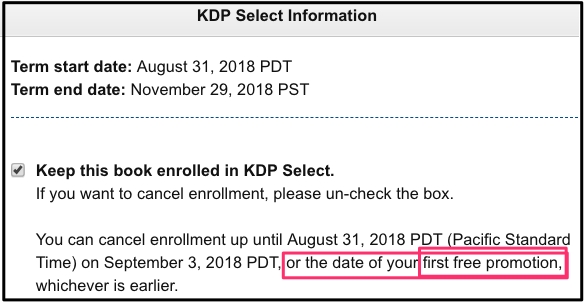
Note: If you set up a free ebook promotion, you must have chosen KDP Select. That means you will be unable to sell the ebook on any other platform for about 3 months.
To enroll, go to the KDP Select page and scroll down to How to Enroll.

Create an eye-catching graphic. Beside it ask people to download the free ebook before the end of the 5-day promotion. Ask for review.
Create an email that explains your ebook and makes people want to share it. Starting with the letter “A”, start dragging select email addresses into the BCC section of the email. After the last address as been sent in, enter your own address into the email so that you can check the performance. Send it.
Go to sites such as Reddit, Slickdeals, Mashable and Hongkiat to see if it is reasonable to add your free 5-day promotion to their website.
Go to the Udemy website to find what online classes are being taught in your subject area. Each time you find a class, look up the teacher. You may have to use both Facebook & LinkedIn.
Email them and ask them to contact their students to find a free copy of the ebook. Tip: Create a sample email so that it will be very easy for them to copy & paste it.
You most likely have links to other websites within your ebook. If so, write an email corresponding to each of the links.
For instance:
Hello,
Please forward this to the appropriate person.
Page 36 of our new ebook, How to Serve Customers with Disabilities, has a link to one of your web pages: https://www.padraig.ca/blog/3773/goal-setting-worksheet/. Check it out: https://www.amazon.com/s/ref=nb_sb_noss?url=search-alias%3Daps&field-keywords=how+to+serve+customers+with+disabilities.
![]()
![]() In the Facebook & Twitter websites, search for free Kindle books and Twitter free ebook promotions respectively. Contact some of these groups and promote your 5-day free trial.
In the Facebook & Twitter websites, search for free Kindle books and Twitter free ebook promotions respectively. Contact some of these groups and promote your 5-day free trial.
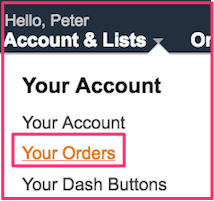
 Have a graphic on Facebook along with a thank you to the people who have given reviews. Tell them how long the ebook will still be free. Go to Amazon’s Your Account > Your Orders to see if anyone has downloaded the free ebook. If so, mention that statistic also.
This will encourage other people to give reviews.
Ebooks on Amazon are priced significantly lower than an equivalent paper book in a bookstore. If you price your book between $2.99 & $9.99 USD, you get a 70% royalty. Otherwise you get a 35% royalty.
So, the minimum I’m willing to charge for my book is $2.99 USD. The maximum is $9.99 USD.
After my 5-day free ebook period is over, I’m going to set the price at $2.99. I might make more money at a higher price. But, I want to get more volume so that it will have a higher ranking on the Amazon search engine.
The 2 categories of my book are physical impairments and customer relations. So, I will search Amazon Kindle books & look at prices of similar books in each of those categories.
The most common price for customer service is $9.99 USD. However, none of the ones on page one of the search engine mention physical impairments. Physical impairments is the main topic of the book.
However, when I searched for those categories, they were too broad. So, I searched using the keywords disabilities & customer service.
I’ll put more weight on the prices of books in the Disabilities category. There was one book on page one that covers both Disabilities and Customer Service. It was priced at $4.99 USD.
So, for the third week I will raise the price the price to $4.99. For the fourth week I will raise it to somewhere under $10.
Then I will chart profits for each of those 4 price points. The price with the highest profit will become the semi-permanent price.
The DNA of a Successful Amazon Seller
How to Get Your First 100 Sales
10 Steps to Reselling Your Product (Infographic)
How to Promote Your Ebook at No Cost
 I came across a fascinating website today. It’s about what they call the Ask Method class. The idea is to find what smaller-niches want your product and market to them. The Ask Method people call each of these sub-niches a bucket.
The Ask Method people say that you can find your ideal sub-niches by using Google to figure out what people are searching for. Let me give you an example from my personal experience.
 I sell a training manual called How to Serve Customers with Disabilities. So, I typed this into the Google search window: best training manual for. (If I was selling socks, I would have typed best socks for.) Google gave a number of examples of what people had searched for when the search began with “best training manual for”. For my purposes, the four best phrases were:
I drilled down further with “restaurant staff”. I typed best restaurant staff training for into the Google search box and got:
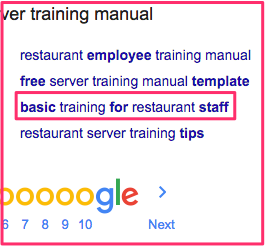 I decided that the most useful phrase of the 4 above phrases was Restaurant employee training manual. So, I went to Google.com and entered the above phrase into the search box. The SERP (search engine results page) had 8 search results at the bottom.
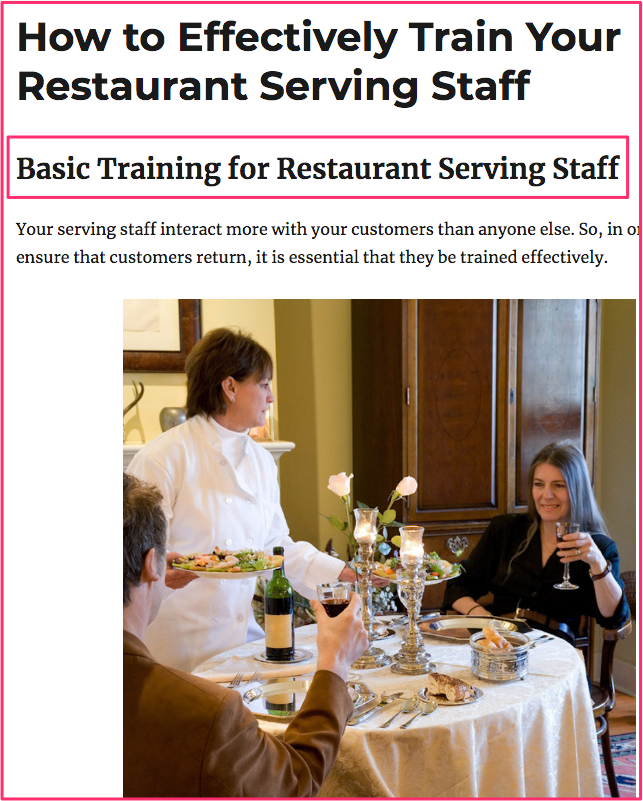
I decided that basic training for restaurant staff was close to the phrase I wanted to use. However, the training manual I’m promoting is titled How to Serve Disabled Customers. So, I decided that the ideal phrase would be basic training for restaurant serving staff .
Using the above information, you can drill down and find very specific sub-niches in your area of expertise. Then you can write blog posts in those areas and use the sub-niche phrases several times in each article.
You could become known as an authority in your sub-niches. Your blog posts could become the go-to posts to find information in your area of expertise.
You can communicate to these groups in a more targeted way. In my example, I could:
It is intuitively obvious that the second bullet point would be the preferable marketing strategy.
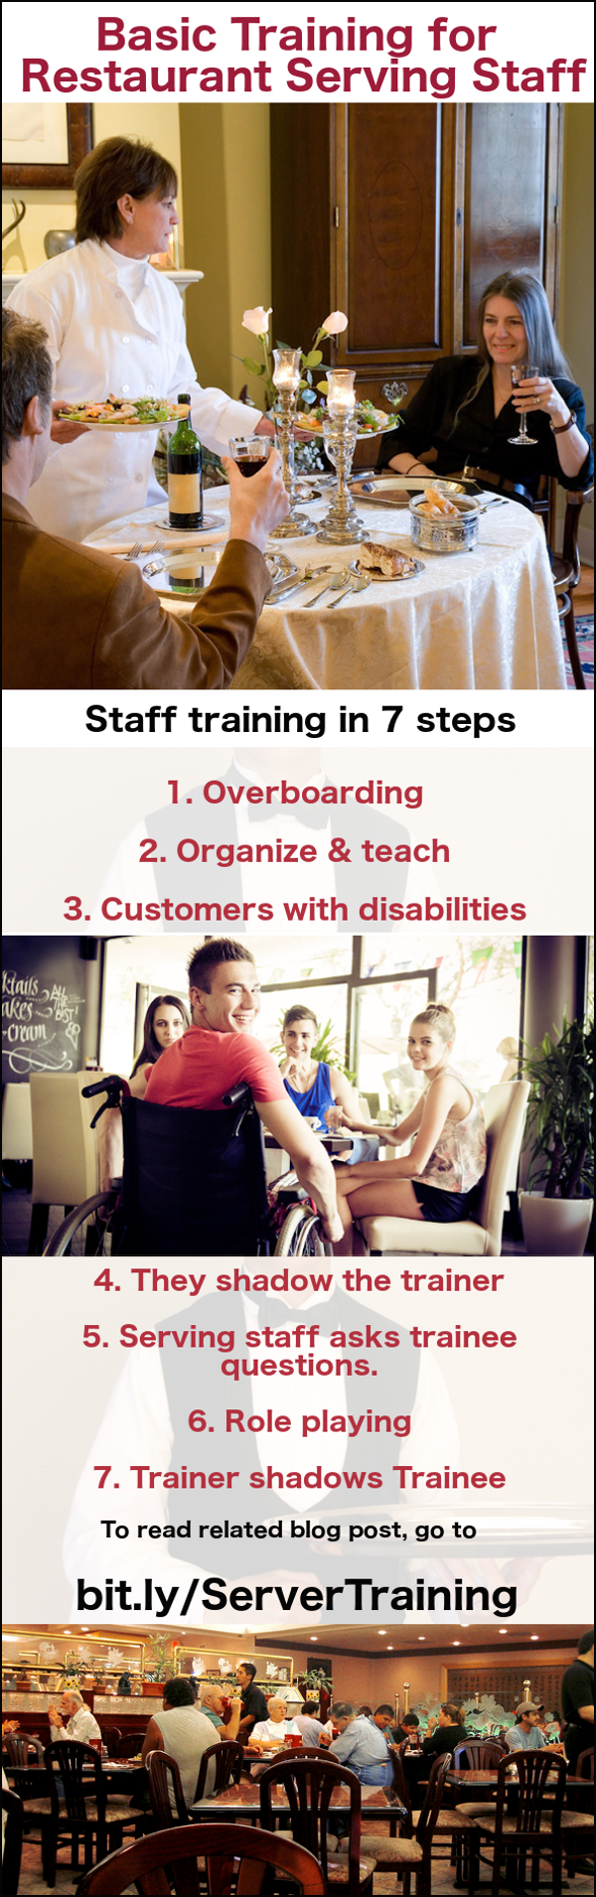
After writing this article, I created the Pinterest pin you see to the right. I also created the blog post you see below. It also promotes the training manual within the article. (Click on the picture below if you want to read the blog post.)
The sub-niche heading is the first H2 heading. The name of the article was different because I felt it was more likely to entice people to read the article. (I could be wrong.)
8 ways to find profitable sub-niches
Target specifically using a Pinterest group board
 I really enjoy working with the tech support people at AWeber. With all of their help, my AWeber email marketing got off to a great start.
To get started, start a free 30-day trial now. After the thirty days is up, you will pay AWeber monthly. I get a small portion of that.
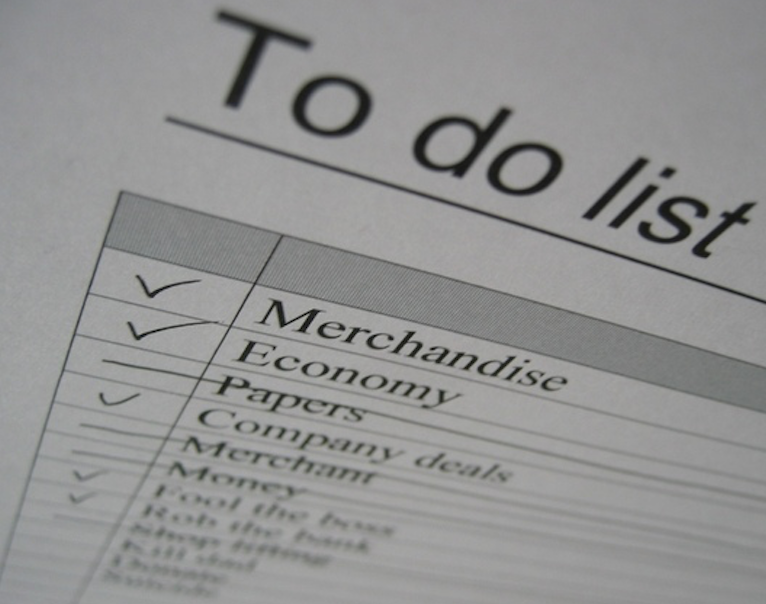 To start sending an AWeber email, you first make a list. A list is a way to separate subscribers with common interests into different groups for easier targeting. Whenever anyone signs up to your list, they are doing so to receive a specific kind of information from you.
For instance, depending upon who wants what information from you, the points in the above list include Merchandise, Economy and Company Deals. When people send a request via AWeber, they could be sent emails about merchandise, the company economy or else company deals, depending upon where they sent their request.
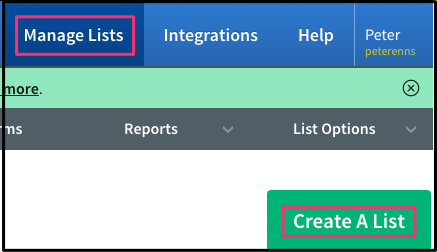
Click Manage Lists in the top horizontal menu and then click Create a List. Simply follow instructions.
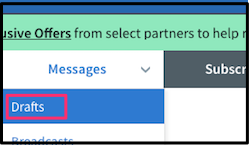
Click on Messages > Drafts and then click on the drop-down arrow in the green Create a Message button.
I usually choose HTML editor so that I can add hyperlinks, change fonts, etc. There is even a paper clip in the lower left-hand corner so that you can attach a file.
Insert your subject in the upper left-hand corner.
I usually begin my message with this: Hello {firstname_fix}!. That way the AWeber email will be personalized.
Legacy Follow-up Series in another term for autoresponder.
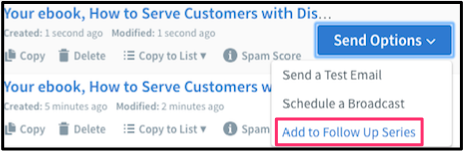 Click on Messages > Drafts. To the right of each message is a Send Options link. From the drop-down list click on Add to Follow Up Series.
This will be one of your messages that will be emailed out.
Under Interval you can use the drop-down box to decide how soon you want it sent out. If you want it sent out less than a day from time of an action, use 0.
You can use this process for as many emails as you want to send out. I like to use a total of 2 emails. The second one links to a web page with a thank you message. If the messages are in the wrong order, drag and drop them so that the one on top will be the first one sent out.
How to get ebooks automatically emailed at time of payment to PayPal
If this blog post has insufficient information, go to this page and click on the icon in the lower right-hand corner. You can start chatting with AWeber tech support to get more information.
 So, you have written a few ebooks and are using PayPal to sell them. Every time someone buys, PayPal sends you an email. As soon as you get time, you send a message with a PDF copy of an ebook.
After a few weeks, you are selling a hundred ebooks a day. You cannot keep up with the emails. What do you do?
Simple. Use the AWeber app. Get a free 30-day trial of AWeber and link it to PayPal using the instructions below. Every ebook will be emailed out as an attachment to your personalized message. It will be emailed out as soon as payment is received.
Before you set up your AWeber-PayPal integration, set up the Messages (emails you will be sending out).
![]()
![]() Click on Integrations in the top menu.
Click on Integrations in the top menu.
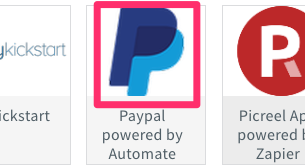 You will see a huge number of icons. Cmd F to find PayPal. Click on it.
![]() Click green Enable button. This will open up the AWeber and PayPal Integration page.
Click green Enable button. This will open up the AWeber and PayPal Integration page.
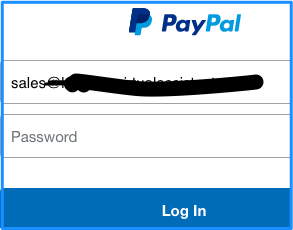 You’ll see a form allowing you to log into PayPal. Login.
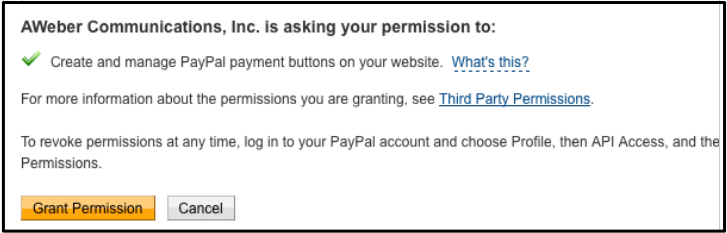 Click yellow Grant Permission button to grant permission to have PayPal payment buttons on your website.
 Click Integrations link in horizontal menu again. Click on the PayPal button near the top. Copy and paste the Notification URL into box under Point #4.
![]()
Click the proper ratio button in point #5 (probably receive IPN messages) and click the Save button.
 Back on the “Integration” page again, select the appropriate list.
Assuming you want all of the people who buy your product to go on the same list, you are finished. If you want to make things more complicated, go to the Related Page below.
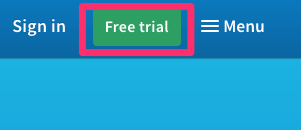 Get a free 30-day trial of AWeber now. Click on the green Free Trial button. Note that if you continue with AWeber after 30 days, you will pay them monthly and I will get a tiny commission.
 An online quiz is the most shared content on social media. These quizzes can be used to market just about anything.
The picture on the right represents the first two questions of a complex online quiz.
In this post you will learn how to make a very simple online quiz.
 Click the turquoise Quiz icon
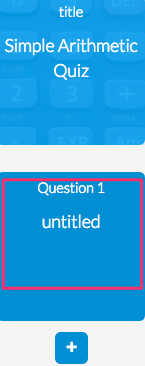 Give your quiz a title.
 Click plus sign on blue square to add more questions.
Learn how to market on Facebook with a quiz.
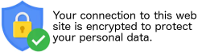 When people buy from your website, they will be looking for signs to make sure that their credit card and other personal information is protected. They’ll be looking for a URL beginning with HTTPS to make sure their data is encrypted. They’ll be looking for assurance such as the image above. In other words, they’ll be looking for an SSL certificate.
To buy an SSL certificate, go to your web host’s website to see if it is possible to buy one there. Otherwise you will have to make an online search.
 I use LiquidNet Ltd Hosting. To buy my latest certificate, I clicked on My Domains > Order SSL Certificate and then clicked on the drop down menu to choose the domain name that needed securing. After that it was just a matter of filling in the blanks. After that I had to get tech support to help me make it active so that the “S” would show up after HTTP. Then I made sure an SSL certificate logo showed up.
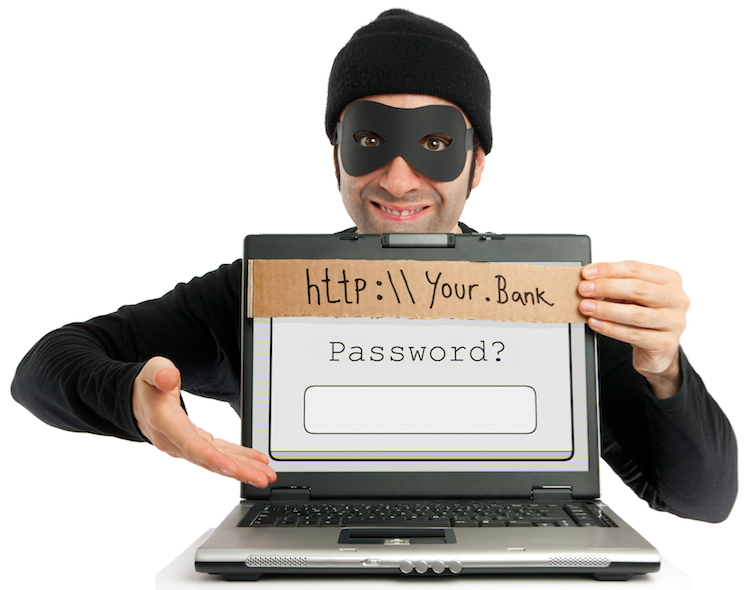
 When people buy things from your website, they obviously submit personal information such as a credit card number. This information must travel through several computers. An identity thief could be using software that makes his computer appear to be your computer.
If you have an SSL certificate installed in your website, the identity thief will be unable to capture your encrypted data.
One advantage of buying your certificate is that the money will go to you rather than some hacker. However, the main advantage is peace of mind for your customers. When they see your HTTPS or see your certificate logo, they are much more likely to feel secure enough to buy from you.
 Advertisers and tracking companies don’t respect your privacy. They use various techniques to record your Internet browsing habits. They collect all kinds of information:
There are other reasons why you may not want people to be able to see your Internet use:
Google, Bing, and other search engines:
There is a technique to protect you from those prying eyes. It’s called using PrivateVPN (virtual private network). It makes you untraceable on the Internet.
 When you start a web surf, you go straight to PrivateVPN and BYPASS YOUR ISP (Internet service provider). When you get to the website you want, you will be using the IP address of the particular PrivateVPN server. Whoever would like to track you does not know it is you.
PrivateVPN cloaks and encrypts your signal:
You may be concerned about the wrong party:
Wherever you lie in that spectrum, PrivateVPN will be a good step in the right direction.
In the case of PrivateVPN, the signal may even jump to a server in another country before you get to the website. The snooper won’t even know what country you’re from.
PrivateVPN will allow employees to access a corporate intranet in complete privacy while located outside the office.
Your girlfriend, wife or business partner can enter the URL of a chat room to take part in a secret chat.
Every place you go to, your online activities can be monitored by Internet service providers, government organizations or criminals. Protect ourselves against malware or con tricks when web browsing.
Use PrivateVPN to securely connect geographically separated offices of an organization, creating one cohesive network.
Secure your transactions with PrivateVPN to circumvent geo-restrictions and censorship. Countries like Afghanistan, Belarus, China, Cuba, Egypt, Saudi Arabia and Syria surveil and limit access to the Internet. Activists and journalists in one of these countries can connect  to PrivateVPN server and tunnel out of the censorship restrictions. PrivateVPN conceals your page-by-page activity from any government eavesdropping.
YouTube users might have come across a message that says, “This video is not available in your country”. PrivateVPN’s free YouTube proxy allows you to watch any video with zero constraints.
Note that you must add Private VPN to your computer before you arrive in the geo-restricted country.

Do you get annoyed by the shopping sites keeping tabs on you? They start sending you ads related to where you shop. PrivateVPN makes that a thing of the past.
PrivateVPN’s services allow SEO and marketing professionals to connect to servers in different regions to test their strategies and processes.
 Those Starbucks or McDonald’s hotspots are not safe for confidential email and browsing. Public wi-fi offers no encryption security to its users, and your signals are broadcast for anyone savvy enough to eavesdrop.
Accessing insecure websites makes it easy to steal your private information.
It’s very easy for even a beginner hacker to intercept your unencrypted wi-fi signal using an Evil Twin phony hotspot or a Firefox Tamper Data plugin. Mobile users should consider spending the 4 to 5 dollars per month for the safety of a PrivateVPN connection.
It’s relatively easy to eavesdrop on Voice-over-IP (Internet telephoning). Even intermediate-level hackers can listen in to your VOIP calls. Perhaps you regularly use VOIP services like Skype. If you log into a public wi-fi network and then connect to your PrivateVPN, all of your hotspot web use will then be encrypted and hidden from prying ears & eyes.
 Flight and accommodation Booking websites:
 If you wish to tryout a VPN at no cost for 7 days, go to free 7-day trial VPN. No credit card is required.
You will create a password that allows you to use PrivateVPN from anywhere in the world — on up to 6 devices at the same time.
It takes only a few minutes before your own PrivateVPN will be downloaded into your Downloads folder. Double click on it and then drag the PrivateVPN app into your applications folder icon.
 In a few seconds you will actually see it within your actual applications folder.
 Double click on PrivateVPN. Fill in the email address and password that you gave during registration.
 Click on the country list link. Click on the country from which you want to appear to be browsing.
Suppose you tested your new PrivateVPN out by clicking on the Belgium country link. Then search for what is my IP ![]() address? IP Lookup will give your IP address. Click on Get IP Details.
address? IP Lookup will give your IP address. Click on Get IP Details.
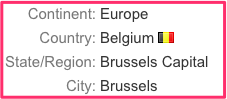 You will see data telling that you are in Belgium.
During the next 7 days, test out everything you can think of.
After you have used your PrivateVPN, you may be unable to use your regular email. That’s because you are not using your regular IP address.
To enable your regular IP address, click on PrivateVPN in your applications folder. You will get a PrivateVPN panel. Click on the button in the centre of the panel & your home IP address will be set up again. Then you email will work the way it did before you got PrivateVPN.
To buy PrivateVPN, please click on any PrivateVPN link on this blog post. I will get a commission & it will help defray the cost of creating and keeping up this website.
Evil twin
Mobile devices & cybersecurity
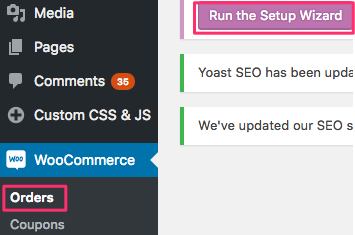 Start setting up your checkout section by going into your dashboard and clicking on WooCommerce > Orders. Then run the Setup Wizard and set up as much as the Wizard will allow.
Among other things, this will set up four new pages. Here are the names of the pages that will show up after the slash (/) in your address window:
Next
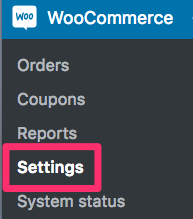 Then you should click on Settings. This will give you a horizontal menu. Click on the Checkout tab.
![]()
![]() After getting to the checkout page, you will see another horizontal menu. After you click on the Checkout Options tab, read through each section and make an appropriate response. Personally, I would check the Enable Guest Checkout button. I would buy an SSL certificate and then check the Force Secure Checkout button.
After getting to the checkout page, you will see another horizontal menu. After you click on the Checkout Options tab, read through each section and make an appropriate response. Personally, I would check the Enable Guest Checkout button. I would buy an SSL certificate and then check the Force Secure Checkout button.
For the Cart Page, Checkout Page & Terms and Conditions lines, click on the appropriate dropdown arrow. It will give the names (H1 headings) of the various pages. Click on the one corresponding to each line.
If the page has not been created yet, create it and then click on the appropriate dropdown arrow.
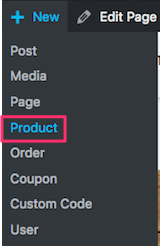 Starting a new products page is similar to starting a new post or regular page. You click on New > Product.
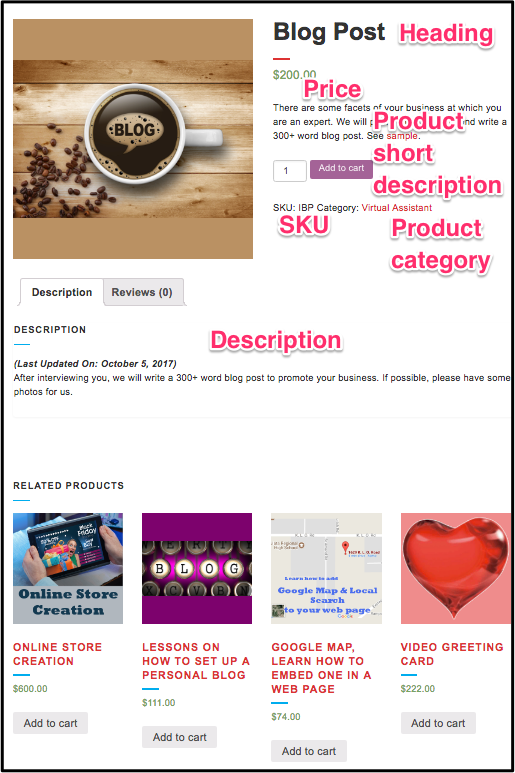 The products page on the right is for a website that sells blog-writing services. The points below explain how to add various features of the product page.
The Checkout form is the simplest way for you to securely collect your customer’s payment information. When your customer enters their credit card information, it’s validated and then tokenized for your server-side code to use.
Using Checkout, sensitive credit card information is sent directly to Stripe, and does not touch your server. Stripe returns to your site a token representation of the card, and this token can then be used in a charge request.
Below is the code snippet for the Checkout form.
<form action="/your-server-side-code" method="POST">
  <script
    src="https://checkout.stripe.com/checkout.js" class="stripe-button"
    data-key="pk_test_aUfv37UMFj6BxSxE2qzCGj7x"
    data-amount="999"
    data-name="Demo Site"
    data-description="Widget"
    data-image="https://stripe.com/img/documentation/checkout/marketplace.png"
    data-locale="auto"
    data-currency="cad">
  </script>
</form>
Add the above code to your payment page. (This link tells you how to do that.)
This is added to the page ending in /checkout/. However, it results in an error message. Find out from the forums why.
In response to a question about this, tech support said
Building a website and especially a custom payment flow with Stripe is not a complete copy and paste procedure, and therefore it’s unfortunately not possible to have one example at hand that will work with every website.
What I can do is point you in the direction of our list of third party integrations for one-time and recurring payments that work with Stripe:
https://stripe.com/works-with/categories/recurring-payments
You can have a look around and see if you find one that suits your business needs.
If you’re not confident you can do it by yourself, I’d recommend hiring a developer to look at it for you. I know there are skilled developers on these websites you can hire just for a Stripe integration:
https://www.upwork.com/o/profiles/browse/?q=stripe
https://www.peopleperhour.com/freelance/stripe?ref=search
The story continues & gets more complicated. I end up seeing that I should PROBABLY delete WooCommerce Stripe Gateway and set up something else that will cost me 2.9% of charges plus 30 cents per successful card charge. There will be NO other charges such as setup charges.
The data on this page is based on my research for the store I created in June 2017. Software and government rules both change with time. So, I am not responsible for any problems you may encounter because you follow my advice.
Endpoints are an extra part in the website URL that we detect and show different content when present.
For example, you may have a ‘my account’ page shown on the URL yoursite.com/my-account. When the endpoint ‘edit-account’ is appended to this URL, making it ‘yoursite.com/my-account/edit-account’. WooCommerce shows the Edit account page instead of the My account page.
You have 5 boxes in the Checkout page. Going from top to bottom, I would use these default names:

When you click Save Changes at the bottom of the Checkout page, the above endpoints will be saved.
You also should usually keep the defaults on the Accounts page. When you click Save Changes at the bottom, the eight endpoints will be saved.

Read much more information about endpoints.
In order to accept payments, you need a bank account (preferably in the name of your business). If you want a bank account in the name of your business, a business name must be registered with the government. An inexpensive way to search for a name & register it with the government in Canada is to use Speedy Search.
In order to register a name, it must be unique, distinctive and descriptive. Here’s how Kelowna Virtual Assistant meets those criteria:
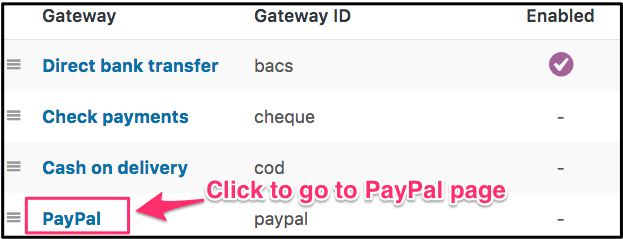 After you click on the Checkout tab, you can scroll to the bottom & see the Payment gateways. You will see 4 or 5 choices of payment Gateways. PayPal also includes credit cards. So, it should be first choice if the Stripe credit card choice is not there.
Click on the three lines to the left of “PayPal”. Your cursor becomes 4 arrows. Drag and drop PayPal to the top of the list.
Direct bank transfer has been enabled already. In the picture, none of the other Gateways can be used because they have not been enabled.
To enable PayPal, click on the blue PayPal name. When you get to the PayPal page, click on what seems the most logical.
Image URL
If you want your logo to appear on the PayPal checkout page, copy your 150×50 pixel logo to any page you wish. Go into the page in text ![]() view and find the code for the image. The URL of the image will begin with “http”. It will be within the quotation marks that follow the term “src”. Cmd C to copy it into your clipboard. Cmd V to paste it into the Image URL box.
view and find the code for the image. The URL of the image will begin with “http”. It will be within the quotation marks that follow the term “src”. Cmd C to copy it into your clipboard. Cmd V to paste it into the Image URL box.
API credentials to process refunds
In order to be able to process PayPal refunds, you must set up something called “API credentials”. This is how to do it.
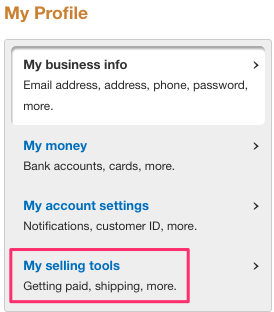 Click on Profile in top right
PayPal Sandbox
A sandbox is something you play in. So, the feature you use to play with PayPal and pretend you have orders is called Sandbox.
![]() So, when you go into Checkout > PayPal, you should enable the Sandbox. Then you can check PayPal to make sure everything is set up properly.
So, when you go into Checkout > PayPal, you should enable the Sandbox. Then you can check PayPal to make sure everything is set up properly.
The BACS feature in WooCommerce does nothing more than provide your bank transfer details to the customer. The bank transfer happens outside WooCommerce (initiated by the customer) and you have to manually mark the order complete when the transfer comes through.
So, in the instructions box, make sure you give good instructions to the customer including an idea about a secret question.
When filling out the Account Details, the first 3 boxes are self explanatory. The Bank Transit Number is a 5-digit number comprised of your 4-digit branch number followed by a number indicating the geographical location of your branch.
![]() The transit number appears on your cheque after the cheque number. In the illustration, the cheque number is 004 and the bank transit number is 12345.
The transit number appears on your cheque after the cheque number. In the illustration, the cheque number is 004 and the bank transit number is 12345.
You may or may not need to fill out the IBAN and SWIFT boxes. They are numbers to facilitate international wire transfers. Ask your bank which number you should use and what it is.
Learn more about IBAN & SWIFT.
Here is some sample text for the instruction box: Before starting a wire transfer, decide upon the secret question and answer. Your contact at Kelowna Virtual Assistant must know the answer to the question. Your exact technique for wiring the money will vary from bank to bank. With the Bank of Montreal, you click on the Payment and Transfer tab at the top of the page. Then you click on Interac e-Transfers in the left-hand column. Follow instructions.
![]()
Tokenization is the process of
Instant payment notification (IPN)

 Peter Enns has been developing websites since 1996. He is a social media blogger and author of the free YouTube video-creation tutorial called 7 Day YouTube.