
26 million downloads and counting
 WooCommerce is a WordPress plugin that helps make setting up your online store simple. Do you think you should use this solution? Because it is the most popular ecommerce platform, I would say “yes”. WooCommerce powers 30% of the world’s online stores.
Online store index
- Accept credit cards using Stripe
- Add new products
- Bank transfer to pay for product & services
- Checklist when all finished
- Coupons
- Delete a product
- Empty your cart
- FAQ
- Features
- Guided tour video
- PayPal
- Plugins
- Sales tax to foreign countries
- Setup
- SSL certificate to prevent fraud
- Tech support
WooCommerce online store features
Talk about a huge list of things you can sell in your online store! Look at these WooCommerce features:
- Sell anything anywhere
- Physical products (in all shapes and sizes)
- Digital downloads
- Affiliate products
- Recurring subscriptions
- Your time
- Sell worldwide
- Sell by country
 Mobile friendly (you may have to use a few third party tools)
- Scale into a larger business as you grow
- Customer support
- Hundreds of free & paid extensions to make your store more effective. (Find what is available in the initial free download.)
- Offer free shipping, flat rate shipping or make real-time calculations
- Drop shipping
- Store’s data can be accessed anywhere, anytime, 100% securely
- Automatic installation
- Integrates seamlessly with WordPress
- Comes bundled with the ability to accept major credit cards, PayPal, BACS (bank transfers), and cash on delivery
- Store’s data can be accessed anywhere, anytime, 100% securely
- Gives both store owners and developers complete control from taxes to stock levels to customer accounts
- Storefront is a free WordPress theme available to any WooCommerce store
- FAQ at bottom of this page
- Learn more.
How to set up WooCommerce
Plugin
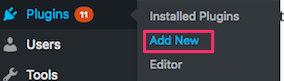
In your WordPress dashboard, click Plugins > Add New. Type “woocommerce” into the search box. Install & activate WooCommerce.
SetUp
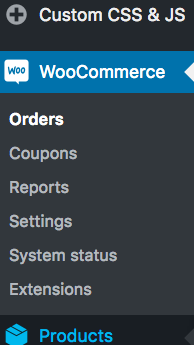
A WooCommerce link will show up in your WordPress dashboard. Click on these one at a time and set them up.
![]()
Notice that for the setting link, there will be a horizontal menu. Click on them one at a time and fill them out.
Also note that you will find another horizontal menu when you click on the
 Products
- Tax and
- Checkout tabs.
Adding products
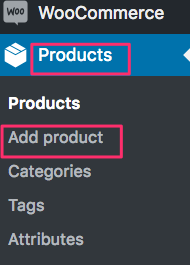 After you have set up everything from General to API, you can start adding products. On the left side of your dashboard you will see Products right below WooCommerce.
Click on Products and then Add Product in the Products submenu. Name the product where the page title usually goes.
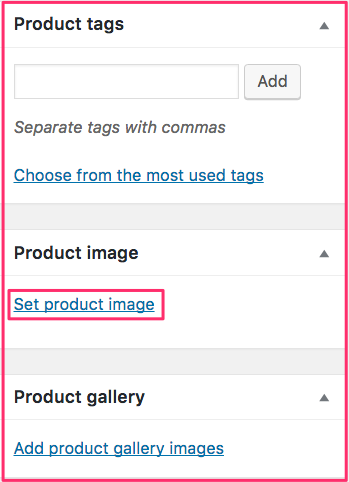 After you have added the title to your page, scroll down until you see the Product Image panel on the right-hand side. Click Set Product Image and insert a 300 x 300 pixel square picture of the product. No text accompanies the picture.
The Product Gallery is a place where you can have 3-5 different pictures of the same product. Customers like to see different views.
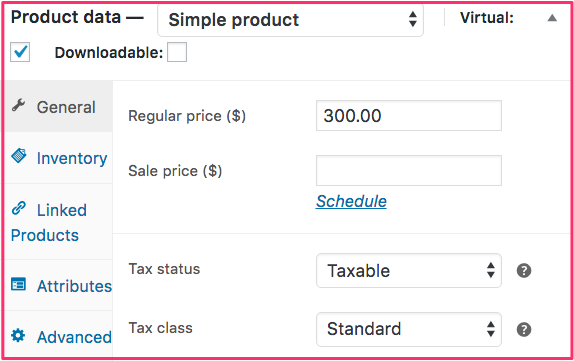 You scroll down to add text. In the Product Data window you may have to click the tiny black triangle to open the window up. You check a check box to add that the product is
- Virtual (removes and shipping data tab) or
- Downloadable (digital).
If neither are checked, the product is a hard good that will be shipped. Fill in the rest of the data and open the Product Short Description window.
The product data window in the image above is open in the General view. There are four other views that should be looked at.
Note about sales to foreign countries
In 2016 a Canada Revenue Agency website said
Goods and services that are normally subject to the GST/HST may be untaxed when exported from Canada. In this case, they are referred to as “zero-rated” goods or services.
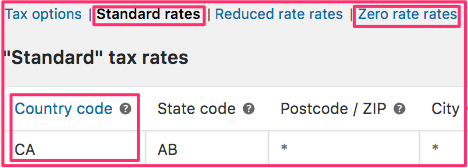
In this example, every line in the Country Code column has a “CA” in it. There is a line for every province & territory.
It is not shown here, but, you can go to the Zero Rate Rates page. The Country Code column has nothing in it.
This scenario tells you that
- Every sale within Canada would have sales tax added
- No sale outside of Canada would have any sales tax
HTTPS
Just as “http://” means “this is a website,” seeing “https://” means “this is a website, and it’s using SSL to encrypt data and authenticate the website.” SSL (Secure Socket Layer) is a protocol used on the web for encrypting website data so data sent from the browser to the server and vice versa is protected.
The above paragraph means that you should buy an SSL certificate to make sure web hackers don’t steal money from you or your customers.
If your website is hosted with LiquidNet Ltd Hosting, the quickest way to buy & set up a low-cost SSL certificate is to follow these instructions.
The prices for SSL certificates range from free to over $1000/year. When getting an SSL certificate, the most important characteristics of it are
- Level of Encryption (256 bit is recommended)
- Browser Recognition
- Warranty
Where to buy a CHEAP SSL certificate
It is possible to buy affordable SSL certificates for your online store for less than $10/year.
- NameCheap
- StartSSL
- Let’s Encrypt (free, and available on some web hosts with a one-click install).
setup
Go here to learn how to buy & activate your SSL certificate.
Go here to learn about webhooks.

Security Info
Here is what LiquidNet tech support told me about security: The API is not a SSL extension and both have nothing to do with each other, except work together.
A SSL certificate is used to encrypt the data transfered over the web on your website.
You load the website, the SSL encrypts the request to load the website to the server and then decrypts it on the server. That way if you were to build a store on your website and a client provides personal information it will be encrypted, uploaded to your store and then decrypted. Therefore a secure encrypted connection over the web.
The SSL does not provide protection against hackers, it protects data which is routed over the web. From the website visitor to the server.
In order to protect your self against hackers, you need to keep the outgoing security manager active and the mod_security as well. Both can be managed from the Advanced section of your hosting control panel.
You also need to use strong passwords for your hosting account, FTP Accounts and for the administrative accounts of your websites.
You should always keep your applications, plugins and themes up to date, because outdated software contains many security holes.
You should always keep a local backup of your websites so you can restore them if needed (our system keeps backups for as long as 30 days and then the oldest backups are being replaced by newly generated ones).
As an additional security measure you can also enable Jail Host for your domains and subdomains. The Jail Host feature prevents the scripts hosted on one of your domains from accessing directories outside the root directory of the domain they are hosted on.
WordPress theme
Storefront is the theme that was supposedly designed to fit perfectly with the WooCommerce plugin. The recommended Storefront header size is 1950 x 500 px. I made and installed a header that size. The menu and other text was right on top of the header.
So, I switched back to the Twenty Sixteen theme. Everything works very well now.
Coupons
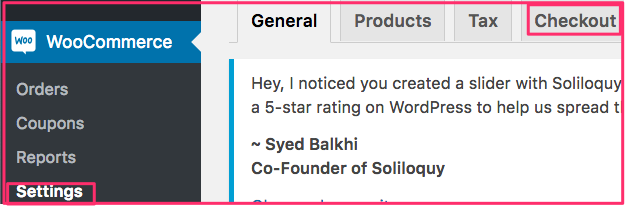
To create a coupon, go to your WordPress dashboard. Then go to WooCommerce > Settings > Checkout. Make sure the use of coupons has been enabled.
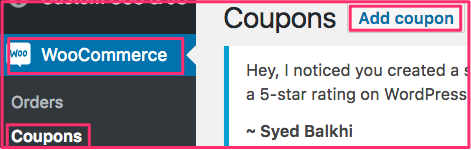
Then go to WooCommerce > Coupons > Add Coupon.
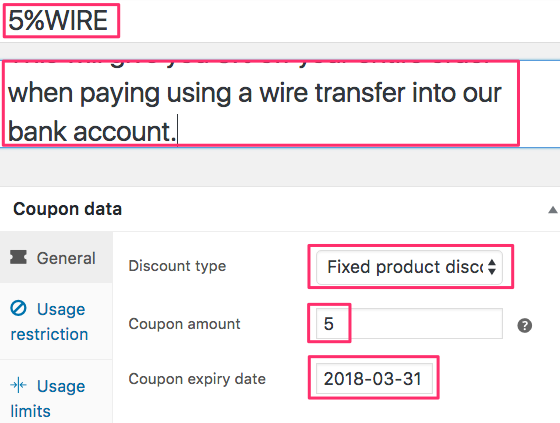
Fill in the blanks and then click the Publish button. Make sure you have given your coupon a unique name such as 5%wire.
The coupon in this example is from Kelowna Virtual Assistant. The store on that website sells virtual assistant services such as website design. When people pay for the services, they can get 5% off by paying with a wire transfer.
Bank transfers (BACS)
Here’s how bank transfers work with WooCommerce:
- Once your customers select this payment method, your account details will be displayed to them so that they can make the payment.
- The order will be on-hold, until you process it in your dashboard when you have successfully received the payment in your account.
Interac e-Transfer
With Interac e-Transfer you can send money to anyone with an email address or mobile phone number and a bank account in Canada. You will not share any personal financial information.
temporary link Display on other page so that can finish this post
Buy & activate your SSL certificate
I’ve been designing websites since 1996 and by far my favourite web host is LiquidNet Ltd Hosting. For $35 (USD) per year you can get a single website with a huge number of features plus world class tech support.
Just before my store went live, LiquidNet tech support asked this: Would you like me to move the connection with the site to https://kelownavirtualassistant.com/ at any time so that you can take the full advantage of the ssl ?
That was because I asked by the “s” was not showing up after the http.
Purchase a certificate for your online store
If you have LiquidNet Ltd Hosting, you can purchase a $19 SSL certificate by going to My Domains > SSL Certificates > Order Certificate tab on your web hosting control panel.
No further action
Note that after you buy the SSL certificate from LiquidNet Ltd Hosting, they do all of the installation for you. You will get an email from the SSL creator.
They will suggest further action. LiquidNet has done all of that for you. Ignore the email. No further action is necessary.
Installation instructions
Input the following details in the order form:
CSR Details
Organization Name: Type in the exact legal name of your organization. Do not abbreviate the name of your organization.
Organization Unit: Specify the exact department of your organization (optional).
Country: Select your country from the list.
State: The state or province where your organization is legally located. It should not be abbreviated.
Hostname: The fully qualified domain name for your web server, e.g. www.my-best-domain.com. This must be an exact match. (If using LiquidNet Hosting, use the dropdown arrow to find your domain name.)
E-mail: Type in your personal e-mail address.
Note that none of the following characters can be used in the details: < > ~ ! @ # $ % ^ * / ( ) ?.,&
Contact Info
All fields are pre-filled with the details you provided for your hosting account. You must select an “Approver E-mail” at the bottom, which must be an e-mail account hosted here (one created in the E-Mail Manager on your web hosting control panel).
Purchase Details
Select the registration period – the longer, the cheaper per year.
Make sure you read the User Agreement and select the checkbox next to “Accept User Agreement“, then select a payment method and finally click on the “Continue” button at the bottom to complete the order. You will be forwarded to a billing gateway page to submit the payment.
Once your payment has been submitted, you will be able to see your newly ordered certificate in the “My Certificates” tab in Site Management > SSL on your web hosting control panel. As soon as the status is changed to “Active” you can apply the certificate to your domain.
Install certificate
To install an SSL certificate to your domain go to My Domains > Hosted Domains and find your domain (or subdomain) in the list and click on the edit icon on the right. On the next page click on the “Secure Socket Layer (SSL) :” drop-down menu at the bottom and select the option to “Upload SSL certificate” – as soon as you select this option, 4 text fields appear uder the form:
CSR
Private key
SSL certificate
CA
All four of the above have been generated when you purchased the certificate and you can get them from My Domains > SSL Certificates. It would be best to open the SSL section of the control panel in a separate tab and copy-paste each of the four. When ready, press “Upload SSL certificate“.
If you have followed this tutorial strictly, now you should have SSL activated for your domain. You can safely accept payments in your online store.
Your new preferred URL will be in this form: https://www.kelownavirtualassistant.com.
Please note that you will need to redirect your ‘http’ traffic to ‘https’ to send all visitors to the new secure URL automatically.
Optimizing checkout flow
from https://woocommerce.com/2016/03/optimizing-woocommerce-checkout/?utm_source=WooThemes&utm_campaign=949cac9614-AUTOMATION_Post_Purchase_Project_4&utm_medium=email&utm_term=0_13860df971-949cac9614-253681709&mc_cid=949cac9614&mc_eid=7a0f2d0734
In order to avoid losing sales, you must get your store’s checkout “flow” as smooth as possible. Here are some tips on optimizing checkout flow:
Investigate default checkout
The default checkout is about as smooth as possible. It has a minimum display of fields. From the online store shopping cart you go directly to a page with no more than:
- Billing & shipping info
- Order summary
- If multiple shipping or payment options, quickly toggles to correct option.
Potential checkout issues
These issues can cause you to lose sales at the checkout counter:
- Unnecessary fields (middle name, title, multiple lines for address, order notes…)
- Unnecessary re-confirmations or reminders of products, pricing, or any other information already entered
- Links to other pages — Don’t distract the shoppers too much
- Insisting they create an account instead of allowing guest checkout
Buy now button anywhere
![]()
You can add a Buy Now button to any page in your WooCommerce website by using the QuickBuy button.
Go to Plugins > Add New and search for “quick buy”. Install & activate the WooCommerce Quick Buy button. Go to WooCommerce > Settings and you will see the above menu. Click on WC Quick Buy.
Editor’s note: I found it best to have an Add to Card button on each products page. So, I deactivated Quick Buy.
Change button style
Button CSS class: single_add_to_cart_button.
Button internal style: .single-product .product .single_add_to_cart_button.button{.single-product .product .single_add_to_cart_button.button{ background-color: #144b85; color: #d7f5fe;}.woocommerce .product .add_to_cart_button.button{ background-color: #144b85; color: #d7f5fe;}
Change the hexadecimal numbers to reflect the colour styling of your page.
Complete documentation of Button Style page.

WooCommerce Guided Tour Videos – WooCommerce Docs
Add new products
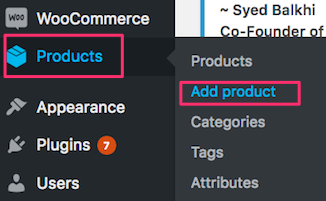 To add new products to your WooCommerce store, click on Products in your WordPress dashboard. Then click on Add Product.
 Make sure you study the Product Data section.
General
To get unique IDs, regular & sale price, etc.
Add to cart button
![]() When you add the regular price in the General setting, you automatically add an Add to Cart button to the Product Short Description section of the page.
When you add the regular price in the General setting, you automatically add an Add to Cart button to the Product Short Description section of the page.
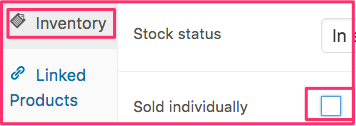 Notice the number 1 to the left of the Add to Cart button. If there is a number in that space, you can add the quantity directly from this button. In order for this to happen, the sold individually box must be left unchecked.-
Inventory
Set stock quantity, allow backorders, allow to sell individually, get SKUs,etc.
Shipping
Give each product
- Weight
- Dimensions and
- Shipping class.
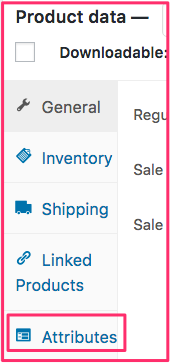
Attributes
When you click the Attribute link, you can help customers group products by attributes. For instance, a women’s clothing store can group by
- Dresses
- Skirts
- Belts, etc.
Linked products
Promote related products to get more up-sells & cross-sells.
Advanced
- Note to customer after purchase
- Menu order
- Enable reviews
 Product photo
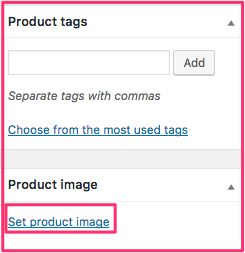 A photo should be perfectly square. You insert it by clicking Set Product Image in the right-hand column.
Related product pictures
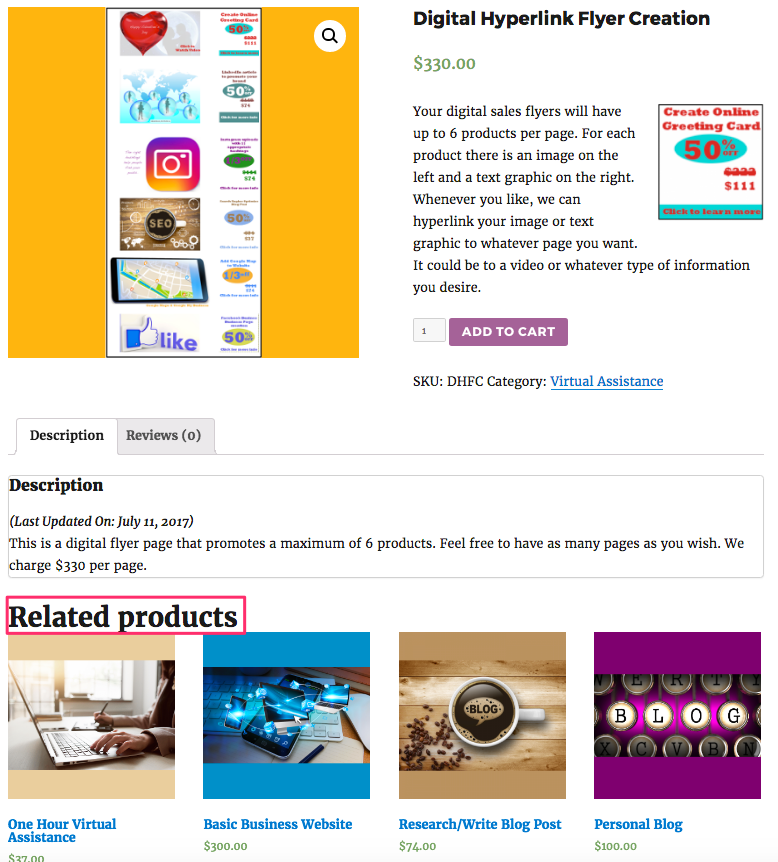
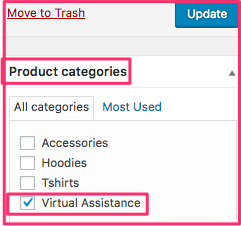 You may want related products to show up below a corresponding product page. To do that you create product categories in the right-hand column. In the example to the left, all products that have Virtual Assistance checked off will show up below all other products in that category.
It seems to me like only 4 related products can show up. You may have more than 4 products in a category. If that is the case and you want a certain product to show up, make sure you have the special cross-sell or up-sell product in your Linked Products section.
Publish
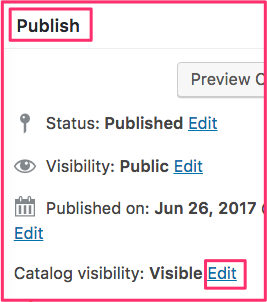 When you edit the product visibility, you decide whether it will be available
- From both the search engines & catalogue
- In the catalogue only.
To find much more detail about any of the product-adding features, go to the WooCommerce Manage Products page. Cmd F to find the section you are having problems with.
Delete products
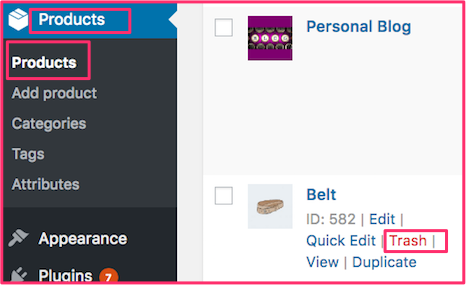 To delete a product, go to Products > Products. Click on the product you wish to delete. Click on Trash.
Empty cart
![]() To empty your cart, go to the cart page. The URL will end like this example: http://kelownavirtualassistant.com/cart/. You will see your cart with product in it. To remove the product, click on the little red “x”.
To empty your cart, go to the cart page. The URL will end like this example: http://kelownavirtualassistant.com/cart/. You will see your cart with product in it. To remove the product, click on the little red “x”.
PayPal
How get API username, password & signature for Paypal.
Accept credit cards using Stripe
 Stripe is a FREE WordPress plugin. Install & activate it. The reviews have some negative comments.
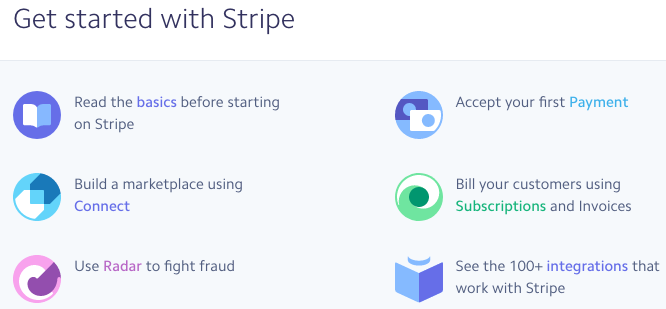 So, as soon as you have set Stripe up, I suggest that you read the links in the Get Started with Stripe section.
This is the link to the Get Started with Stripe page.
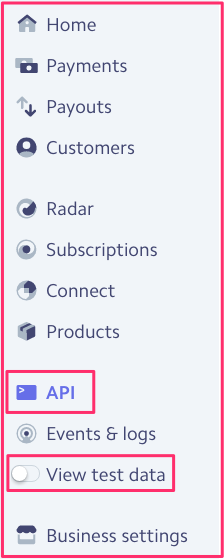 Eventually you will get to the dashboard. If you have filled out your account information properly, the circle to the left of View Test Data will be white.
Then click the API tab. You will see a publishable key token. You can also reveal a test key token.
In your WooCommerce dashboard you can go to WooCommerce > Settings > Checkout > Stripe. Copy & paste the publishable and test key tokens from your API panel to the Stripe checkout boxes called Live Publishable Key and Live Secret Key.
Check list when all finished
![]()
After you are all finished, go to the Stripe dashboard again. Click on the white circle beside View Test Data. It will turn orange and the API codes will now be test codes. Go into the Stripe section of the WooCommerce dashboard discussed above. Copy & paste the test API codes into the Stripe dashboard.
Go into your store and “buy” a product using 4242424242424242 for a VISA number or 5555555555554444 for a MasterCard number. (You can find all of the testing numbers on this page.)
Then look at this checklist to make sure everything else works properly.
FAQ
Q.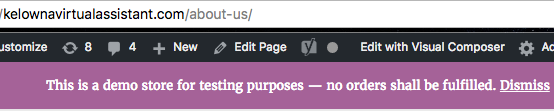 I get a purple stripe when I open a web page. It says, “This is a store for testing purposes — no orders shall be fulfilled.” How do I eliminate that?
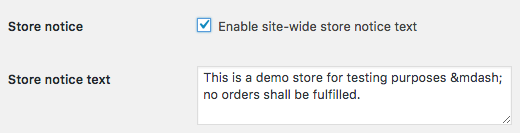 A. Click on WooCommerce > Settings > General Options in your WordPress dashboard. Uncheck the box that says “Enable site-wide store notice text.” Click Save Changes.
Q. How do I get hold of WooCommerce tech support?
A. Here: https://woocommerce.com/contact-us/
Plugin
A WordPress plugin is a piece of software that can be added to a WordPress website to improve the visitors’ experiences.
 Do you want to add a quiz to your website? It can get people more involved. There’s a plugin for that.
- Do you want to add display ads into your right-hand columns? There’s a plugin for that. (See sample.)
- Do you want people to book appointments from your website? There’s a plugin for that.
- Do you want to add slider into your header? There’s a plugin for that.
- There are over 49,000 plugins from which to choose.
Related pages
- WooCommerce Overview
-
How to Install and Set Up a WooCommerce Plugin 2020
Installing & setting up WooCommerce
Read an article called 10 free WooCommerce extensions for new stores to consider. It has links to lots of related pages.
Four ways to make managing your store’s updates easier - WooCommerce Tutorial — How do set up your webite
- Adding & Managing New Products
- WooCommerce Quick Buy button
