
Category: Uncategorized
Image Words
Sometimes text can be for effective if we use image words.

Classic Editor
Start with Classic Editor
Make sure you have the WordPress plugin called Classic Editor. If you don’t have it, install it now.
Order of operations
- Install & activate Classic Editor.
- Log into rumble.com.
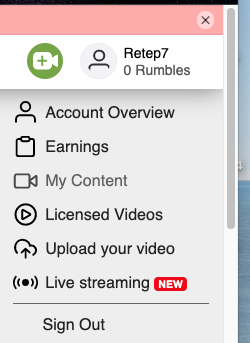 Click on your username in the upper right-hand corner and click on My Content.
- Click on the video you wish to embed.
- Click on the word Embed below the lower right-hand corner of the video.
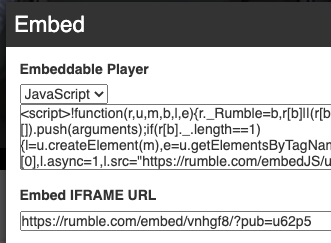 Copy the address under Embed iFrame URL into your clipboard (Cmd C).
 Cmd V to paste the URL into your page in text view.
Save the page and view it. The Rumble video will show up where you embedded it.
Malware, How to Remove It from Your Mac
What is malware?
Malware is a contraction of malicious software. It is designed to damage devices, steal data and/or cause chaos. Examples are ransomware, Trojans, viruses & spyware.
How to remove the malware
Go to malwarebytes.com/mac. Click on the Free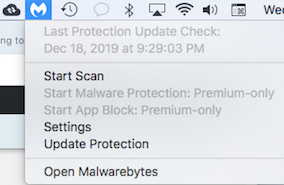 Download button. (It’s free for 14 days.) After opening the program, click on the Malwarebytes icon at the top of your screen. Then click
 Start Scan.
After I clicked on Start Scan, I got rid of 26 different threats to my computer. I had no idea that any of them were there.
How to protect your device against malware
- Double-check any downloads. Before downloading, read comments and reviews to decide if you should trust the site.
- Be alert when clicking on emails from unknown sources or suspicious profiles and outrageous offers on social media.
Related pages
Keynote Not Working After Upgrading to High Sierra
Version of Keynote obsolete
 I upgraded from El Capitan to High Sierra on my old (2011) iMac desktop. Now my Keynote program will not work. What can I do?
Friend with Mojave or Catalina?
If you have a trustworthy friend or family member with either the Mojave or the Catalina operating system on their iMac, your problem can quite easily be solved.
Keynote 08 4.0.4 will work on a 2011 iMac that uses the ![]() High Sierra operating system. It is available at no charge from the App Store. However, you cannot download Keynote from the App Store without doing a little bit of weird account activation.
High Sierra operating system. It is available at no charge from the App Store. However, you cannot download Keynote from the App Store without doing a little bit of weird account activation.
Your friend creates a new account
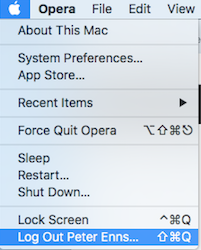 The information below is from an Apple Support article about creating a temporary user account. Your friend begins the process by going to the Apple menu and logging out of their Apple account. Then they follow the 6 steps below.
- They choose Apple menu () > System Preferences, then click Users & Groups.
- They click
 , then enter an administrator name and password. This will be your Apple ID and password.
 - However, before entering your information, they will have to give their computer password for security reasons.
- Click the Add button (+) below the list of users.
- Complete the fields shown for a Standard or Administrator account, then click Create Account (or OK).
 Then they click on the App Store icon. They download a copy of Keynote (it’s free) for the new user.
Now the App Store with “know” that you have purchased Keynote. Now you will be able to do it again in your old iMac.
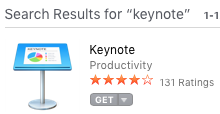 You open the App Store and search for “keynote”. The first app in the upper left-hand corner will be the one you see in the image.
You order Keynote and your computer will automatically download the version that is compatible with your computer and operating system combination.
Enfold Header, How to Add One
Enfold header with pictures fading in and out
 This post will show you how to make an Enfold header similar to the one in the animated GIF here. It will have 3 pictures. Every few seconds the pictures will fade out and change places.
Step by step instructions
- Click on blue Advanced Layout Editor button.
- From Layout Builder, drag a single column layout element to the location of your header. (Note: The background will be light green as you drag your mouse over it.)
- From Media Elements, drag the Fullwidth Easy Slider into the light green space above the single column layout element.
- Click within the Fullwidth Easy Slider element.
- Click on the Add Multiple Images button.
- Your images should fit into an Enfold header 1310 px wide & 300 px high.
- Drag and drop your images into the library if they are not already there.
- One at a time, click on your desired image and then click on the blue Insert Images button in the order you would like them displayed.
- You can experiment with the various options. If you want your pictures to display like the sample at the How to Serve Customers with Disabilities website, the dropdown boxes will be displayed as follows:
- No scaling
- Yes, stretch the image
- Fade
- Always load videos
- Yes
- Do NOT check the Stop Autorotation box
- 3
- Hidden.
- Do NOT check line beginning with “Use first slides”.
- Click the blue Save button.
Related page
How to add content to an Enfold theme page
Contact Form Not Sending, Working Around the Bug
 A serious bug
Enfold is by far my favourite WordPress theme. However, I have found one serious bug. It’s in the Enfold contact page. When people try to contact us, they get a message saying the email was sent. However, it does not come to us.
I went online and many other people are saying the same thing.
The problem most likely stems from the fact that mail service providers apply stricter rules year by year. This is to protect users from mail abuses like spam and spoofing.
The Enfold contact page solution
I found the solution to be Contact Form 7. This WordPress form can manage multiple forms and allow you to customize your forms.
The steps below tell you how to get a Contact Form 7 onto your page.
1. Add new WordPress plugin
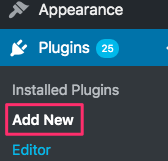 Go into your website in edit view. In the black column on the left-hand side, go down to Plugins and click Add New.
In the search box enter Contact Form 7. When it shows up, click on Install Now and the Activate.
This plugin will now be activated for any of the web pages in your website. You will need to add a shortcode on any page that requires a contact form.
2. Add Contact Form 1 shortcode to page
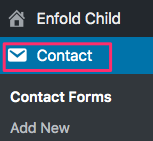 Look at that black column on the left-hand side again. There is a new word, Contact. Click it and then click on Contact Forms. Click on Contact Form 1.
At the top of your new page you will find a shortcode. Click within the blue bar and then Cmd C to copy it into your ![]() clipboard.
clipboard.
3. Paste code into website
Decide precisely where you want the Enfold contact form to display. Go to that page in edit view.
a. Drag a 1/1 layout element to the place on the form where you want the form to go.
b. Drag a Code Block content element into the 1/1 layout element.

c. Click on the code block. Cmd V to paste the code into the first block. Click Save.
4. Add your email address
a. Click Contact in the black left-hand column again.
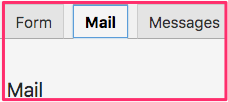 b. Click the Mail tab.
c. In the To box, add the email address to which the form should be sent. That will likely be your own email address.
d. Click the blue Save button.
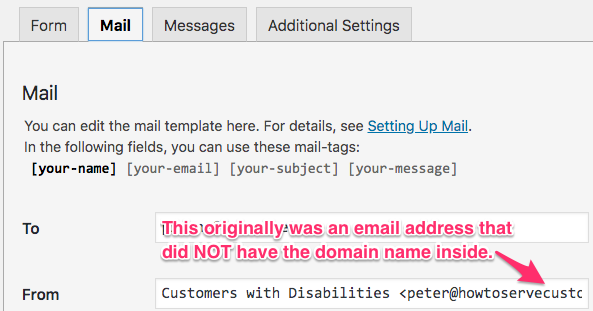 e. I had to do lots of troubleshooting to get my forms to send. Eventually, I found out that the email address in the From section under the Mail tab had to have form’s website domain name in it.
My form was in howtoservecustomerswithdisabilities.com. I solved my problem by having this email address in the From box: peter@howtoservecustomerswithdisabilities.com.
With my web host, I had set up an email forwarding from that address to my regular email address.
5. Set up Contact Received messages
When you click on the Messages tab, you see a list of messages you will see in various situations. The default messages are things such as
- Thank you for your message. It has been sent.
- One or more fields have an error. Please check and try again.
- This field is required.
- This telephone number is invalid.
If you want any of these changed, do so and click the blue Save button.
Test your form
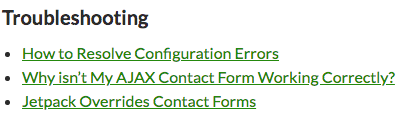 Test your form immediately. If you do not get a test email, go to the troubleshooting section at the bottom of the page and get a solution.
YouTube Video
Related page
How to Set Up Contact Form 7 (for Beginners)
WordPress Login, How to Edit a WordPress Page
WordPress Login
Suppose you have a web page entitled mypage.com. To login for editing purposes, go to mypage.com/wp-login.php. That’s all you need to do for a regular WordPress login.
How to Train Your Staff & Increase Profits
Technology
 In this day and age technology can be a great help when you train your staff. For instance, you can give them a manual to read and then give them an online quiz. In our example, we will discuss training a restaurant staff how to serve customers with disabilities.
Readable manual to train your staff
The training manual, How to Serve Customers with Disabilities, is a 39-page ebook that should be mandatory reading for restaurant servers. The copyright allows you to print out a copy for each of your staff. They read it and then do each of the 3 quizzes. (See Quizzes in the horizontal menu of the page that “3 Quizzes” links to.)
Read the testimonial below from a restaurant general manager.
Testimonial letter
To whom it may concern
 I am writing you regarding a remarkable citizen who needs to be recognized for the challenges he has faced and the difference he has made to lives of many in our community and his accomplishments.
Mike Haines has been a citizen of Kelowna since 1981. Mike has cerebral palsy and has never let it stop him from living his life to the fullest.
Mike has always worked hard since coming to town, starting a delivery service on his three wheeled bicycle. He learned how hard it as to navigate the streets with improper curbing. That led him to run for city counci.
Fast forward to the present. He is now in an electric wheel chair and still making the rounds and advocating for people with disabilities as he has learned from personal experience.
Mike has had a tough time making ends meet over the years. But he always sees a shining star. He has recently published an ebook for the service industry on how to serve persons with disabilities. A couple of years ago Mike spoke to my staff about how it feels to be treated and how uninformed and uncomfortable people are on how to serve people with disabilities. It was a great presentation by him and it brought my staff to tears. Anyway, I really think Mike deserves a look for a story and anything we can to do to help bring the tools to the people.
For more information and history on him go to www.michaeldhaines.com . His ebook went live June 14th and it can be found at https://howtoincreaseyourrestaurantsales.com/. (That web address has been made into a short form. You can also go to bit.ly/disabledpatron.)
I am strong believer in Mike and I want him to have some success and recognition which he deserves for all he has done over the years. If you have any questions, please don’t hesitate to call me at 250-215-1495. Thank you for your consideration
Andrew Neville
General Manager
Rose’s Waterfront Pub
1352 Water Street
Kelowna BC, V1Y 9P4
Work:250-860-1141
Cell:250-215-1495
Email: rosespub@telus.net
Final word on Mike
Mike Haines is a fascinating person. Learn a bit more about what he did before he wrote this ebook on how to train your staff.
How to Set up AWeber Email to Quickly Autorespond
Free 30-day AWeber trial
 I really enjoy working with the tech support people at AWeber. With all of their help, my AWeber email marketing got off to a great start.
To get started, start a free 30-day trial now. After the thirty days is up, you will pay AWeber monthly. I get a small portion of that.
Setup a list
 To start sending an AWeber email, you first make a list. A list is a way to separate subscribers with common interests into different groups for easier targeting. Whenever anyone signs up to your list, they are doing so to receive a specific kind of information from you.
For instance, depending upon who wants what information from you, the points in the above list include Merchandise, Economy and Company Deals. When people send a request via AWeber, they could be sent emails about merchandise, the company economy or else company deals, depending upon where they sent their request.
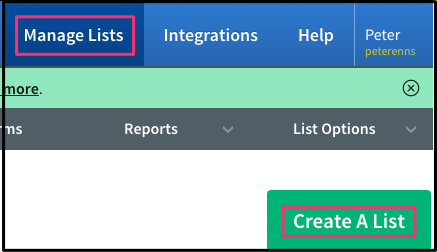
Click Manage Lists in the top horizontal menu and then click Create a List. Simply follow instructions.
Create messages
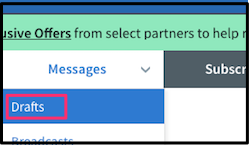
Click on Messages > Drafts and then click on the drop-down arrow in the green Create a Message button.
I usually choose HTML editor so that I can add hyperlinks, change fonts, etc. There is even a paper clip in the lower left-hand corner so that you can attach a file.
Insert your subject in the upper left-hand corner.
I usually begin my message with this: Hello {firstname_fix}!. That way the AWeber email will be personalized.
Legacy Follow-up Series
Legacy Follow-up Series in another term for autoresponder.
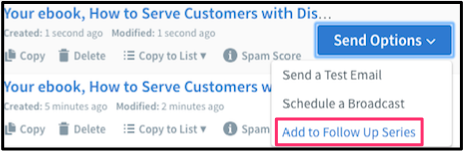 Click on Messages > Drafts. To the right of each message is a Send Options link. From the drop-down list click on Add to Follow Up Series.
This will be one of your messages that will be emailed out.
Under Interval you can use the drop-down box to decide how soon you want it sent out. If you want it sent out less than a day from time of an action, use 0.
You can use this process for as many emails as you want to send out. I like to use a total of 2 emails. The second one links to a web page with a thank you message. If the messages are in the wrong order, drag and drop them so that the one on top will be the first one sent out.
Related AWeber email pages
How to get ebooks automatically emailed at time of payment to PayPal
If this blog post has insufficient information, go to this page and click on the icon in the lower right-hand corner. You can start chatting with AWeber tech support to get more information.