
Getting started with WordPress
 So you want to have a website with a WordPress blog. This post explains your website setup from the very beginning to a working (very simple) website. Other posts in this blog will explain setting up
- Your home page
- Horizontal menus
- WordPressBlog
- Etc.
Website setup in 3 steps
Note that you have to set up everything in the exact order you see here.
1. Get a domain name
You want to start by registering a domain name that matches your business name. The domain registration blog post explains how to do that.
Part of the process of registering you domain name is linking it to your web host. This is called changing the DNS (domain name servers) information. The DNS blog post will show you how to do that.
2. Host your domain name
Since I started creating websites in 1996, I’ve used many different web hosts. In terms of price, tech support and other features LiquidNet Ltd Hosting is by far my favourite host.
The instructions in this post assume you are using LiquidNet. If you are using a different host, you will have to adjust these instructions accordingly.
Log into your LiquidNet Hosting Control Panel. Go to My Domains > Hosted Domains. If you cannot figure out how to add your new domain, open up a new ticket with tech support and ask them.
3. Add WordPress to your website
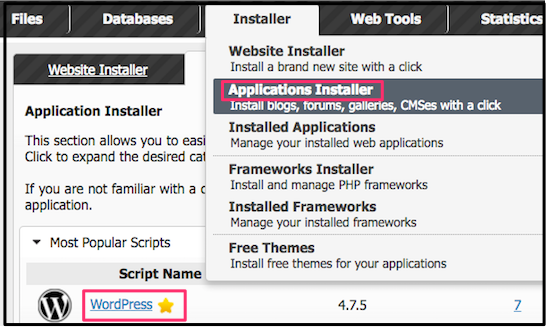
If you are using LiquidNet, go to Installer > Applications Installer and click on the Install icon in the WordPress line.
You will see a new panel called Install Application. Make sure every line is filled in properly:
- For the In Directory line, leave only the slash.
- Select and delete the word “wordpress”.
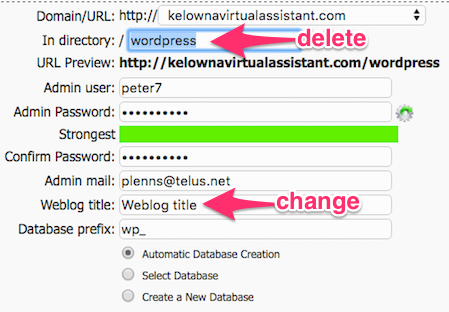 Select “weblog title” and change it to a name that describes your business.
- Keep the radio button on Automatic Database Creation
- You will see a number of templates. Use the forward and back arrows to help you choose one you like. (I Installed the Twenty Sixteen WordPress Theme.)
- Click the Install WordPress button.
- Click the Visit Admin Area button
- You can start creating your posts & pages
- You will get an email giving your login URL, username & password. Record them in a safe place — cryptically if possible. (The default username is Admin. Do NOT use that. You want to make it difficult for hackers!)
Notes on Posts & Pages
When you click New in the top of a WordPress Post or Page, you will get a choice of Post or Page. A Post will be part of your blog. When you scroll down to the bottom of a Post on the Internet, you will see a Previous and a (usually) Next button. They will link to the corresponding blog posts.
Any other page you create will be a WordPress Page. E.g., Home, About Us and menus for the various blog categories will all be Pages.
Website setup finished
As long as you performed all of the above steps in the exact order, your website setup should be finished. You should be all set to start creating WordPress pages & blog posts.
If you still have problems, use the search box or else the Blog menu to find the answers.
