Contact Form to Email
Wanting to set up a brand new contact form in my new WordPress blog, I decided to choose Contact Form to Email.
Setting it up was challenging. The creators of Contact Form to Email say that they have 40,000+ users. I sort of suspect that most of those forms were set up by people who do this type of thing for a living. The setup process was not intuitive at all.
I persevered and decided to create this blog post so that you would not have to persevere so hard.
![]() Start by going to plugins > add new and enter the word form in the search box in the upper right-hand corner. That will give you a large number of WordPress plugins with the word form in the title.
Start by going to plugins > add new and enter the word form in the search box in the upper right-hand corner. That will give you a large number of WordPress plugins with the word form in the title.
You will see the Contact Form to Email graphic above. Notice that the form has only three and a half stars. I suspect that’s because the installation process is so non-intuitive. After I finally got it set up, the form works perfectly and I am glad that I chose this particular contact form. I’ve worked with other forms and this one is my favorite WordPress contact forms.
Click on the blue Contact Form to Email and then click the blue Install Now button on the lower right-hand corner. Wait half a minute while it downloads and then click the Activate Plugin link.
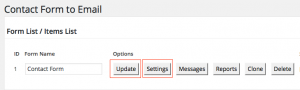 The name of the form will show up near the bottom of the black left-hand column. Click on it and six tabs will show up.
Click on the Update tab and you can fill in your email address in the Send email from and the Send to email(s) tabs. Save by clicking the Update Report Settings button.
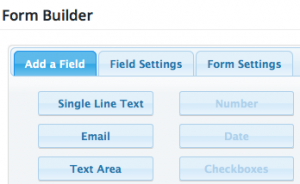 Click the Settings tab near the top of the page. Fill in the blanks and then scroll down to the blue form builder. With the Add a Field tab selected, click on a box type such as Single Line Text. Then select the box you created and click on Field Settings > Field Label box. Change the label to Name or whatever you want to call it.


Earn a percentage of the selling price for every book sold.
Click here to learn more.
At this point you can drag and drop your new box up to the point where you wish it to be located. Alternately, you can click on the tiny blue garbage can if you wish to delete it. Scroll to the bottom and click Save Changes.
Now you should create some sort of form sent page. In my case I named my new page thanks. The message was Your form has been sent. Go back to the Settings page and insert something such as this after Thank you page (after sending the message) — http://My-website.com/thanks. Don’t forget to save it.
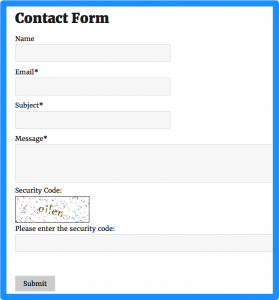
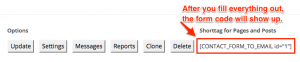 The form code will show up after your items list. Copy this code into your clipboard and paste it where you wish your form to show up. This can be either in visual view or text view. After you update the page, a contact form such as the one below will on your page or post. Test it. If you are having any troubles at all, look for the word help while you are trying to create your form.
Possible error
There may be an error on the WordPress Contact Form 7. It that is your problem, here is a solution I found online. It is a Quick Fix to spinning arrow displays forever & no success/error message displayed.
You can go to the contact form plugin settings in admin and add a file upload field in your contact form. If you don’t want to display the file upload field in your form then you can simply make it hidden. Like this:-
|
1
|
<span style=“display:none;”>[file file–upload]</span>
|
Here, file-upload is the name of the file upload field.
More information about Contact Form to Email
 Peter Enns has been developing websites since 1996. He is a social media blogger and author of a free YouTube tutorial. It’s called 7 Day YouTube and will teach you how to make entertaining videos & animated GIFs.