Animated GIFs with bouncing objects
This page explains how to use  Keynote and ScreenFlow to make the bouncing balls like you see in this animated GIF.
A picture is worth a thousand words and a video is worth a lot more. So, I highly recommend that you watch the video below to help you understand the instructions that teach you how to make an animated GIF of a bouncing ball.
Bouncing ball instructions
 Follow the instructions below in the order they are given. It may be a good idea to pause your video occasionally, read an instruction below and then carry out the instruction using your memory of what happened in the video.
With practice you will be learn how to make objects bounce in your videos. (The points below assume you are using a Mac computer.)
-
- Using a free program called GIMP, create a coloured circle.
- Open a free program called Keynote.Click the Add Slide button and then add a new blank slide.
- Drag your circle from the Finder to the Keynote slide.
- Make the circle smaller and drag it into the lower left-hand corner.
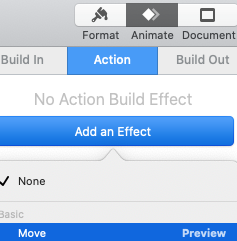 Click Animate > Action > Add an Effect > Move.
- Using the numbers at the top of the page for a reference, hold the centre of the circle with your mouse and drag it up to the proper number. (In your next slide, you will want to take a circle and insert it up
 at THE SAME NUMBER. In this example it will be 400.)
 - Click on the circle and then press Cmd C to copy it into your clipboard.
- Click on Add Slide and then click on the Blank slide icon.
- Press Cmd V to paste the circle from your clipboard onto the new slide.
- Click on the circle to select it and then click Animate > Action > Add an Effect > None in order to delete the Move effect from the circle.
- Move the circle to the top of the screen at the same number (400) as you had in point number 6 above.
- Click on the circle to select it and then click on Animate > Action > Add an Effect > Move.
- Drag the centre of the circle with your mouse and drag it to the bottom of the screen similarly to what you saw in the video.
- Select your circle (that means click on it) and press Cmd C.
- Click on Add Slide > Blank slide.
- Cmd V to paste the circle into your new slide.
- Select circle and click on Animate > Action > Add an Effect > None.
- Select circle and click on Animate > Action > Add an Effect > Move.
- The next few points show you how to place the circle at precisely the right point on the lower line. You will start by going to a circle on a previous slide, select it and Cmd C to copy it into your clipboard. This is illustrated in the animated GIF to the right.
- Return to the slide on which you wish to add the Move effect.
- Cmd V to paste it.
- Select that new circle and click on Animate > Action > Add an Effect > None.
- Move that new circle to the bottom at the 600 point. (Watch in the animated GIF where the blue arrow points to the 600 point at the top.)
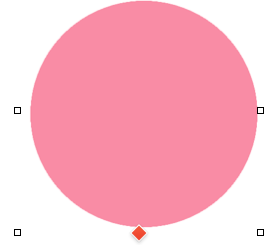 Click on the red circle at the top of the slide. Then click on the red diamond at the bottom of that circle.
- You will see the end point of the moving circle. Drag it over the new red circle that is at the 600 point.
- Click some white space and that end point circle will disappear.
- Click on the circle at the bottom 600 point and press the Delete key.
- Press Play to check your work.
- Repeat the above exercise to make a circle move from the 600 point to the upper right-hand corner.
- Now repeat the above exercises to make the circle go from the upper right-hand corner to the 600 point, to the 400 point and back to the lower left-hand corner.
- Check your work to make sure it looks similar to the animated GIF at the top of this page.
- Go to these instructions and change your video into an animated GIF.