
Previous
Duplicate parts of images
For this exercise, we will duplicate the dark haired girl in the empty space. 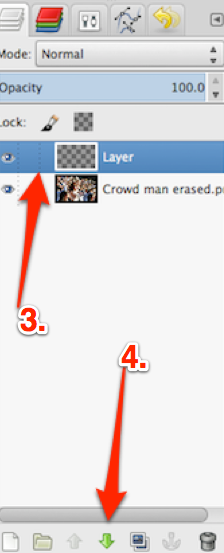
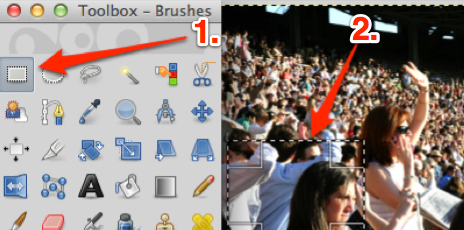 1. Click on select tool.
2. Draw rectangle around dark haired girl
• You will notice dotted lines
• Press cmd-C to save selected section in your clipboard.
• Select picture with blank space and press cmd-V to paste the girl
• Drag her so that she covers erased space
3. Right-click on layers panel
• This opens a create a new layer window.
• Make sure the “transparent” radio button is selected and click on the OK button.
•D rag the image to what you feel would be ideal location.
• Right-click in layers panel again and select merge down.
4. Alternately, can click on green arrow to merge down.
![]()
![]()
![]()
Changing the background

![]() • Notice that partial blue shirt behind girl looks out of place
• Notice that partial blue shirt behind girl looks out of place
• So, replace that with crowd in background
• Using what you learned in two sub-sections above, erase blue shirt leaving a checkered transparent background.
• Select original picture of crowd and then click File > New > OK
• This will create a new panel identical size to 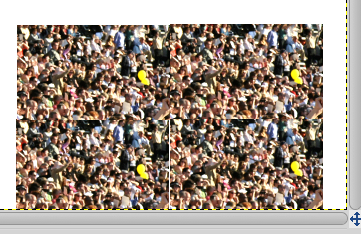 picture of crowd
• Click on select tool and draw rectangle around distant crowd
• Cmd-C to copy crowd into clipboard.
• Select new blank panel and cmd-V four times to copy the crowd in same area of screen where the things were erased.
• (Notice that the pictures paste in centre of screen. You must drag and drop them in appropriate location.)
• Click on picture with erased area
• Cmd-C
• Paste it onto the panel with small crowds
• Now man’s blue shirt has been replaced by crowd.
Text
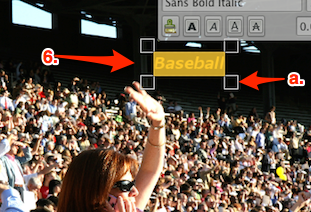
 You will now type the word “baseball” in the black space above the crowd. Follow the numbers in the illustrations.
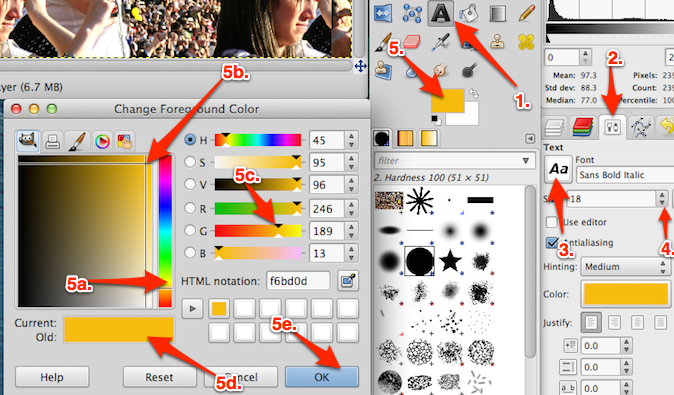
1. Select the text tool
2. Select the text menu panel
3. Select your font
4. Select your font size
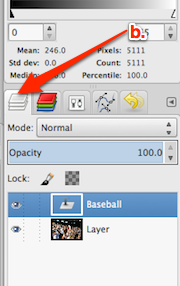
5. Your foreground color was black Double click the black rectangle.
a. Select yellow in the color bar
b. Move slider close to tone you want
c. Slide black triangle to add some red to color
 d. Your current color will be in this box.
e. If you like final color, click OK
6. Click on the black area, type “Baseball” and press cmd-A to select all letters.
• Use dropdown arrows on #4 to find ideal font size
 a. Use sizing boxes to make panel larger or smaller.
b. Use boxes on left to change initial position of text
c. Select normal layers panel
d. Right-click and select Merge down
e. Save your new picture.

Keep practicing
The above points represent the basics of GIMP. Keep practicing them until you understand them perfectly. As time goes by, you can find YouTube tutorials showing you more of the finer points about this free photo editor.
More tutorials
There are many more tutorials on the official GIMP website.
Previous page
CURVES, GIMP
How to draw a curved line
- These are called Bézier curves
- We will show how to use GIMP to draw a curved graph
- Moving in with volume increasing geometrically over time
- Watch YouTube video for example
Drawing a curved line
 Draw straight line with GIMP
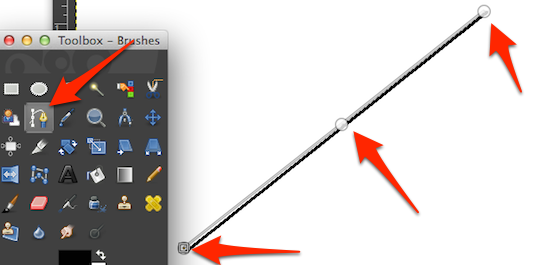
- Click on Paths tool
- Click on either end of straight line and also in middle
- Light grey line alongside darker line
- Drag middle point to an end point
- Drag light grey line away from darker line
Manipulate the handles

- As you drag light grey line
- Notice handle showing up at either end of straight line
- Manipulate handles for several minutes until
- Good idea of how they can change curved line
Triangle with a curved side
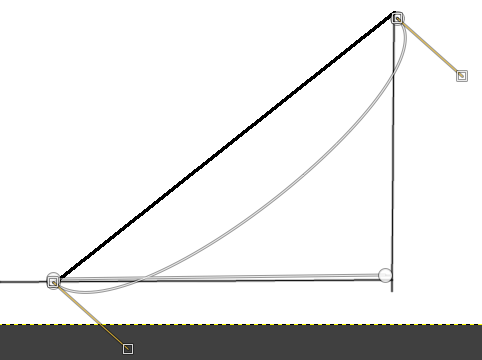
- Make a triangle making sure all lines connect
- Select the Paths tool and make points at top, middle and bottom of diagonal line
- Then make a point at the right angle
Create the ideal curve

- Try to show a curve that is increasing geometrically as it moves to right
- Drag handles until curve is approximately like illustration
Removing the area beneath the curve
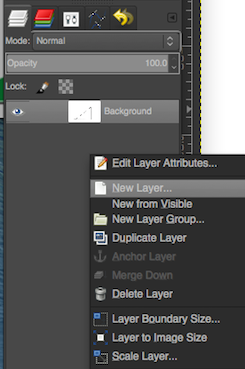
 Right-click in layers panel
- Select New Layer
- Click on Transparency > OK
- That will create transparent layer
- Right click on the layers panel and select Merge Down
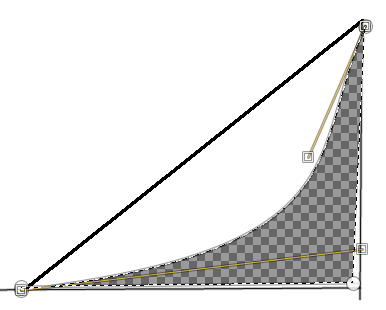
- (A transparent layer is useful because can delete part of opaque layer to see it
- When saved as PNG file, you will then be able to see the images in other layers beneath the deleted part)
- Click on Select > From Path
- Click on Edit > Cut
- That will expose area beneath curve as you see here
Save as a PNG file
- To manipulate image in another program (such as Keynote),
- Saved as a PNG file.
(I could not do this at first. After much study and frustration, I found out that GIMP 2.8.10 has a bug. I downloaded GIMP 2.8.14 and no longer had a problem.)
(Some people write Bézier curves as Besier curves if they cannot quickly create the accent.)

