Why my SlideShare posts needed repair
 I changed web hosts. That meant that the URLs of each page were different. So, none of the links from my SlideShare presentations to my web pages worked. This pages describes a fast way of making the repairs so that all of the hyperlinks would work.
19 steps to repair SlideShare links
SlideShare web page
 1. Go to your SlideShare web page and click on my uploads.
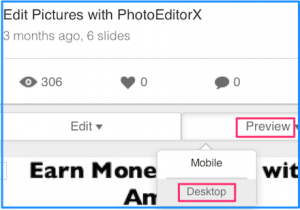
2. Find the post you wish to repair and click preview > desktop.
3. Use Cmd+ to make the images as large as possible.
4.  Use Skitch to make a new picture of each slide.
5. Give each picture a descriptive name. In my case I began by typing PhotoEditorX slide into Skitch export panel.
6. I pressed Cmd C to copy that 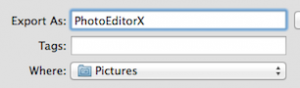 name into my clipboard.
7. Then I added the slide number to the appropriate image name.


Earn a percentage of the selling price for every book sold.
Keynote presentation software
8.  Drag the appropriate images into the corresponding Keynote slides.
9.
Save your presentation with a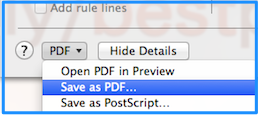 descriptive name.
10. Click file > print > PDF > save as PDF > save.
Create clickable links
11. 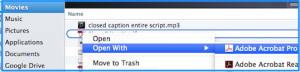 Right-click on the name of that saved PDF file in your Finder. Then click on Open with > Adobe Acrobat Pro.
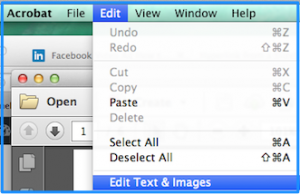 12. Click on Edit > Edit Text & Images.
13. In the right-hand column, click on Add or Edit Link.
14. Then draw invisible rectangle around the text to be linked.
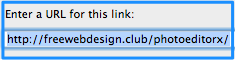 15. Click Next, paste the URL into the box and click OK.
16. As you are working on the file, occasionally press Cmd S to save the latest changes.
SlideShare
17. Go back into SlideShare and find the presentation you wish to repair.
18. Click edit > edit.
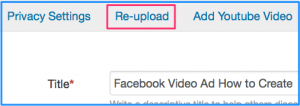 19. That will get you to the page with the title, description and tags from the original version of the slide. Click the Re-upload tab, select the file from your Movies folder and click Upload.
You may have to wait half an hour. After that time the old presentation will have been replaced with the repaired presentation. All of your old information such as the description will still be there. EVERY web page of yours that had the original presentation will now show the updated version.
YouTube video
Watch the YouTube video below to help you understand the concepts on this page.

 Peter Enns has been developing websites since 1996. He is a social media blogger and author of the free YouTube video-creation tutorial called 7 Day YouTube.