
Web host
 This blog post tells you how to install WordPress using LiquidNet Ltd Hosting. Their starter plan costs only $35/year. Installing WordPress is simple if you follow the instructions below. Installing WordPress is complicated without the instructions.
Getting started
♦  Go to the LiquidNet Ltd Hosting website.
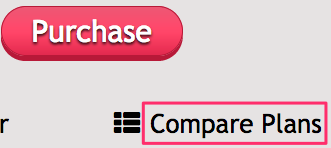
♦ In the Starter column, click Start Free Trial.
♦ Fill in the account owner details
(♦ Pay your $35 after your free month is up.)
♦ Log into your new account.
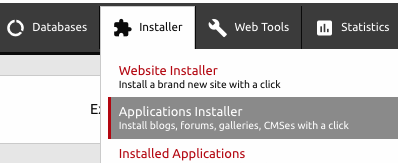
♦ In the control panel click Installer > Applications Installer.
♦ That will get you to a page that has a few dozen different applications that you could install. Click on WordPress.
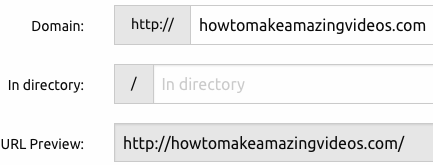 ♦ That will include a panels that includes the boxes to the right. Change the domain to the domain you are working on. In the next box, delete the word “wordpress” after the slash. This action will delete the “wordpress” in the next line.
♦Create a password and save it in a secure place.
♦Create a descriptive weblog title.
♦ Press the red Install WordPress button.
♦Follow the prompts and you will end up in the back end of your new WordPress website.
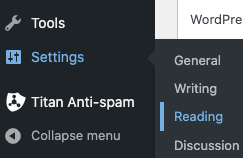 ♦ Using Settings > Reading, make sure your front page is set as a static page and the front page box says Home. Remember to click the Save Changes button.
♦ Using Settings > Permalinks, change the common settings to Post name.
♦ Using Users > All Users, Change the Admin user name to increase security.
Plugins
A WordPress plugin is a snippet of code that “plugs in” to your WordPress website. It adds new functionality to your WordPress site or extends existing functionality on your site.
I would never start a new WordPress website without these plugins:
- Classic Editor — Adds text & icons to top of a page in edit
 view. This makes it easier to edit a page. The Visual and Text tabs are missing from the image above.
  Advanced Editor Tools — Adds many more editing tools to the Classic Editor.
- Contact Form by WPForms — Use for your Contact Us page.
- Yoast SEO — It helps the search engines find you.
- Akismet — It helps block spam.
In the black column in editing view, you click on Plugins > Installed and Akismet will likely be there. All you have to do is activate it.
For the others click on Plugins > Add New. Type the name of the plugin into the search box. Then install & activate it.
How to Install WordPress menus
You will have one horizontal menu that you will create using a WordPress app. The other menus for the various categories of topics will be pages.
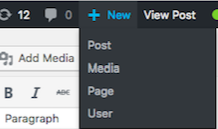 Before I continue, you must know the difference between posts and pages. When you click New at the top of WordPress, you must decide if it will be a post or a page.
Every entry into your blog should be a post. 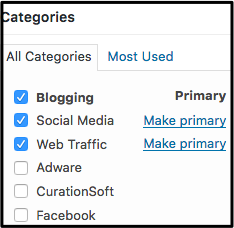 These entries are listed in reverse chronological order. You should select categories for them so that people can find each blog post on a particular topic.
Pages on the other hand are static, they are not listed by date and do not use categories.
That’s enough background information. Now go to the blog post on how to create menus.
