
How to add a contact form to your page
 We will use Contact Form 7. In a WordPress page edit view, click on Plugins > Add New. Search for Contact Form 7. Install & activate it.
The word contact will show up in the black column on the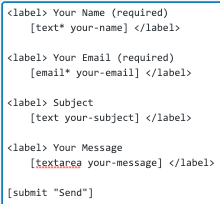 left-hand side of the page. Click Contact > Add New.
You will be show the fields of a very simple form as seen in the image here. Suppose you want to add a box in which you want people to add the city in which they live.
You would select the code for the Name field. You should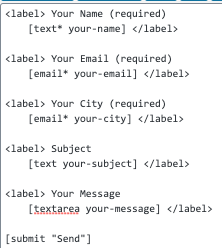 select <label> Your Name(required)
[text* your-name] </label>. Change each “name” to “city” as shown in this screenshot. Then you would copy and paste it into the appropriate place in your form.
![]() You want to make sure the form gets emailed to you after someone fills it out. So, click on the Mail tab. Making sure the email indeed goes to you is a bit complex. So, read the next paragraph carefully.
You want to make sure the form gets emailed to you after someone fills it out. So, click on the Mail tab. Making sure the email indeed goes to you is a bit complex. So, read the next paragraph carefully.
I placed the form in page with the domain name of wordpresspeter.com. The default From email address was wordpress@wordpresspeter.com.
![]()
That email address would not work. So, I went into my web host (LiquidNet Ltd Hosting) and created an email address called peter@wordpresspeter.com. It forwards emails to my most common email address.
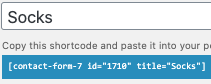 Suppose your web page sells socks. Change the title of the page to socks. After you click the blue Save button, the word Socks will appear in the form code.
You want Socks or a variation thereof to appear in the subject line. So, make sure you change your subject![]() line similar to what you see in this image.
line similar to what you see in this image.
Click on the blue bar to the right of the form code and press Cmd C. Now the form code will be in your clip board.
All you have to do is click the place on your page where you want the form to appear. Then press Cmd V and the code will be pasted in the place where you wanted the form to appear.
Test your contact form out and you should be good to go.
