Setting up your checkout
Getting started
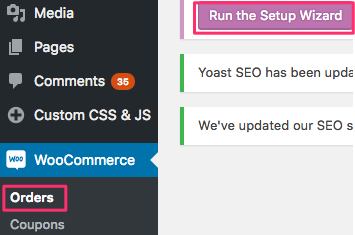 Start setting up your checkout section by going into your dashboard and clicking on WooCommerce > Orders. Then run the Setup Wizard and set up as much as the Wizard will allow.
Among other things, this will set up four new pages. Here are the names of the pages that will show up after the slash (/) in your address window:
- shop
- checkout
- my-account
- cart.
Next
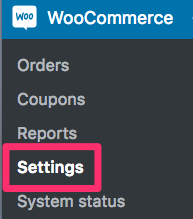 Then you should click on Settings. This will give you a horizontal menu. Click on the Checkout tab.
![]()
![]() After getting to the checkout page, you will see another horizontal menu. After you click on the Checkout Options tab, read through each section and make an appropriate response. Personally, I would check the Enable Guest Checkout button. I would buy an SSL certificate and then check the Force Secure Checkout button.
After getting to the checkout page, you will see another horizontal menu. After you click on the Checkout Options tab, read through each section and make an appropriate response. Personally, I would check the Enable Guest Checkout button. I would buy an SSL certificate and then check the Force Secure Checkout button.
Page index
- Accounts
- Checkout form
- Checkout pages
- Direct wire transfer (BACS)
- Endpoints
- Product pages
- Payment gateways
- Refunds and API credentials
- Search & register a name
Checkout pages
For the Cart Page, Checkout Page & Terms and Conditions lines, click on the appropriate dropdown arrow. It will give the names (H1 headings) of the various pages. Click on the one corresponding to each line.
If the page has not been created yet, create it and then click on the appropriate dropdown arrow.
Products page
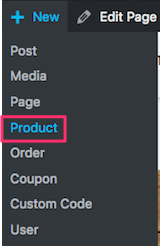 Starting a new products page is similar to starting a new post or regular page. You click on New > Product.
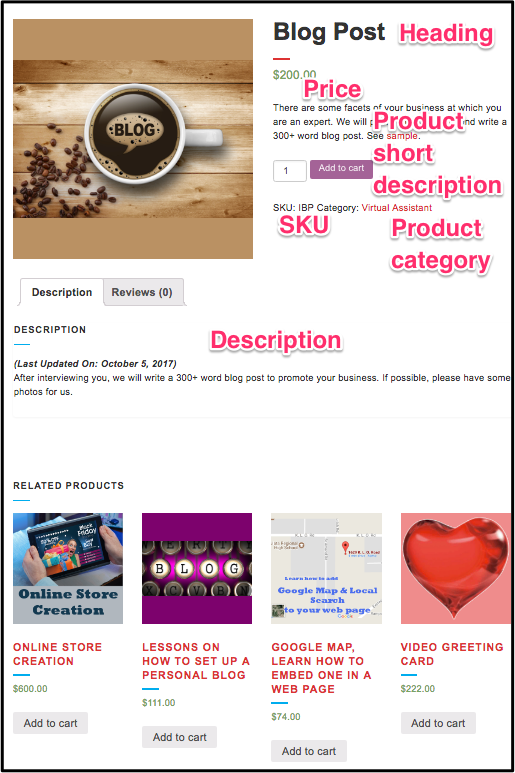 The products page on the right is for a website that sells blog-writing services. The points below explain how to add various features of the product page.
- Product name (what’s called heading in the image here)
- Write description that will show up below product image
- In Product Categories panel check off product category (add a new category if necessary)
- Scroll down. Set product image > Upload files > Drag & drop picture > Set product image
- General
- Regular price
- Sale price (if any)
- Tax status
- Inventory
- SKU, etc.
- Shipping
- Learn about Virtual & Downloadable
- Rest is self explanatory
- Linked product — Click on question marks for explanation
- Attributes — See definition
- Advanced — self-explanatory except for menu order
- Scroll down to Product Short Description. Write the description that appears at the top to the right of the picture
Checkout form
The Checkout form is the simplest way for you to securely collect your customer’s payment information. When your customer enters their credit card information, it’s validated and then tokenized for your server-side code to use.
Using Checkout, sensitive credit card information is sent directly to Stripe, and does not touch your server. Stripe returns to your site a token representation of the card, and this token can then be used in a charge request.
Below is the code snippet for the Checkout form.
<form action="/your-server-side-code" method="POST">
  <script
    src="https://checkout.stripe.com/checkout.js" class="stripe-button"
    data-key="pk_test_aUfv37UMFj6BxSxE2qzCGj7x"
    data-amount="999"
    data-name="Demo Site"
    data-description="Widget"
    data-image="https://stripe.com/img/documentation/checkout/marketplace.png"
    data-locale="auto"
    data-currency="cad">
  </script>
</form>
Add the above code to your payment page. (This link tells you how to do that.)
This is added to the page ending in /checkout/. However, it results in an error message. Find out from the forums why.
In response to a question about this, tech support said
Building a website and especially a custom payment flow with Stripe is not a complete copy and paste procedure, and therefore it’s unfortunately not possible to have one example at hand that will work with every website.
What I can do is point you in the direction of our list of third party integrations for one-time and recurring payments that work with Stripe:
https://stripe.com/works-with/categories/recurring-payments
You can have a look around and see if you find one that suits your business needs.
If you’re not confident you can do it by yourself, I’d recommend hiring a developer to look at it for you. I know there are skilled developers on these websites you can hire just for a Stripe integration:
https://www.upwork.com/o/profiles/browse/?q=stripe
https://www.peopleperhour.com/freelance/stripe?ref=search
The story continues & gets more complicated. I end up seeing that I should PROBABLY delete WooCommerce Stripe Gateway and set up something else that will cost me 2.9% of charges plus 30 cents per successful card charge. There will be NO other charges such as setup charges.
Disclaimer
The data on this page is based on my research for the store I created in June 2017. Software and government rules both change with time. So, I am not responsible for any problems you may encounter because you follow my advice.
Checkout endpoints
Endpoints are an extra part in the website URL that we detect and show different content when present.
For example, you may have a ‘my account’ page shown on the URL yoursite.com/my-account. When the endpoint ‘edit-account’ is appended to this URL, making it ‘yoursite.com/my-account/edit-account’. WooCommerce shows the Edit account page instead of the My account page.
You have 5 boxes in the Checkout page. Going from top to bottom, I would use these default names:
- order-pay
- order-received
- add-payment-method
- delete-payment-method
- set-default-payment-method.

When you click Save Changes at the bottom of the Checkout page, the above endpoints will be saved.
You also should usually keep the defaults on the Accounts page. When you click Save Changes at the bottom, the eight endpoints will be saved.

Read much more information about endpoints.
Searching & registering a name
In order to accept payments, you need a bank account (preferably in the name of your business). If you want a bank account in the name of your business, a business name must be registered with the government. An inexpensive way to search for a name & register it with the government in Canada is to use Speedy Search.
In order to register a name, it must be unique, distinctive and descriptive. Here’s how Kelowna Virtual Assistant meets those criteria:
- Unique — No one but Kelowna Virtual Assistant has that name
- Distinctive — The city “Kelowna” makes it distinctive from any other virtual assistant company.
- Descriptive — “Virtual Assistant” describes what type of business it is.
Payment gateways
 After you click on the Checkout tab, you can scroll to the bottom & see the Payment gateways. You will see 4 or 5 choices of payment Gateways. PayPal also includes credit cards. So, it should be first choice if the Stripe credit card choice is not there.
Setting up PayPal
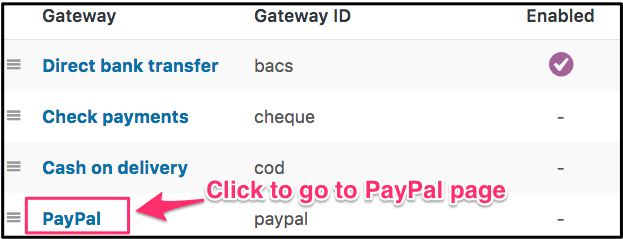
Click on the three lines to the left of “PayPal”. Your cursor becomes 4 arrows. Drag and drop PayPal to the top of the list.
Direct bank transfer has been enabled already. In the picture, none of the other Gateways can be used because they have not been enabled.
To enable PayPal, click on the blue PayPal name. When you get to the PayPal page, click on what seems the most logical.
Image URL
If you want your logo to appear on the PayPal checkout page, copy your 150×50 pixel logo to any page you wish. Go into the page in text ![]() view and find the code for the image. The URL of the image will begin with “http”. It will be within the quotation marks that follow the term “src”. Cmd C to copy it into your clipboard. Cmd V to paste it into the Image URL box.
view and find the code for the image. The URL of the image will begin with “http”. It will be within the quotation marks that follow the term “src”. Cmd C to copy it into your clipboard. Cmd V to paste it into the Image URL box.
API credentials to process refunds
In order to be able to process PayPal refunds, you must set up something called “API credentials”. This is how to do it.
- Go to paypal.com and set up an account for your business
- Login
 Click on Profile in top right
- Profile & Settings
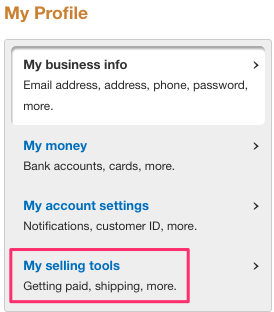
- On left click My Selling Tools
- In the My Business Setup column go down to API access.
- Click Update and then Request API credentials
- Click Request API Certificate radio button
- Agree and SubmitDownload Certificate
- You will find your API certificate in the Downloads folder of your hard drive. The name will be cert_key_pem.txt.
PayPal Sandbox
A sandbox is something you play in. So, the feature you use to play with PayPal and pretend you have orders is called Sandbox.
![]() So, when you go into Checkout > PayPal, you should enable the Sandbox. Then you can check PayPal to make sure everything is set up properly.
So, when you go into Checkout > PayPal, you should enable the Sandbox. Then you can check PayPal to make sure everything is set up properly.
Direct bank transfer (BACS)
The BACS feature in WooCommerce does nothing more than provide your bank transfer details to the customer. The bank transfer happens outside WooCommerce (initiated by the customer) and you have to manually mark the order complete when the transfer comes through.
So, in the instructions box, make sure you give good instructions to the customer including an idea about a secret question.
When filling out the Account Details, the first 3 boxes are self explanatory. The Bank Transit Number is a 5-digit number comprised of your 4-digit branch number followed by a number indicating the geographical location of your branch.
![]() The transit number appears on your cheque after the cheque number. In the illustration, the cheque number is 004 and the bank transit number is 12345.
The transit number appears on your cheque after the cheque number. In the illustration, the cheque number is 004 and the bank transit number is 12345.
You may or may not need to fill out the IBAN and SWIFT boxes. They are numbers to facilitate international wire transfers. Ask your bank which number you should use and what it is.
Learn more about IBAN & SWIFT.
Here is some sample text for the instruction box: Before starting a wire transfer, decide upon the secret question and answer. Your contact at Kelowna Virtual Assistant must know the answer to the question. Your exact technique for wiring the money will vary from bank to bank. With the Bank of Montreal, you click on the Payment and Transfer tab at the top of the page. Then you click on Interac e-Transfers in the left-hand column. Follow instructions.
Accounts
![]()
Tokenization
Tokenization is the process of
- Replacing sensitive data with unique identification symbols
- They retain all the essential information about the data without compromising its security.
- Tokenization seeks to minimize the amount of data a business needs to keep on hand
- It has become a popular way for small and mid-sized businesses to bolster the security of credit card and e-commerce transactions while minimizing the cost and complexity of compliance with industry standards and government regulations.
Related pages
Instant payment notification (IPN)

 Peter Enns has been developing websites since 1996. He is a social media blogger and author of the free YouTube video-creation tutorial called 7 Day YouTube.