In the domain registration blog post I told you how to register a new domain name with a domain registration company such as WhoIs. Once you have registered a domain name, you must make changes to the domain name servers (DNS). You must link them to your web host.
On the best web hosting blog post I recommended that you use LiquidNet Ltd Hosting for your web host. It’s only $35/year for the starter program and includes WordPress, excellent 24/7 tech support and many other wonderful features. I will use that company in my example.
The DNS names for LiquidNet Ltd Hosting are dns1.supremedns.com and dns2.supremedns.com.
Steps to changing the name servers
♦ Go to your domain registration vendor. In the following example I will use WhoIs. ♦ Click Account > MyAccount.
♦ Where it says Jump to Domain, enter the domain name with which you are working.
♦ Click the arrow to jump there.
♦ Click on Name Servers.
♦ Enter DNS information in appropriate boxes.
♦ Click on Update Name Servers button.
In the background your new domain name is being made available on the internet all around the world. Note that this can take up to 24 hours.
Hosting new domain
After you feel your domain name may be available around the world,
Click on My Domains > Hosted Domains from the LiquidNet dashboard.
Click Host Domain
type domain name in the Domain box
Click Add a Host
Then, when you click Files > File Manager, you will see the new domain name in the list of domain names.
Related pages
DNS — Domain Name Server is what?
The CloudOn website says
… the system allows only one set of correspondence between IP addresses and domain names. Read more.
DNS Amplification Attack
The Hackersidea website says
A Domain Name Server (DNS) amplification attack is a …. reflection attack which manipulates publically-accessible domain name systems, making them flood a target with large quantities of UDP packets. Read more.
Domain Names in Plain English
The BizTV Shows website says
In this episode, WordPress Adventure Guide Lee Drozak explains the science behind the process of domain names. Read more.
Go to the Google Trends to find the ideal long-tail keywords for your business and domain names. Then read the Domain Registration blog post for tips on how to get the best names.
3. Move domain name to web host
Once you have registered a domain name, you must have it pointing to your web host. This blog post explains how to make that happen.
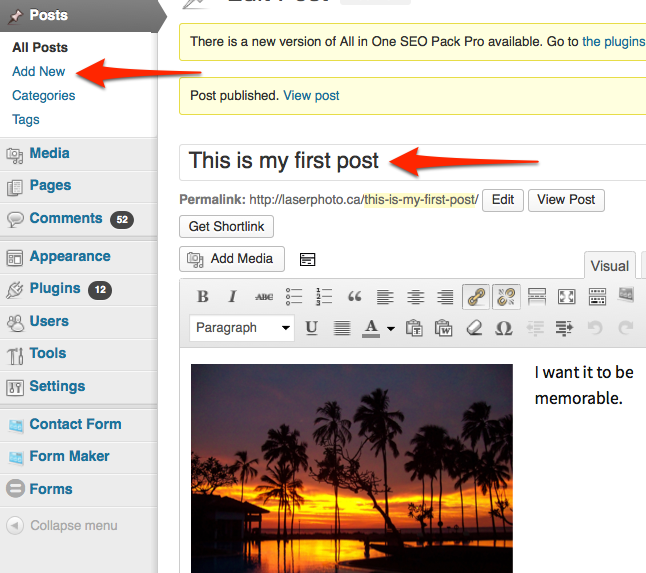
4. Installing WordPress
To learn how to install WordPress including the home page & the menus, go to the Install WordPress blog post. For just about any new website, you should use WordPress. It’s free and absolutely full of features that many CMSs don’t have.
5. WordPress Plugins
WordPress plugins are smaller apps that can be uploaded to extend the functionality of your WordPress site. There are over 49,000 from which to choose. Please read the plugin blog post to learn more including adding forms to your web pages.
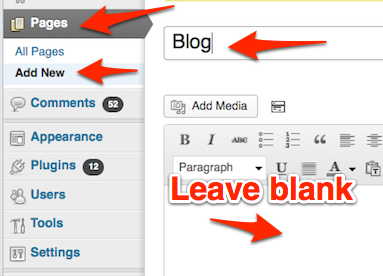
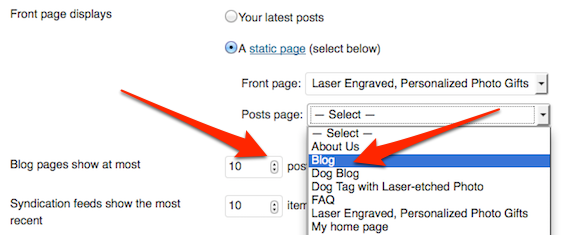
6. Start creating some pages
Start creating some new WordPress pages representing your company. These will be pages as opposed to posts. You will be using posts for your blog.
Learning about social media can be overwhelming. So, start by learning one, getting good at it and then going on to the next one.
I recommend starting with a Facebook page. Study that post thoroughly.
At the beginning of each blog, each Facebook page post and the beginning of most social media posts, you should grab their attention with an amazing image.
Read the blog post about how I get amazing stock photos for my social media posts. Make sure you scroll down to the section about 20 steps for downloading Adobe photos.
After you have a few Facebook posts that link to a blog post, start learning your next social medium. Below are the next 6 social media I suggest you learn. They are listed in what I consider the order of importance for my situation.
Note that virtually every blog I create will have a link to it from Twitter, Google Plus and Facebook as a minimum. If it is an especially good blog post, I will add more social media.
Commit yourself to making a video a day for 30 days. Soon you will be able to make YouTube videos like the one below.
Comments on SlideShare
You may notice that in the last slide you can click on a link. That will take you to this blog post.
That requires some expensive software and is not extremely necessary. So, I left it out of the budget.
If you do buy it, your first year budget for a professional-looking website with a high-quality blog will still be under $1000.
New features to the various platforms are happening all of the time. By the time you read this, there may be a way to link to a web post without having to pay for the software.
Freelance work
Suppose you become really good at creating WordPress websites and blogs. You decide you want to do some freelance work. Find out how much to charge.
When someone lands on one of your web pages, you have less than three seconds to get their attention. Otherwise they may leave your page and never come back. Use amazing stock images to grab their attention.
Pay for high resolution images
Sometimes I get pictures from a free image site. However, when I want to make sure I get someone’s attention, I head straight over to Adobe Stock. I pay $30 a month for 10 photos. The photos that are not purchased from the 10 will accumulate into future months.
Adobe Stock has tens of millions of high-quality images. They are well indexed. For instance, if I want a title about videos in yellow, I search for video yellow. Most of my choices will be about videos and have some yellow in them.
If $30/month is too much for you, check out the nocostimages website.
.
Modify images
Sometimes you may want to modify your special images. For instance, in this image about building a WordPress website, I wanted to modify it for the an ad. I used GIMP to add the text.
(As a point of interest, I was able to display this ad on Instagram for less than 2 cents per click. When people clicked it, they were taken to a blog post that told them how to create a WordPress blog.)
Download and file away quality images in 20 steps
I want to make a Pinterest pin warning people about a credit card scam. Here’s how I get photos with a “wow” factor.
Go to the Adobe Stock website.
Enter scam into the search window.
You quickly find thousands of picturesrelating to a scam.
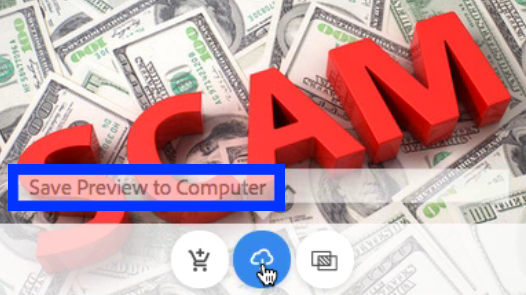
Save possible good choices of free watermarked pictures into your hard drive. (Each time you click to save an image, you will see an arrow on the left side going downwards. That means the watermarked photo is being saved in your hard drive.)
Begin the process of saving 10 or 20 photos.
When you get to the bottom of a page, click the next button to see the next page of photos.
After you have enough photos, go to Finder and look at the download folder.
Change the view so that the photos show at the top.
Enlarge the view area and start pressing the down arrow to scroll through the pictures.
Choose the best picture. (Part of the scam I am discussing involves not reading the fine print. So, the one with the magnifying glass is a very good choice. )
Write down the code number. (103633785 in my case.)
Returning to Adobe Stock, key the code number into the search box.
License and save to buy that picture (without the watermark).
Select the picturewithout the watermark in your download folder.
Press the enter key and give your picture a descriptive name. (Use words with spaces between them that will help you search for a particular picture.)
Right click on the name and copy the picture into your clipboard.
Go to your pictures folder and paste the picture into your high resolution sub-folder. (It’s a good practice to have a high-resolution sub-folder. That way you can search that folder to find the highest quality pictures in your computer. Then you can find the PNG file with the same name.)
Open the (very large) JPEG file.
Using Skitch, make a screenshot of that picture.
Save it as a PNG file with the same name as the JPEG file.
Note: The smaller the PNG files, the quicker a page will load. Dragging a corner of a picture to make it smaller does NOT make the file smaller. You make the file smaller by opening it up in GIMP and clicking Image > Scale Image.
YouTube video
Visualize the above 20 points. Watch the video of the process of downloading high quality stock photos.
Pinterest pin
Here is the Pinterest pin I created using that magnifying glass graphic. See this Pinterest pin in the Pinterest website.
SlideShare
bit.ly/nocostimages
The Bitly address, bit.ly/nocostimages is an easy-to-remember web address for the Dreamstime website. Dreamstime has a collection of tens of millions of photos, illustrations, video snippets, etc. The lower quality images are free. The higher quality ones cost money. Dreamstime can be a very good source of free images.
In the above screenshot, someone searched All Content for pictures that represented designing websites. What if your designing websites picture must match the blue colour in your header. Then you would add the word blue to your search term.
Peter Enns has been developing websites since 1996. He is a social media blogger and author of the free YouTube video-creation tutorial called 7 Day YouTube.
Your WordPress blog can get so many posts that the menu could start going off the side and end of the page. So, you may not be able to use the menu-creating system that seems most intuitive. You must use some pages as opposed to all posts. Each menu must be a page.
Set up your WordPress blog menu in 4 steps:
1. Getting started
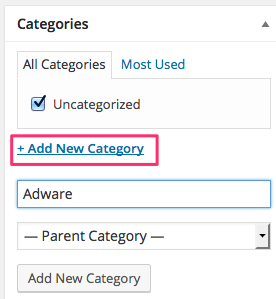
Start by listing the most important categories you have in your blog posts. You may want to have a miscellaneous category for the undecided ones.
List these categories on a WordPress PAGE and save it.
2. Create sub-menus
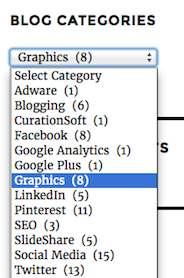
Create a new page for each category. Within each page create a list giving a very brief description of each post.
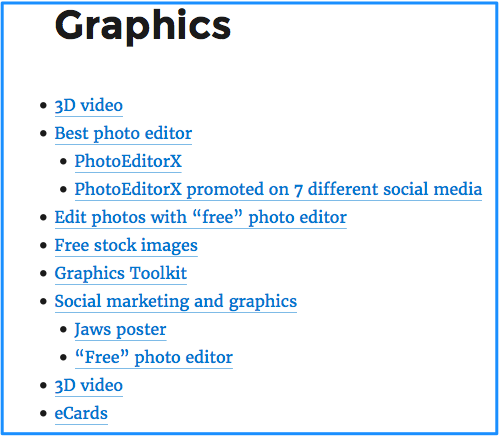
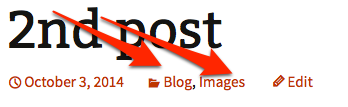
To the right is the list of all posts relating to graphics. Hyperlink each description to the corresponding blog post.
3. Linking menu page to sub-menus
Link each description from the main menu to the corresponding sub-menu.
4. Creating main horizontal menu
Besides the WordPress blog, you most likely have other pages on your website. Similar to the blog menu, each of the other items in the horizontal menu will link to all pages in that category. Notice that these are pages as opposed to posts.
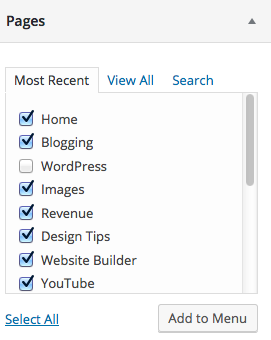
To get started, go to your WordPress dashboard > appearance > menus. Look at your list of pages and check off the ones you want in your horizontal menu. Click the add to menu button.
Play around with your menu, make any changes you want and click the add to menu button.
Click the blue Save Menu button.
Check your WordPress blog menu to make sure that everything is working properly.
a. Some people prefer to drag most of the widgets to the bottom of a post rather than the side. In that case, simply drag the widget into the area called Content Bottom 1.
Watch the promotion for this page in a YouTube video.
Peter Enns has been developing websites since 1996. As a VA (virtual assistant), he specializes in new website development, researching and writing blog posts and creating videos for YouTube and as animated GIFs. He is a social media blogger and author of the free YouTube video-creation tutorial called 7 Day YouTube.
Above is the graphic I used for an Instagram ad. The CTA was “go to the blog post”. I wanted people to go to the blog post so that they may be motivated to buy some software. It was a good promotion. People could get valuable information even if they did not buy the software.
In the ad I put the address of the blog post. One of the objectives when listing the ad was to get visitors to go to the blog post (http://freewebdesign.club/new-website/).
Most people will go to the blog post because they want to start a WordPress blog. So, here’s what I had to ask myself. What would it be easier to remember a month from now — the original address or a specific Bitly address? The Bitly address is bit.ly/bloggingwordpress.
For most people who want to learn how to make a WordPress blog, it would be easier to remember “bloggingwordpress”. That’s the better address to use in advertising.
The original Instagram ad had the “new-website” address. After I thought about it, I went in and edited the ad to the “bloggingwordpress” ad you see here.
Notice how I used GIMP to have “blogging” and “wordpress” two different colors. This is to help them remember it a month from now.
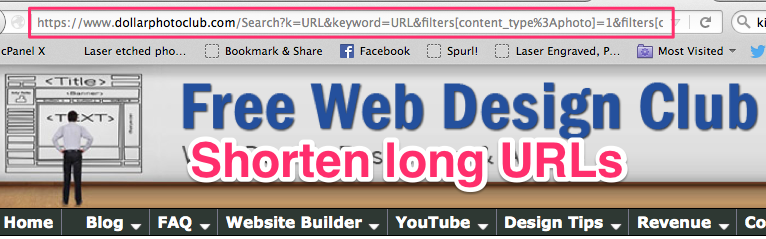
Long web page address
Sometimes you have to display your URL (web address, universal resource locator), but it is a really long link. Your URL may be so long that it upstages the content of your page or your ad. It is simply too complex and distracting. This page is about a URL shortener.
How do you shorten your link?
There are a number of companies with URL shorteners. They can change https://Home?/82722&__u=6906740322&authuser=0&__o=cues#search to something like this: http://bit.ly/1NnFXkB or even bit.ly/MarketingBlog.
This blog post talks about a shortener for URLs using a free service called Bitly. (They make their money by allowing you to upgrade to more sophisticated services.)
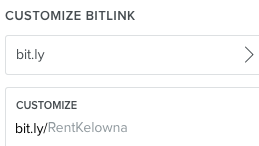
In my case I wanted to rent my basement suite out by the day, week or month using a free classified ad service. My suite was being promoted using a free service called AirBnB.
They allow me to advertise the suite giving a description, lots of color photos, a calendar of available dates and a host of other services.
In order to get more rentals, I wanted to advertise using a free classified without promoting other AirBnB rentals in my city. The link to my free website is https://www.airbnb.ca/rooms/8673882. I wanted to take the “airbnb” out of the URL and I wanted a shorter URL. Read on to see what I did.
How to use a URL shortener to make it descriptive
♦ Go to Bitly.com, sign in and click on orange “create bitlink” button
♦ Paste long URL into box provided and click “create URL“ button
♦ Your new shortened URL shows up
Descriptive name
Click the pencil icon to change bit.ly/1NnFXkB to something with a more descriptive ending. We have a suite for rent in the city of Kelowna. So, we highlighted “1NnFXkB” and replaced it with “RentKelowna”. Now our classified ads can tell people to go to bit.ly/RentKelowna.
Using a smaller city name makes it easier to get a name that no one has reserved yet. I had another blog post about working from home. I had to try a large number of choices before anything worked. Finally bit.ly/MortgageHelper worked.
The challenge is to try to find word combinations that no one has thought of yet. (Also, note that the words are case sensitive.)
YouTube video
To help you visualize these concepts, watch the YouTube video below.
SlideShare
Here this page is summarized as a SlideShare presentation. Click on the white triangle beside “1 of 11” to get started.

 In the domain registration blog post I told you how to register a new domain name with a domain registration company such as WhoIs. Once you have registered a domain name, you must make changes to the domain name servers (DNS). You must link them to your web host.
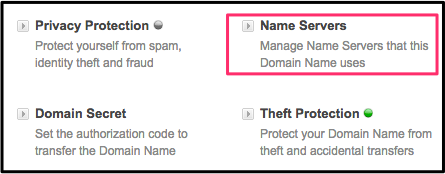 ♦ Click Account > MyAccount.
 Enter DNS information in appropriate boxes.
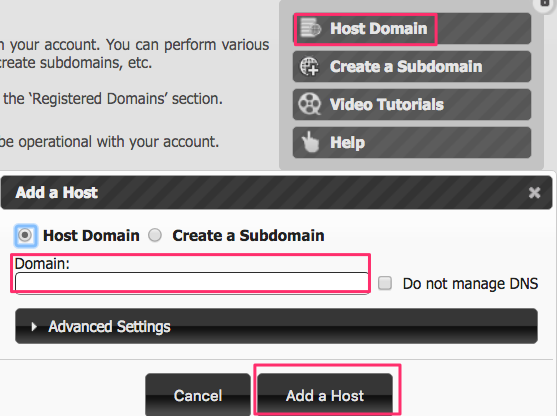 After you feel your domain name may be available around the world,
 How to set up a brand new WordPress website.
 1.
1.  Go to the
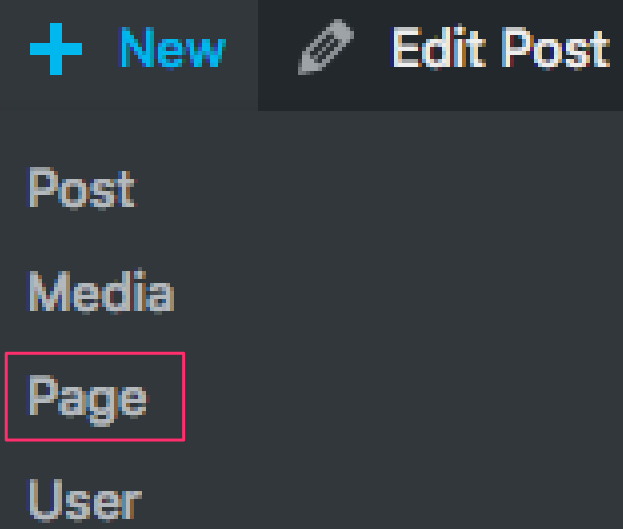
 8.
8.  Learning about social media can be overwhelming. So, start by learning one, getting good at it and then going on to the next one.
 At the beginning of each blog, each Facebook page post and the beginning of most social media posts, you should grab their attention with an amazing image.
 scroll down to the section about 20 steps for downloading Adobe photos.
 When someone lands on one of your web pages, you have less than three seconds to get their attention. Otherwise they may leave your page and never come back. Use amazing stock images to grab their attention.
 Adobe Stock has tens of millions of high-quality images. They are well indexed. For instance, if I want a title about videos in yellow, I search for video yellow. Most of my choices will be about videos and have some yellow in them.
 Save possible good choices of free watermarked pictures into your
 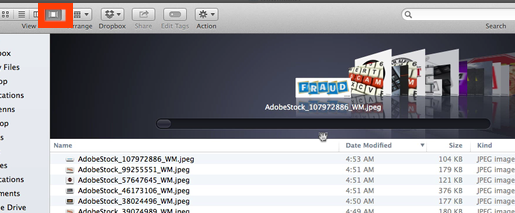 After you have enough photos, go to
 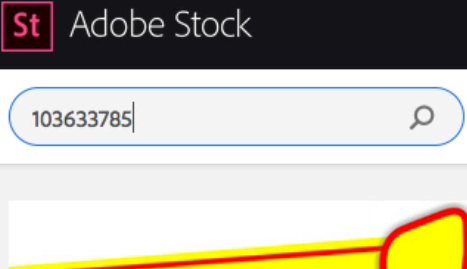 Choose the
 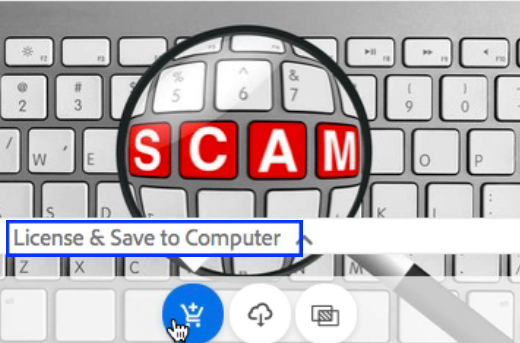 Returning to Adobe Stock, key the code number into the
  Here is the
 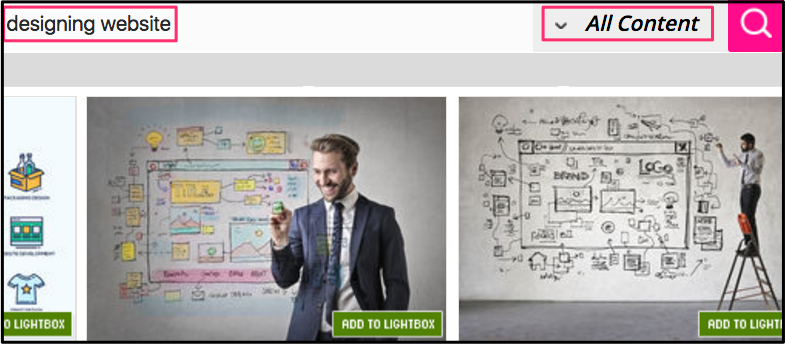 The Bitly address,
 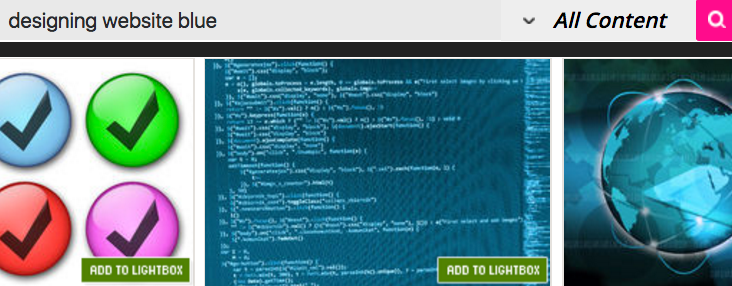 In the above screenshot, someone searched All Content for pictures that represented designing websites. What if your designing websites picture must match the blue colour in your header. Then you would add the word blue to your search term.
 Peter Enns has been developing websites since 1996. He is a social media blogger and author of the free YouTube video-creation tutorial called
 1.
1. 

 This page discusses making a WordPress blog
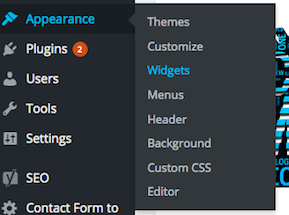 To install the categories widget, go to your dashboard and click on Appearance > Widgets
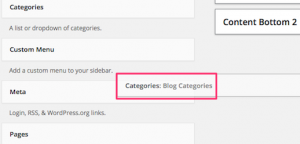
 In the dashboard column you will see the panel here.

 Click the pencil icon to change